Lesson 8: Sprite Properties
Overview
Question of the Day: How can we use sprite properties to change their appearance on the screen?
Students extend their understanding of sprites by interacting with sprite properties. Students start with a review of what a sprite is, then move on to Game Lab to practice more with sprites, using their properties to change their appearance. They then reflect on the connections between properties and variables.
Purpose
In the last lesson, when students were introduced to sprites, they focused mainly on creating a sprite and assigning it an animation. This lesson starts to dig into what makes sprites such a powerful programming construct--that they have properties that can be modified as a program is running. This lays the foundation for much of what students will be doing in the rest of the unit in terms of accessing and manipulating sprite properties to create interesting behaviors in their programs.
Assessment Opportunities
Use dot notation to update a sprite's properties
See Code Studio level 6.
Agenda
Lesson Modifications
Warm Up (5 min)
Activity (40 min)
Wrap Up (5 min)
View on Code Studio
Objectives
Students will be able to:
- Use dot notation to update a sprite's properties
Links
Heads Up! Please make a copy of any documents you plan to share with students.
For the Teachers
- Sprite Properties - Slides
Vocabulary
- Property - A label for a characteristic of a sprite, such as its location and appearance
Introduced Code
Teaching Guide
Lesson Modifications
 Attention, teachers! If you are teaching virtually or in a socially-distanced classroom, please see these modifications for Unit 3.
Warm Up (5 min)
Prompt: What is your definition of a sprite? What sprite properties do you know how to use? What other sprite properties might be useful?
Allow students time to reflect on their own and then with a partner before sharing out to the entire group. It's okay if students do not have a canonical definition of a sprite, but they should recognize that a sprite is a part of the program that has several different properties that control its location and appearance.
Remarks
So far, we've only been able to control our sprite's location and animation, but today, we're going to learn how to update other sprite properties so we can make even better programs.
Question of the Day: How can we use sprite properties to change their appearance on the screen?
Activity (40 min)
Group: Put students in pairs.
Transition: Send students to Code Studio.
Wrap Up (5 min)
Discussion Goal
Students may note that sprite properties and variables are similar in that they both store information. They are different in that variables can be anything, but sprites have particular properties that are used in certain ways on the screen.
Question of the Day: How can we use sprite properties to change their appearance on the screen?
Journal Prompt: What is one way sprite properties are the same as variables? What's one way that sprite properties are different from variables?
Discuss: Allow students to discuss in pairs or small groups before sharing out to the entire group.
- Lesson Overview
- 1
- Prediction
- 2
Student Instructions
What will the program show?
a bee sprite in the middle of the screen
a bee sprite in the bottom right corner
two bee sprites, one in the middle and one in the bottom right corner
three bee sprites, all in different places
nothing, there will be an error
Student Instructions
Sprite Properties
Sprite properties keep track of all the information your program needs to know about a sprite, such as its size and location. You can change the values of these properties just like you do variables, and see the results when your sprite is drawn to the screen.
Do this
- Run the program to see where the sprites appear.
- Change the x and y properties of the paint brush sprite to move it to the palette.
Student Instructions
New Properties
Sprites have lots of properties. Check out the two new blocks in this activity and try them out for yourself. Notice that different sprites can use the same animation, and still look different because of properties.
Do this
Student Instructions
Try out the sprite properties you have learned here
Choose from the following activities:
Use the scale property to make the animals the right size.
Rotate the cars so they fit in the traffic lanes.
Student Instructions
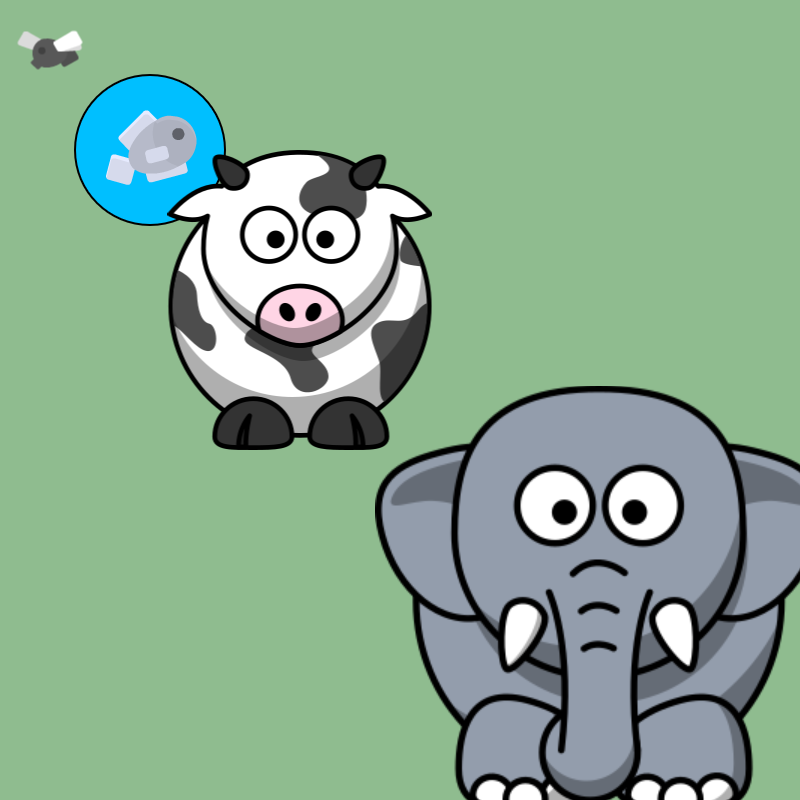
Scale Property
The scale property changes the size of the sprite. Scale of 1 is the normal size, scale of 2 is twice as big, and a scale of 0.5 is half as big.
Do this
- Use the
scaleproperty to make it look like the picture. - Make sure that each animal is as big as it should be.
- Make sure the fish fits in the pond.
Student Instructions

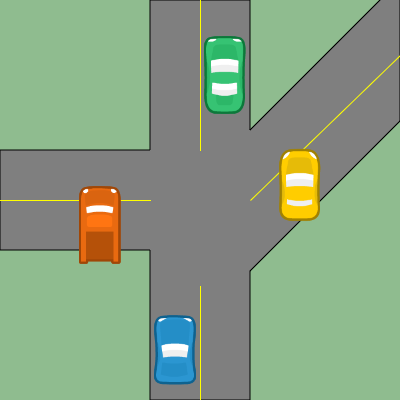
Rotation
The .rotation sprite property rotates an image by between 0 and 360 degrees. The image is rotated clockwise. For example, mySprite.rotation = 90 will turn it one quarter rotation to its right.
Do This
- Add
.rotationblocks to the code to make all of the cars look like they are traveling correctly down the roads.
- Assessment
- 6
Student Instructions
Make it Fit!

The food is way too big to fit on the plate. Use your knowledge of sprite properties to make it fit.
Do this
- Run the program to see how big the food is.
- Use sprite properties to scale all of the food sprites down so they fit on the plate.
Student Instructions
Try these new challenges with sprite properties
Choose from the following activities:

Adjust the sprite's color with tint.

Stretch your sprite horizontally or vertically.
Student Instructions
Tint
Tint is a property that will overlay a color on top of a sprite to tint it. This tint doesn't change the existing colors of a sprite, but is more like putting a pane of colored glass over the top of the sprite.
Do This:
Using either the sprite already created for you or with any other sprites of your choosing, play around with the tint property and see how it works and how it changes on different colored sprites!
Student Instructions
Height and Width
You learned about the scale property, which grows or shrinks a sprite while keeping their height to width ratio the same. But it is possible to only change the height or width of a sprite with other properties!
Do This:
Using either the sprite already created for you or with any other sprites of your choosing, play around with the height and width properties and think about when you would want to use these properties versus using the scale property.
Standards Alignment
View full course alignment
CSTA K-12 Computer Science Standards (2017)
AP - Algorithms & Programming
- 2-AP-11 - Create clearly named variables that represent different data types and perform operations on their values.
- 2-AP-13 - Decompose problems and subproblems into parts to facilitate the design, implementation, and review of programs.
- 2-AP-17 - Systematically test and refine programs using a range of test cases.
- 2-AP-19 - Document programs in order to make them easier to follow, test, and debug.