Lesson 26: Using the Game Design Process
Overview
Question of the Day: How can the problem solving process help programmers to manage large projects?
In this multi-day lesson, students use the problem solving process from Unit 1 to create a platform jumper game. They start by looking at an example of a platform jumper, then define what their games will look like. Next, they use a structured process to plan the backgrounds, variables, sprites, and functions they will need to implement their game. After writing the code for the game, students will reflect on how the game could be improved, and implement those changes.
Purpose
Students have already learned all of the programming constructs that they need to make a game. This lesson reviews many of those concepts while introducing them to a structured process that will help them to manage the work. It builds on the use of the Project Guide in the previous lesson by having students complete more of this project guide independently before using it to build a game. This activity prepares students to write their own game from scratch for the final project.
Assessment Opportunities
-
Identify core programming constructs necessary to build different components of a game
In the project guide, check that the student has identified key functions, sprites and variables needed in the program, and that the general description of the program is accurate.
-
Implement different features of a program by following a structured project guide
See Level 20 in Code Studio.
Agenda
Lesson Modifications
Warm Up (10 min)
Activity (60 min)
Wrap Up (5 min)
View on Code Studio
Objectives
Students will be able to:
- Identify core programming constructs necessary to build different components of a game
- Implement different features of a program by following a structured project guide
Preparation
- Print one copy of the project guide for each student or pair of students
Links
Heads Up! Please make a copy of any documents you plan to share with students.
For the Teachers
- Using the Game Design Process - Slides
- Planning Your Platform Game - Exemplar
For the Students
- Planning Your Platform Game - Project Guide
Teaching Guide
Lesson Modifications
 Attention, teachers! If you are teaching virtually or in a socially-distanced classroom, please see these modifications for Unit 3.
Warm Up (10 min)
Prompt: The Problem Solving Process helps us work through all kinds of problems. Think about the problem of building a larger piece of software, like the game we built in the last lesson. What did each of the 4 steps look like? Why were they important?
Discussion Goal
Goal: Students should share their thoughts but if it doesn't come up naturally then suggest the examples provided. This discussion will motivate the use of the project guide for building a game later in the lesson.
Discuss: Students should brainstorm quietly and write down what each step might be. Afterwards, lead a share out discussion. You can record ideas on the board. Possible parts of each step include:
- Define: Figuring out what you want the game to look like, how it should work, who will play it.
- Prepare: Plan ahead what your code will look like. Decide on a structure for your game.
- Try: Write the code following your plan.
- Reflect: Test your code, play the game to make sure it works, get feedback from other people to make the game better.
Remarks
When you build software, the problem solving process can be a helpful guide. Obviously we need to write the code, but being careful to define what you want to build, making a good plan to build it, and reflecting afterwards on how to improve it are all part of making good software. Today we’re going to use this process to make a new game.
Question of the Day: How can the problem solving process help programmers to manage large projects?
Activity (60 min)
Play Alien Jumper
Distribute: Give each student a copy of the project guide.
Remarks
We're going to be building a jumper game today. You'll have a chance to play a sample game, then plan out how you would create the game on your Project Guide.
Discuss Project Guide
Circulate: Students should complete the project guide in the style of the one they saw in the previous lesson. They will likely want to keep the game up as they try to determine the behavior each of the sprites will have.
Share: Students share out their plans for making the game. Reassure them that there are many correct ways to make the same piece of software, and that they will have a chance to try out their ideas in code studio.
Teaching Tip
Making the game will take at least two class periods. If there's not enough time for all students to finish the lesson, groups of students can work to code different aspects, then share their code with each other. For example, one group could work on the platforms, one on the stars, and another on the player. Students who have finished early can choose more challenges from the later levels.
Share out
Share: Students share their games with their classmates.
Wrap Up (5 min)
Journal
Question of the Day: How can the problem solving process help programmers to manage large projects?
Prompt: Before you started coding your game, you first had to fill out a project guide with a plan. How did having a plan change the way that you coded your game? Will you do anything differently when you make your plan for your final project?
- Lesson Overview
- 1
Teaching Tip
- Planning Your Platform Game - Project Guide (PDF | DOCX)
Student Instructions
- Sample Platform Jumper Game
- 2
Student Instructions
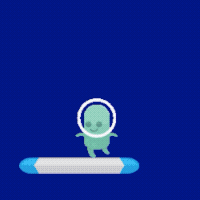
Platform Jumper
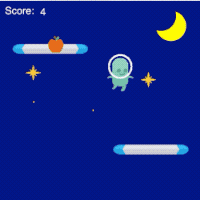
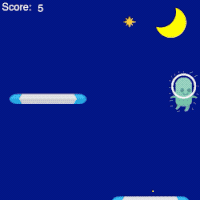
The game on the left is an example of a platform jumper. Press "Run" to play it. You can make the alien jump with the up arrow, and move it to the left and right with the arrow keys. You score by collecting stars, and if you score high enough, the background will change.
You already know how to use all the blocks you need to make a game just like this one, and you'll be making your own platform jumper in this lesson.
- Build a Platform Jumper
- 3
Student Instructions
Build a Platform Jumper
As you build your platform jumper, you'll be using the problem solving process.
Define
The problem is clearly defined for this game, because you already looked at a sample version. However, you might want to make some changes. Make sure any new features for your game are clearly defined.
Prepare
Before you start to code, you need to fill out a project guide. It will get you ready and make the coding a lot easier.
Try
You'll try out your plan when you start coding. Don't forget all of your resources, such as the documentation and Help and Tip tab, as you begin to code.
Reflect
After finishing your project, you'll want to reflect on whether your game turned out how you planned, and ways that you could improve your process for the next time.
Student Instructions
Background
The first thing that you will create for your game is the background. The sample game had two different backgrounds that were chosen according to the user's score. The first background has already been created for you. Look at the background1 function in the code below to see how it works. (Show me where)
In order for the background function to do something, you have to call it inside the draw loop. (Show me where)
There is also an empty function named background2. (Show me where) You will need to fill that function with new code to make a different background, then test the code by calling the function inside the draw loop.
Do this
- Read the code for
background1. - Fill the
background2function with new code for a second background. - Test your
background2function by calling it inside the draw loop.
Hint: It's much easier to copy, paste, and make small changes to your code in text mode.
Student Instructions
Score Variable
Now that you've created your backgrounds, you'll need to choose when each background is drawn. For that, you'll need a score variable to hold information about your player's score.
You should always give your variables a starting value at the very beginning of the program. That way, they are available for any code that comes after.
Do This
- Create a score variable at the beginning of your game program. ( Show me the block )
- Set the score equal to 0.
Student Instructions
Choosing your Background
Now that you have your score variable, you can use it to choose the right background for your game. You can see an example of changing your background according to your score in Lesson 24 Level 10
Do This
- Inside the draw loop, use an
ifstatement and your two background functions to draw your background according to your score level. - Test your code by changing the start score to 100, then running to code to see whether the background changes.
Challenge: If you have a third background, you can click the plus sign at the bottom of the if block. Another space will appear for your third background function, as well as a place to check the score again.
Student Instructions
Make the Scoreboard

You'll also need a scoreboard so the player can keep track of the score. There's already a showScore function written, but it only shows the text "Score" and not the actual score. (Show me where) You can see an example of a working scoreboard in Lesson 24 Level 10.
Do This
- Read the code in the
showScorefunction. - Call the function inside the draw loop, right after you draw the backgrounds.
- Use the
textblock to display the score at the top of the screen.
Student Instructions
Create a Platform Sprite

Now that you have your background and your variables, it's time to create your sprites. Usually, it will be easiest to start with the sprites that are part of the environment, such as your platforms. The sample game had two platform sprites, but you'll make just one first, then test it before copying and pasting the code to make the second.
Do This
- Look at your worksheet and choose a platform sprite to create.
- In the "Create sprites" area at the top of your code, create your new sprite with the
createSpriteblock, giving it the correct position and label (name). (Show me the block) - Use the
setAnimationandvelocityYblocks to give your sprite the correct image and downward velocity. - Test the sprite to make sure that it's moving in the correct way. You might need to adjust its velocity.
Hint: The sprite will go off the screen and not come back. You'll make it loop back around in the next level.
Student Instructions
Loop the Platform Sprite

Right now, your platform sprite moves down, but it doesn't loop back up to the top of the screen. You can look at Lesson 20 Level 6 to see an example of a sprite looping around a screen.
Do This
- Use the
functionblock to create aloopPlatformsfunction at the bottom of your code. - Use the
ifblock inside the function to check whether the platform has gone off the bottom of screen and, if it has, move it back to the top of the screen. - Call the function inside the draw loop, in the "update sprites" area.
- Run the code to test your sprite.
Hint: What will platform.y be when the sprite moves off the bottom of the screen? What should platform.y be when you put it back at the top of the screen?
Student Instructions
Make your Second Platform

Making a second platform will be easier than making the first, because you can copy and paste a lot of the code, then make a few small changes. This is a lot easier in text mode, so be sure to try it out if you haven't already.
You'll need to copy two parts of your code: the part at the beginning where you made the platform, and the part in your loopPlatforms function, where you looped the platform back to the top of the screen.
Do This
- Copy the code you used to create the first platform sprite (
createSprite,setAnimation, andvelocityY), and paste it directly beneath the original code. - Change the names of the sprite in the new lines. For example, if you named your original sprite "platform", you could name this one "platform2".
- Change the starting position of your new platform sprite.
- Inside your
loopPlatformsfunction, copy the if statement, then paste it directly underneath the original code, inside the function. - Change the sprite name in the new lines of code.
- Run your code to test it.
Challenge: You can make your platforms appear at random x positions when they loop back to the top of the screen.
Student Instructions
Create an Item

Next, you need to add the items that fall from the top of the screen. These move just like the platforms, but faster. In order to make the game more interesting, the items start at a random location above the screen. For the sample game, the item's x position is a random number between 50 and 350, and the y position is a random number between -30 and -60.
Do This
- Use the
createSpriteblock to make an item sprite in the "create sprites" section of your code. - Use the
randomNumberblock inside yourcreateSpriteblock to start the item at a random x and y position. - Use
setAnimationandvelocityYto give your sprite the correct image and make it fall from the top of the screen. - Run the code to test your sprite.
Student Instructions
Loop your Item
 Now that your item is falling, you can add code to loop it back to the top. This is similar to what you did for the platform sprite, but the item sprite will loop back to a random x and y location when it goes to the top of the screen.
Do This
- Create a
loopItemsfunction that uses anifblock to check whether the item sprite is off the bottom of the screen, then sends the item back to a random x and y position, just as it did when you first created the sprite. - Call the function inside the draw loop.
- Run the code to test your sprite.
Student Instructions
Make your Second Item

Next, you'll copy and paste the code for your first item to create a second item. Remember that this is a lot easier in text mode, so be sure to try it out if you haven't already.
You'll need to copy two parts of your code: the part at the beginning where you made the item, and the part in your loopItem function, where you looped the item back to the top of the screen.
Do This
- Copy the code you used to create the first item sprite (
createSprite,setAnimation, andvelocityY), and paste it directly beneath the original code. - Change the names of the sprite in the new lines. For example, if you named your original sprite "star", you could name this one "star2".
- Inside your
loopItemsfunction, copy the if statement, then paste it directly underneath the original code, inside the function. - Change the sprite name in the new lines of code.
- Run your code to test it.
Student Instructions
Create your Player

Now you can create your player sprite. Just like the item sprites, the player sprite will fall from the top of the screen. Unlike the items, your player sprite will get faster as it falls, just like real falling objects. This is what allows it to jump up, and fall back down.
Do This
- Use the
createSpriteblock to make a player sprite with the label and starting position that you put on your worksheet. - Use
setAnimationto give it the correct image. - Create a
playerFallfunction that makes the sprite fall from the top of the screen. The code inside the function should usevelocityYin a counter pattern, just as when you made the falling rock in Lesson 21 Level 4. - Call the
playerFallfunction inside the draw loop. - Run the code to test your sprite.
Student Instructions
User Controls
Next, you should add user controls so that you can move your player around. Your player needs to move to the left when the left arrow key is pressed, to the right when the right arrow key is pressed, and jump when the space bar is pressed.
Do This
- Create a new
controlPlayerfunction in the "functions" area of your code. - Inside the
controlPlayerfunction, use theif,keyDown, andsprite.xblocks to make your player move to the left and right according to the arrow keys. Look at Lesson 15 Level 7 for examples. - Inside the
controlPlayerfunction, use theif,keyDown, andvelocityYblocks to make your player jump when the up arrow is pressed. Look at Lesson 20 Level 5 for examples. - Call the
controlPlayerfunction inside the draw loop. - Run the game and test your code.
Student Instructions
Player Interactions
The last part of making your game is programming the player interactions with the other sprites. First, your player needs to land on the platforms.
Do This
- Create a
playerLandsfunction and add it to the "functions" area of your code. - Inside the function, use the
collideblock so that your player can land on both the platforms. - Call the function inside the draw loop.
- Run the code to test your function.
Student Instructions
Collect Items
Last, you'll want your player to collect the items falling from the top of the screen.
Do This
- Create a
collectItemsfunction and add it to the "functions" area of your code. - Use the
ifandisTouchingblocks to change the x and y position of the items when the player touches them. You can look at theloopItemfunction for clues in how to reset the item position. - Inside your
ifstatement, add a counter pattern that will increase the score every time the player touches an item. Look at Lesson 24 Puzzle 10 for an example. - Call the function inside the draw loop, in the "update sprites" area of your code.
- Run the code to test your function.
- Platform Jumper Review
- 18
Assessment Opportunities
Using a structured process to plan and develop a program
Extensive Evidence
The project guide accurately reflects the program, both as shown in the example and as coded by the student. Relevant functions, variables, and sprites are consistent between the project guide and actual project, with very few exceptions.
Convincing Evidence
The project guide is generally consistent with the sample project and student project, with main functions and sprites included. There may be some inconsistencies.
Limited Evidence
The project guide mentions some features of the program and associated functions and sprites, but there are major parts of the program missing from the guide.
No Evidence
The project guide is incomplete or does not seem to describe the program.
Student Instructions
Review Your Game
Look over your project guide, and play your game a few times to make sure you have completed everything.
- Does the player sprite move the way it should?
- Do all of your interactions work?
- Are the platforms moving correctly?
- Does the scoreboard work?
Student Instructions
Plane Jumper
Here's another example of a platform jumper, but it has a few more features. You can use it to get ideas to improve your own game. For example, there is a coin sprite that gives the player an extra life.
Choose one or more of the following changes and add them to your game. Choose new animations for your player, platform, and items. Make it impossible for your player to go off the left or right of the screen. Add a different type of item for the player to collect or avoid. Add a variable that keeps track of how many lives the player has, and end the game if the player runs out.
Student Instructions
Bunny Jumper
Here's another example of a jumper. In this one, the items get faster when they fall, and bounce off the platforms.
Choose one or more of the following changes and add them to your game. Make your player's animation change direction when the player changes direction. Add another background and make it appear when the score gets even higher. * Make your items interact with the platforms in some way.
Student Instructions
Improve your game with these challenges!
Choose from the following activities:
Make your player's animation change direction when the player changes direction.
Add a variable that keeps track of how many lives the player has, and end the game if the player runs out.
Add a different type of item for the player to collect or avoid.
Prevent your player from going off the side of the screen.

Give your game a custom theme by giving your sprites new animations.
Student Instructions


Animation Change Direction
The Animation tab lets you duplicate sprite animations and make changes such a flipping images horizontally. Locate and experiment with the options shown here for yourself.
You can make your player's animation change the direction it faces with the player's left-to-right movement.
Do This
- Prepare an animation for facing the player to the left and the right. Name each animation in a way that makes sense to you.
- Within your
controlPlayerfunction, add code to: - Switch to the "left" animation if the left key is pressed.
- Switch to the "right" animation if the right key is pressed.
Student Instructions
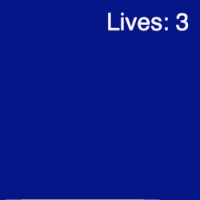
Adding Lives
You can add a variable that keeps track of how many lives the player has, and end the game if the player runs out.
Do This
- Create a variable such as a
livesand give it a starting value like 3. - Draw text to the screen to show the label
"Lives: "and the value oflives. - Check for the player's y position to be off the screen (
player.y > 400) and subtract one from the score. - Extra challenge: Check for 0 lives left and change the sprites or background to show the game has ended.
Student Instructions
Different Kind of Item
You can add a different type of item for the player to collect or avoid.
Do This
- Draw or find a new animation for your item.
- Create a new sprite with the animation. It should start a randomized location.
- Adjust the item's velocity to get it moving.
- Program a new interaction inside the
collectItemsfunction.
Student Instructions
Edge Sprites
The special command createEdgeSprites(); creates four large sprites around the border of the screen hidden just out of view. After creating these sprites you can program your other sprites to collide with them, which is an easy way to keep things from moving off the screen!

Edge sprites (left) and a collision with edge sprites (right)
Do This
- Use the
createEdgeSprites();command in the main part of your program where you create your other sprites. - Create a new function called
sideWalls();that should: - Make the player sprite collide with the special hidden sprite named
leftEdge. - Make the player sprite collide with the special hidden sprite named
rightEdge. - Call the
sideWalls();function somewhere inside your draw loop.
Student Instructions
Add New Animations
Give your game a custom theme by giving your sprites new animations. You can draw your own or select from the ones in Game Lab.
Do This
- Give your character a new animation.
- You can even create a left facing and right facing animation.
- Give the platforms a new animation.
- Give the collectibles a new animation.
Standards Alignment
View full course alignment
CSTA K-12 Computer Science Standards (2017)
AP - Algorithms & Programming
- 2-AP-11 - Create clearly named variables that represent different data types and perform operations on their values.
- 2-AP-12 - Design and iteratively develop programs that combine control structures, including nested loops and compound conditionals.
- 2-AP-13 - Decompose problems and subproblems into parts to facilitate the design, implementation, and review of programs.
- 2-AP-16 - Incorporate existing code, media, and libraries into original programs, and give attribution.
- 2-AP-17 - Systematically test and refine programs using a range of test cases.
- 2-AP-19 - Document programs in order to make them easier to follow, test, and debug.