Lesson 3: Building an App: Multi-Screen App
Overview
This lesson gives students time to familiarize themselves with the process of making event-driven apps before we move on to deeper content. They will design and create a (minimum) 4-screen app on a topic of their choosing. There are some other constraints on the project to help guide students in their thinking. Students are also encouraged to do independent work, but alongside a "coding buddy" or "thought partner" to be a help along the way.
Note: This activity is not intended to be a Practice PT but could be used similarly. The aim is to give an opportunity to get comfortable with Design Mode and the structure of event-driven programming in a creative way. Another goal is to intentionally build in an environment of informal collaboration, even when doing individual work. Suggestions for containing the scope of the project and amount of time allocated to it can be found in the lesson plan.
Purpose
This lesson is not heavy on new CS content. It is primarily a time to reinforce programming skills in App Lab while quickly prototyping a simple event-driven application. The lesson does, however, fall at the intersection of the Big Ideas of Creativity and Programming. The fact that students will share ideas before programming their projects and will provide feedback using a peer rubric also mirrors some of the practices of collaboration that students can employ on the Create Performance Task.
As for the project itself, it probably bears the closest resemblance to creating a "computational artifact" as outlined in the Explore Performance Task -- Creating something to communicate an idea non-textually.
Agenda
Getting Started (5 Minutes)
Activity (80-120 minutes)
Wrap-up (15 minutes)
Assessment
View on Code Studio
Objectives
Students will be able to:
- Develop and design a plan for multi-screen application
- Collaborate with a "thought partner" during the implementation of a project
- Create a multi-screen application in App Lab using simple UI elements and event handling
Preparation
- Print project planning guides (see student documents).
- Review the lesson plan to decide how many days of class time you want to use for this mini-project.
- Decide how peer review will work (anonymous or not).
Links
Heads Up! Please make a copy of any documents you plan to share with students.
For the Students
- Activity Guide - Multi-screen App - Activity Guide
Vocabulary
- Event-driven program - a program designed to run blocks of code or functions in response to specified events (e.g. a mouse click)
- Event handling - an overarching term for the coding tasks involved in making a program respond to events by triggering functions.
Teaching Guide
Getting Started (5 Minutes)
Introduce the Multi-screen App mini project.
Remarks
Today you will get a chance to make an app of your own design that uses multiple screens and lets you practice using design mode and programming some simple user interactions. We want to spend most of our time working on it, so let’s get to it.
- Pair students with a "coding buddy" for this project.
-
Students will make a project independently, but have a partner with whom they can get instant and rapid feedback and help.
-
See first two levels of Code Studio which you might use as review-and-kickoff to the project.
Activity (80-120 minutes)
Complete the multi-screen app design worksheet and project
For a suggested project timeline look below the seciton that shows code studio levels.
Suggested Project timeline
A proposed schedule for doing this project entirely in-class is shown below. See “Teaching Tips” for alternatives.
This project can take anywhere between two to three days depending how much time you want to spend in class working on it.
Teaching Tip
This mini-project is a good candidate for asking students to work on outside of class. For example, you might do this, which would save you the better part of 2 class days:
Day 1: Take 10 minutes to simply introduce the project, and move on to the next lesson.
- Do planning/sketching outside of class.
- Do programming outside of class.
Day 2: (some days later): Full class day. Do gallery walk and peer review.
Possible Timeline:
Day 1 - Review and Start Planning
Distribute: Activity Guide - Multi-screen App - Activity Guide
- Review the project requirements, process, and timeline, review process, and rubric.
- Answer any questions and move onto the planning / sketching stage.
Teaching Tip
Function Before Design Encourage students to work on getting working connections between screens before focusing on layout. Function before Design should be something students get used to as it’s more important. Design can always be improved.
Planning: Students use Planning Guide to sketch out multi-screen app.
- Example provided in Activity Guide.
Peer Review: Share app sketch with a classmate to get feedback. Students should focus on giving feedback about
- Connections between pages
- Descriptive IDs
- Design/ Layout
Programming: Students start programming their apps.
Day 2 -- Start/Continue programming your multi-screen app
Programming: Work day. Students should continue working on app.
Goal: Students’ app should be completely functional by the end of Day 2 and ready for debugging tests.
Day 3 -- Finalize their app, get feedback
- Focus should be primarily on debugging and making final aesthetic changes.
- Students should go through the rubric themselves first before sharing it with peers.
Teaching Tip
Peer Review: One strategy for peer review, especially if you haven’t done any in the class up to this point, is to do a “double-blind” review where both the programmer and the reviewer are anonymous to each other. To do this:
- Have students share their apps via the share link, or bring up on another device.
- Assign each student to do a peer review of one or two other apps, using the rubric provided.
- You’ll need some way for students to indicate which app they are reviewing.
- Collect feedback forms and return to original programmer.
- You might also assess students on the quality of their feedback. (Students will remain anonymous to each other, but you’ll know who reviewed what.)
Complete peer review.
Peer Review: Set up peer reviews of students’ final apps.
Wrap-up: Students will improve one piece of their app, based on feedback.
Wrap-up (15 minutes)
Incorporate peer feedback
Improve App:
Give students a chance to respond to the feedback they receive on their app. They should pick at least one piece of feedback to implement in their app. This could be done outside of class, if desired.
Create PT Prep
Have students complete the Create PT prep question that appears at the end of the lesson.
Assessment
Rubric: Use the provided rubric (in the Activity Guide), or one of your own creation, to assess students’ submissions.
Extended Assessment:
If you want to make the project more like a practice performance task you could have students write responses to applicable reflection prompts from the real Performance tasks.
You might modify these slightly for this context, but useful prompts are:
From Create PT:
- 2b. "Describe the incremental and iterative development process of your program, focusing on two distinct points in that process. Describe the difficulties and/or opportunities you encountered and how they were resolved or incorporated. In your description clearly indicate whether the development described was collaborative or independent. At least one of these points must refer to independent program development; the second could refer to either collaborative or independent program development. (Approximately 200 words)"
From Explore PT::
- 2b. "Describe your development process, explicitly identifying the computing tools and techniques you used to create your artifact. Your description must be detailed enough so that a person unfamiliar with those tools and techniques will understand your process. (Approximately 100 words)."
- Lesson Overview
- Student Overview
- Event Driven Programming Recap
- 2
Teaching Tip
Teaching Tip
Perhaps show/review this page as a warm-up just to tie up loose threads from previous lessons.
Student Instructions
Event-Driven Programming Recap
Before embarking on making your own app from scratch let's recap a few important things:
1. Mental Note: UI elements all function basically the same way
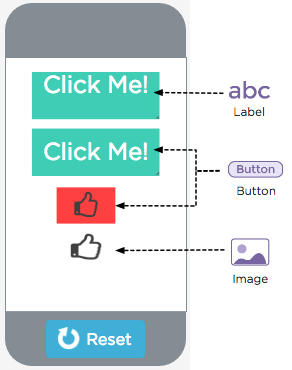
This example shows how buttons, labels and images can be made to look very similar. They can all behave similarly as well depending how you do event handling.
All UI elements have IDs and can listen for user events and be used with onEvent.
-
Labels can have a background color, but are designed to be filled with more text.
-
Buttons have a default styling (green button) that changes slightly in color when you click it. But buttons can also have a background image and background color at the same time which is convenient if your image is an icon (red thumbsup).
- Images can act a lot like buttons, only they can't have text or a background color.
Screens have IDs and you can use onEvent with them but they don't quite fit the mould because they have the special property that if you use onEvent with a screen, it will capture every event of the type you specify regardless of whatever other elements are clicked on.
What UI element should you use?
There are no particular rules. Use the UI element that makes the most sense to you and is easiest for you use and do what you want. The UI elements actually aren't exactly the same, but the basic event-driven pattern fits.
2. There is a Pattern to Developing Event-Driven Programs in App Lab
You will find yourself going through this process over and over again. The point is not that it's boring or repetitive (far from it!), but rather that when you have an idea for something to make, you know you can apply this process to get it done.
Step 1 - Design Mode
Step 2 - Add onEvent to Code
Step 3 - Write the code for the event handling function
Step 4 - Run. Test. Debug.
Repeat
As you learn more, of course, you'll see there are nuances to these steps, but these are the big ones.
Click continue to see "Tips for Working on Your Own"
- Tips For Working on Your Own
- 3
Teaching Tip
Teaching Tip
You may want to review the 3 things on this page as a whole class to kickoff to the upcoming project.
Especially true for talking about "coding buddies" which is a form of collaboration.
For this and future projects it's worth pointing out that even if you're doing independent work, you can have a buddy to help you with technical problems and to bounce ideas off of. Remind students that:
- It's not a competition!
- Work on your own ideas, be generous when helping others.
- You should always write your own code but you can have a friend help you spot problems.
Plagiarism can present a gray area for students here.
"Help" means:
- Helping a friend work through their ideas
- Helping a friend get "unstuck" from a bug of a particular kind.
- Suggesting a strategy for getting something done.
- Pointing out a cool idea
"Help" does not mean:
- Writing code for a friend
- Giving your project to a friend to use as a starting point
- Telling your friend what to do
Student Instructions
Tips for working on your own
As you are about to embark on your first solo project we thought it would be a good time to give you some tips.
Tip 1: Have a "coding buddy" and "thought partner"
Working on your own doesn't mean working by yourself. It's very useful to have someone nearby who you can use as a "thought partner". Many professionals work at the same table or desk, even if they are working on completely different projects, because of the benefits of having someone nearby. There's a lot to remember and a lot to try to keep straight, so it's helpful to have someone nearby who provide another perspective.
| What Thought Partners Do | How it might sound |
|---|---|
| Bounce ideas off each other |
"Hey, would it be cool if I tried x, y, or z?" |
| Share insights or discoveries they've made through their own programming |
"Whoa! I didn't know it could do that! Check it out!" |
| Answer each other's questions in the moment |
"What's the command to change the location of an object again?" |
| Help Double-check code and provide a second pair of eyes for debugging |
"Gah! This is driving me nuts. Can you look at this? What am I not seeing?" |
Tip 2. Persistence Pays off
When you are learning to program, you will inevitably run into problems.
As you get better, this doesn't change :) Only the types of problems do. Like anything else, over time you stop making the same mistakes you made as a novice, and in fact, you don't even think about them as mistakes.
Remember:
- No program ever works correctly the first time
- The whole point is to build something up in small increments
- You can't break anything. Add code, try it out. Doesn't work? Get rid of it. Try something else. No big deal.
- Add. Run. Test. Debug.
Got problems?:
- If you run into a snag where something isn't working stay calm and work the problem -- This is where having a program buddy and thought partner really helps.
- There is a reason why it's not working, you just have to find it.
- Once you've solved a problem or bug, you've learned something and you're less likely to make that same kind of mistake again.
Stick with it. It pays off!
Tip 3. Use online documentation - some new commands
You'll see we've included a more full toolbox of commands for you to use and experiment with. Some of the commands may be new to you, but you can probably figure out how to use them if you read the documentation.

1. Hover your mouse over a block and it will show a tool tip with a brief explanation.
2. Click on "see examples" to expand the documentation. It gives more explanation plus code examples that show how it works.
With those lessons learned...click continue to start making your own app!
- Project - Your Own Multi-Screen App
- 4
Student Instructions
Multi Screen App
You will be creating your own multi-screen app to practice designing user interfaces and writing event-driven programs.
Look at the Project Guide and Planning Sheets before programming.
NOTE: Bigger toolbox
- You may notice that we've included all of the commands you know so far in the coding toolbox plus a few more
- Remember you can hover over a command to see documentation for it.
- You can also just try it out to see what it does.
Requirements Reminder
- Your app must have a purpose
- Your app will have at least 4 screens.
- Your app should include text, images, buttons, and sound.
- There should be no “getting stuck” on any screen. It should always be possible to navigate from a screen in your app to some other screen.
- Your program code should follow good style.
- Your user interface should be intuitive to use.
- AP Practice Response - Describe Your Process
- 5
Student Instructions
AP Practice - Create PT - Process
One component of the AP Create Performance Task is describing the development process used for your program.
-
2b. Describe the incremental and iterative development process of your program, focusing on two distinct points in that process. Describe the difficulties and/or opportunities you encountered and how they were resolved or incorporated. In your description clearly indicate whether the development described was collaborative or independent. At least one of these points must refer to independent program development. (Must not exceed 200 words)
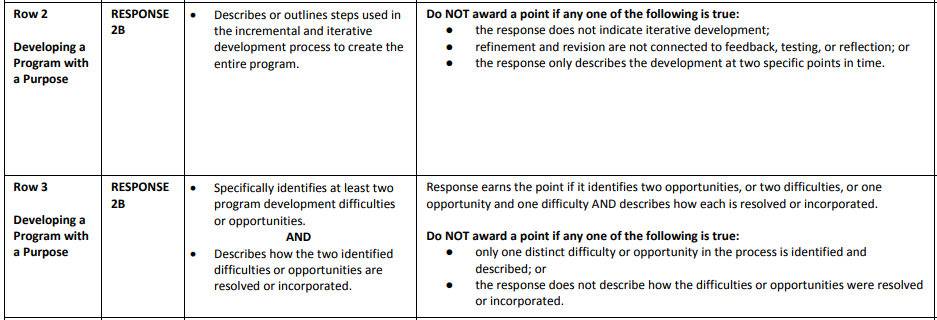
Here's two rows of the scoring guide for this question
Grade the Response
A student wrote the following response.
"In developing my program I encountered two major problems. The first one was early in programming when sometimes the apple would disappear from the screen. By debugging my program I was able to recognize that the ranges of my random X values went from 0-3200, not 0-320. I was easily able to correct this issue in my code. A second issue occurred when I realized that classmates using the game often didn't know how to start it. In order to fix this problem I made the button significantly larger and a different color than the background. Afterwards I no longer saw this problem."
Each row is worth one point that either can or cannot be awarded. Explain why you would or would not award the points for Row 2 and Row 3.
Hint: Pay particular attention to the last column of the scoring guidelines and the checklists entitled "Do NOT award a point if..."
Standards Alignment
View full course alignment
Computer Science Principles
1.1 - Creative development can be an essential process for creating computational artifacts.
1.1.1 - Apply a creative development process when creating computational artifacts. [P2]
- 1.1.1A - A creative process in the development of a computational artifact can include, but is not limited to, employing nontraditional, nonprescribed techniques; the use of novel combinations of artifacts, tools, and techniques; and the exploration of personal cu
- 1.1.1B - Creating computational artifacts employs an iterative and often exploratory process to translate ideas into tangible form.
1.2 - Computing enables people to use creative development processes to create computational artifacts for creative expression or to solve a problem.
1.2.1 - Create a computational artifact for creative expression. [P2]
- 1.2.1A - A computational artifact is anything created by a human using a computer and can be, but is not limited to, a program, an image, audio, video, a presentation, or a web page file.
- 1.2.1B - Creating computational artifacts requires understanding and using software tools and services.
- 1.2.1C - Computing tools and techniques are used to create computational artifacts and can include, but are not limited to, programming IDEs, spreadsheets, 3D printers, or text editors.
- 1.2.1E - Creative expressions in a computational artifact can reflect personal expressions of ideas or interests.
5.1 - Programs can be developed for creative expression, to satisfy personal curiosity, to create new knowledge, or to solve problems (to help people, organizations, or society).
5.1.1 - Develop a program for creative expression, to satisfy personal curiosity, or to create new knowledge. [P2]
- 5.1.1A - Programs are developed and used in a variety of ways by a wide range of people depending on the goals of the programmer.
- 5.1.1B - Programs developed for creative expression, to satisfy personal curiosity, or to create new knowledge may have visual, audible, or tactile inputs and outputs.
5.1.2 - Develop a correct program to solve problems. [P2]
- 5.1.2A - An iterative process of program development helps in developing a correct program to solve problems.
- 5.1.2B - Developing correct program components and then combining them helps in creating correct programs.
- 5.1.2C - Incrementally adding tested program segments to correct, working programs helps create large correct programs.
- 5.1.2D - Program documentation helps programmers develop and maintain correct programs to efficiently solve problems.
- 5.1.2E - Documentation about program components, such as blocks and procedures, helps in developing and maintaining programs.
- 5.1.2F - Documentation helps in developing and maintaining programs when working individually or in collaborative programming environments
- 5.1.2J - A programmer designs, implements, tests, debugs, and maintains programs when solving problems.
5.1.3 - Collaborate to develop a program. [P6]
- 5.1.3B - Collaboration facilitates multiple perspectives in developing ideas for solving problems by programming.
- 5.1.3C - Collaboration in the iterative development of a program requires different skills than developing a program alone.
- 5.1.3D - Collaboration can make it easier to find and correct errors when developing programs.
5.4 - Programs are developed, maintained, and used by people for different purposes.
5.4.1 - Evaluate the correctness of a program. [P4]
- 5.4.1E - Locating and correcting errors in a program is called debugging the program.
- 5.4.1F - Knowledge of what a program is supposed to do is required in order to find most program errors.
- 5.4.1G - Examples of intended behavior on specific inputs help people understand what a program is supposed to do.
- 5.4.1L - An explanation of a program helps people understand the functionality and purpose of it.
CSTA K-12 Computer Science Standards (2017)
AP - Algorithms & Programming
- 3A-AP-16 - Design and iteratively develop computational artifacts for practical intent, personal expression, or to address a societal issue by using events to initiate instructions.