Lesson 2: Multi-Screen Apps
Overview
Students continue learning about Event Driven programming in this lesson by learning how to add multiple "screens" to an app and adding code to switch between them. More techniques of debugging are presented, namely using console.log, a command that allows them to print out text which the user cannot see. It is useful for displaying messages to yourself to figure out what is happening as your program runs. Students will end the lesson by creating an improved version of the “chaser” game which has multiple screens.
Purpose
As event-driven applications get more complex, it is easy to generate errors in a program, and the need to debug the program will become more prevalent. In some instances, the error will be in the syntax of the program (e.g., a missing semicolon or misspelled function name). In other instances, however, programs will have logical errors which the computer will not catch and so can only be found by testing. Debugging and learning to interpret error messages is a critical step in the process of developing reliable software. Learning about yourself and the types of mistakes you typically make is one aspect of getting good at debugging. Learning how to insert console.log statements into your code to display messages that give you insight into what your program is doing and when is also an important, universal technique of program development and debugging.
Agenda
Getting Started (5 Minutes)
Activity (60 minutes)
Wrap-up (15 minutes)
Extended Learning
Assessment
View on Code Studio
Objectives
Students will be able to:
- Write a simple event-driven program that has multiple screens.
- Recognize debugging as an important step in developing a program.
- Use console.log to debug simple issues related to event-driven programming.
Preparation
- Review levels that explain concepts, decide if you would like to demonstrate them or have students read/do on their own.
Vocabulary
- Debugging - Finding and fixing problems in an algorithm or program.
- Event-driven program - a program designed to run blocks of code or functions in response to specified events (e.g. a mouse click)
- Event handling - an overarching term for the coding tasks involved in making a program respond to events by triggering functions.
Introduced Code
Teaching Guide
Getting Started (5 Minutes)
Recall and Move on
Recall or revist important ideas from the last lesson as necessary.
- Are students comfortable adding buttons, images and text to an app?
- Are students comfortable adding a simple onEvent handler for a button or image?
Address any questions as necessary. Refer students to the instructional pages from the previous lesson that contain diagrams and explanations of how to do these things.
Remarks
In the last lesson you ended up making a simple "chaser game" that wasn't much of a game.
In this lesson you'll learn imporove that app by:
- adding more screens
- and adding a way for the game to end.
Without further ado let's get to it.
Activity (60 minutes)
Transition to Code Studio:
Instructions for Getting Started and Setup
-
Today students will still work independently but there are a few more problems to solve and mysteries to figure out than in the previous lesson.
-
It is recommended that each student have at least one coding buddy or thought partner to work through these stages with.
-
Students can read instructions together, and ask questions of each other.
-
In particular, it's effective to have students do prediciton tasks with a partner.
-
At the end of the lesson it's okay for students to work more independently as they will be touching adding to their chaser game project.
Wrap-up (15 minutes)
Share Chaser/Clicker games
Time Permitting it's fun to have students share their work. You can do it a variety of ways.
- Do a gallery walk
- Or have students share their apps by using the Share tools in code studio - via URL or Text Message
- Do small-group demos
Reflection on debugging and error messages
Discuss
This lesson is one of the first times students will likely have consistently generated and responded to error messages. Students may (incorrectly) view error messages as “bad,” when in reality they are an entirely normal part of programming and extremely useful when debugging code.
In fact, logical error messages, which can be “silent" and don’t generate error messages are much worse, since they are much harder to catch. Use this early moment to normalize getting error messages and needing to debug code.
Prompt:
- "Today was one of the first times we saw error messages in our programs and started thinking about debugging our code. Is it “bad” to generate an error message? Will every error in our programs generate an error? Why might a programmer actually “like” to get an error message?"
Discuss:
Give students an opportunity to share their thoughts, either in small groups or as a class.
Points that might come up:
Teaching Tip
If you didn't before you might consider bringin up this somewhat off-the-wall analogy: programming and debugging is like getting dressed up to go out.
- You put on some clothes that you think will look good but then you have to look in the mirror, make some adjustments and decisions, maybe even realize you need to go a different direction entirely, and so on – you are debugging your outfit.
- Writing a program is initially is like throwing on some clothes, and running the program is like looking in the mirror for the first time. You do it to see what it looks like, knowing that you’re going to have to make some adjustments.
- But looking in the mirror frequently to see what everything looks like together actually speeds up the process. Getting ready to go out, putting on makeup or combing your hair without looking in the mirror would not only slow things down, it’s foolish. The Run. Test. Debug. pattern of behavior is part of the programming process, just like using a mirror is part of making yourself presentable.
- Even expert programmers make errors, so debugging is a critical step of writing any program.
- Since we can assume that all code will have some errors in it, we’d much prefer the computer to catch those errors for us. Error messages are how the computer gives you a helping hand in writing your program, and often they’ll include helpful information about how you can fix your code.
- Of course, not every error will generate an error message because sometimes we write functional code that does something different than we want. In order to catch these logical errors, we’ll need to understand how our code is supposed to run and then test it to make sure that it does.
- In either case, this process of finding and fixing errors in your code is entirely normal and is just as important a skill as writing the code in the first place.
Remarks
We're making a big deal out of error messages and debugging because they are often hurdles for new learners.
But you just need to have the right attitude about writing code - debugging is part of the process.
You get used to a pattern of:
- Write a little code
- Test it to make sure it does what you think
- Write the next piece
If you do this, the errors you make will tend to be smaller and easier to catch.
Extended Learning
-
Add a "bad guy" to the game. If you click the bad guy instead of the target you lose. Trick: make the bad guy move to a random location every time the mouse moves on the screen.
-
Make a prediction: Exchange code with a partner and try to figure out what her program does without running it.
Assessment
If you wish to assess the chaser game, see the teacher notes associated with that level.
Questions:
-
Which of the following statements about debugging and program errors is FALSE?
- Error messages help programmers identify problems in their code.
- Not all errors in a program will generate an error message.
- Debugging is the process of locating and correcting errors in a program.
- It is common for programs to contain errors the first time they are written.
- A program that does not generate any error messages can be assumed to run as intended.
-
Elements in your app are required to have unique IDs. Given what you now know about how event handlers work, why is it important for the IDs of page elements to be unique?
- Lesson Overview
- Student Overview
Student Instructions
Design Mode: Layering and Deleting
 User interface elements can overlap one another, so you'll want the ability to change the order or depth at which each one is shown.
You Try it: Use the depth and delete tools to create the "After" image (shown below).
- Scroll to the bottom of the Properties tab you'll find buttons which allow you to easily change the depth of an element.
- Change the depth of elements by using the double or single arrows.
- Click the double arrow to send all the way to front or back.
-
Click the single arrow to move up or down one layer.
-
Delete an Element by selecting it (clicking on it) in the design view and then clicking the Red Delete button in the properties tab.
| Before | After |
|---|---|
 |
 |
Student Instructions
Add onEvent from Design Mode!

Design Mode has a shortcut for you to add onEvent to your code for specific UI Element. It's quite handy.
You try it: Add an event handler to a button from Design Mode
Design Mode * A Red button has already been added to the app. * In Design Mode click on the button to select it * Click the EVENTS tab and then click the link that says Insert and Show Code * You may change the ID if you like
This will insert an onEvent block with the ID and "click" filled in already.
It also inserts a line of code with a command we haven't seen yet: console.log.
Run. Test. Debug Run the program and click on the button to see what happens * Hint: look at the Debug Console area below the coding workspace. If nothing happens, retrace your steps and try again.
Once you see a message displayed in the Debug Console click finish to move on.
Student Instructions
Exploring console.log

In the last level, we saw a new command: console.log. You should have noticed that it prints out text in the Debug Console below the code workspace.
The Debug Console area is an important tool for programmers. You've seen it display error messages, but you can also have your program display messages there.
You can find console.log in the Variables code toolbox, and it is the command you use to send messages to the console -- it's just about the simplest thing you can do to make your code generate output.
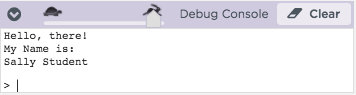
You try it: Add a console.log statement to say your name
-
Drag out a
console.logstatement into the workspace and add it below the 2 statements there. -
Following the lead of the first two lines - update the code so that it says your name.
-
The output should look something like this:
Teaching Tip
Teaching Tips
This is a level that might be worth pausing on. There are a few things that are important to reinforce:
- Every programming language has some way of display simple plaintext output
- Printing to the console is a very common technique not only for debugging but also as an aid in program construction and development.
- In other words, you can use console.log to send messages to yourself to verify the program is doing what you think it's doing which helps prevent errors down the line.
Student Instructions
Printing to the console
The most effective debugging tool is still careful thought, coupled with judiciously placed print statements.
-- Brian Kernighan, Unix for Beginners (1979)
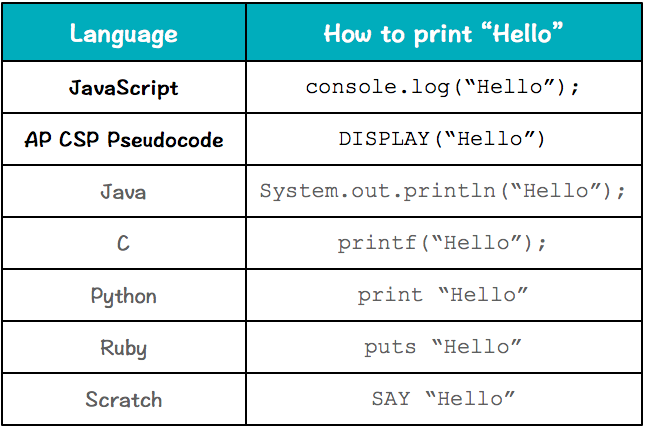
How to print to the console in various programming languages.
The quote at the top of the the page is from one of the authors of the first books about the C programming language. It is still relevant and largely true today.
When you use console.log we say that you are "printing to the console".
Almost all programming languages have some form of a "print" command -- an easy way to see text output from your code (as opposed to printing on paper). A sampling is shown to the right.
In the future you might see a task that asks you to do something like, "Write a loop that prints all the values to the console". That means write a loop with a console.log statement in it.
Gaining control: Display messages to yourself
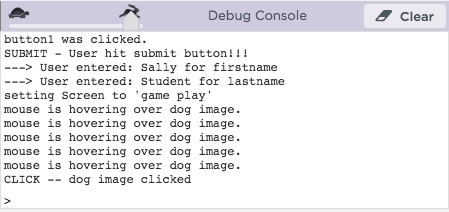 Example output from a programmer who used a lot of console.log statements to track what was happening in her program.
Many professionals get started building programs with very simple inputs and outputs, using the console initially to just display a plain-text transcript of activity. It helps you see what's happening early on. You can update graphical displays and remove print statements later on.
As you program more and more you realize that it's nice to get immediate feedback from the computer that your program is doing something.
Over time this gives you an increasing sense of control over the process of writing programs.
Debugging with console.log
One of the oldest, but still best, ways to debug programs is to put console.log statements into the code to display messages to yourself about the state of program execution at any given point in time.
Using console.log is a way to get the computer to tell you what's happening and when.
This doesn't mean you can be lazy! You still have to think about where and how to insert those statements but you can take advantage of the fact that the computer has to execute them, and will do so in the order it encounters them.
Using well-placed console.log statements is very useful technique for figuring out things like:
- The order in which things are happening
- A value or state of something at various points in the program during execution
- Whether an event is firing or not, and when.
Over the next few levels we'll practice with console.log and use it to investigate bugs and and other mysteries of the system.
Note: Debug Console automatically expands when necessary
You may notice that the Debug Console area is usually collapsed by default in order to save screen space. However, it will automatically pop up whenever:
- You print something to the console
- An error message is displayed
So you don't need to worry about missing anything, it will open when necessary. This animation shows the action.

You can expand and collapse the Debug Console yourself by clicking on the little arrow in purple header.
Teaching Tip
Teaching Tips
Prediction is important
You might want to have all students do this level at the same time and explain the prediction process to them.
-
Do what you can to really get students to examine the code and predict what will happen before hitting run. Perhaps have them do it with a partner.
-
Later on in the course there are levels that force you to make a prediction first. We're not that heavy handed yet.
The purpose of prediction is that you are more likely to remember the result of some action if you try to predict what will happen first.
- In fact, you might remember better if your prediction is wrong.
- So there is no pressure to be right, only that you force yourself to make a prediction.
- Professional programmers do this implicitly out of habit - it's a great way to quickly gain insight into your code and what it is (or isn't) doing.
Student Instructions
Predict what will happen
We've added some console.log statements both in event handlers as well as just out in the open, between event handler definitions.
- Study the code first
-
We've added some white space between lines to make it more readable.
-
Predict: What do you think will happen when you click Run? What will display? Will it:
- Print all 5 messages?
- Print only a few? Which ones?
-
Halt with an error message?
-
After you've made some kind of prediction, hit Run.
-
If the program runs, then try to use it - click on the buttons and such.
-
Were you right? Anything unexpected?
- Reset and Run the program again a few times until you understand what's happening.
What's happening? [click to expand]
Student Instructions
Which comes first?
Another useful thing to do with console.log statements is to use them to figure out the order in which events are triggered. In the code below one button has 3 different event listeners, that will respond to the events: "mousedown", "mouseup", and "click"
The question is, if you click the button:
- Will all 3 of these events trigger?
- Will any of them trigger? Which one(s)?
- What order will these events be triggered in?
You try it: 1. Study the code and make Prediction 2. Run the program 3. Were you right? What's unexpected? 4. Keep testing until you see what's happening.
Student Instructions
Use console.log to Test Overlapping Objects and the Screen
There are two goals here:
- Practice inserting your own console.log statements.
- Investigate how the screen captures events (it's different).
Do This:

- Add
console.logstatements to each of the 3 event handlers we started you out with. -
Make the text that gets printed be descriptive so that you know exactly what is happening when.
-
Run the program and try clicking where the diagram (at right) shows.
- Click on each button
- Click where the buttons overlap
- Click on the screen (i.e. the background)
Investigate until you can answer these questions: 1. When you click on a location where two objects are overlapping, which event(s) fire(s)? 2. When you click on an non-overlapping part of some object what gets triggered? 3. When does a "click" on the "screen" get triggered?
Answers: [click here]
1. When you click on a location where two objects are overlapping, which event(s) fire(s)?
2. When you click on an non-overlapping part of some object what gets triggered?
3. When does a "click" on the "screen" get triggered?
Teaching Tip
This page contains a lot of information and several large diagrams. But like many other things so far, once you know what you're doing there's not that much to it. Adding a screen fits the same kinds patterns we've used before.
When you encounter large pages like this an instructional option you might consider is Demo-and-Reference - demonstrate the key ideas outline on this page for the students, and let them use this page as reference afterward.
This is a technique you might use to have some whole-class interaction mid-lesson where you can also do small checks for understanding.
Demo and Reference for Adding Screens
- Have students read the first section "What's a screen anyway" then pause.
- Do a demonstration or walk through of adding a new screen, setting its style, and adding a call to
setScreen - Remind students that this page exists for reference later on.
- The last two diagrams might be useful to have projected at the front of the room as students continue to work.
Student Instructions
Making and Using Multiple Screens
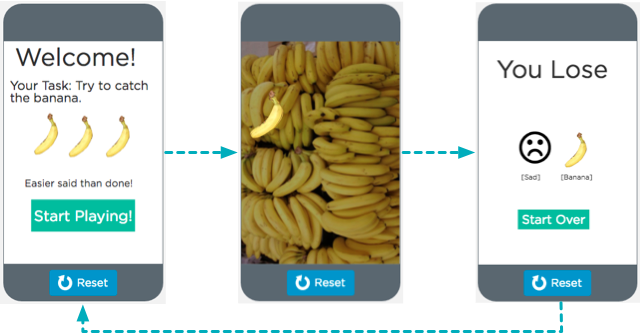
You may imagine that a typical app has a number of "screens" or views that user goes through as part of using your app. Below is a typical example with 1) a welcome screen, 2) a screen that plays a game and 3) a "game over" screen.
What's a screen, anyway?
A screen is just a UI element like anything else in Design Mode. But it has a few special properties:
- A screen is a UI element that contains other UI elements.
- Only one screen can be visible at a time
- Only elements that "belong" to a screen will visible when that screen is active.
- Multiple screens, but only one coding workspace
- Even though your design elements might be spread across multiple screens, your code does not get broken up like that.
- There is only one coding workspace, that will still house all of your code for the app.
A little bit more about screens...[click to expand]
In reality, screens aren't really "real"If you must know, a screen is just an HTML <div> tag that contains other html elements. To show a screen it is made visible and the other divs are hidden.
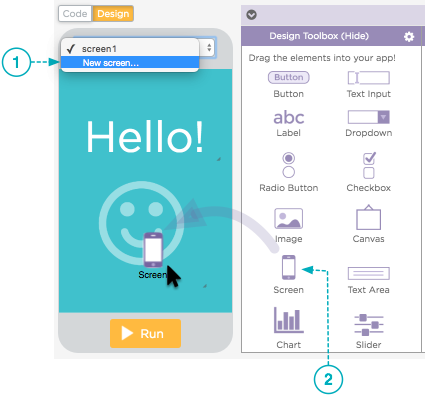
How to Make a new Screen
1. Either choose New Screen... from the pulldown menu at the top of the display area. Note: you also use this pulldown menu to switch between screens in design mode.
2. Or drag and drop a Screen UI element from the toolbox. Heads-up: As soon as you release the screen element, the app will show you a new blank screen. You can get back to other screens using the pulldown menu at the top.
Set a Screen's Properties
1. Use this pulldown menu to select the screen you want to work on. The list will contain the IDs of all the screens you've created.
2. Click on a blank area of the background to select the screen and set its properties.
3. Screens also have IDs. Like other UI elements, it's a good idea to give your screens descriptive and meaningful IDs. It makes writing code so much easier.
4. If your screen is full with UI elements and there's no blank area to click to select it, use this pulldown menu. It lists all the UI elements that are part of this screen, including the screen itself.
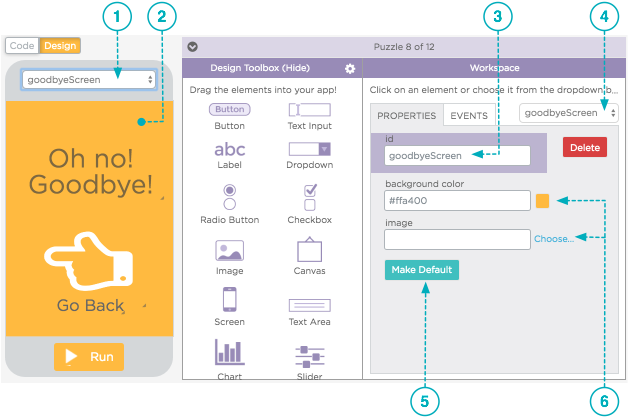
5. Click this button to make this screen the "default screen" which means the screen that will show first when the app is run.
6. Screens don't have many properties but you can set the background of the screen to a color or an image. Images are stretched or squeezed to fit the screen.
Using the setScreen command to change screens with code
The setScreen command changes the screen to show whatever screen you want. You specify the screen by its ID.
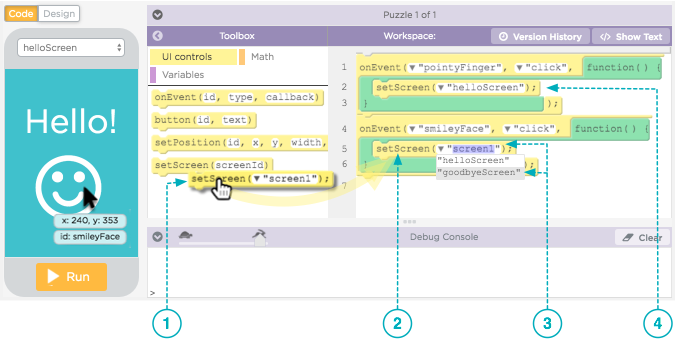
1. Find setScreen in the UI Elements toolbox and drag it into the code workspace.
2. Most of the time you change the screen in response to some user-event. In this case setScreen is being added to a "click" event handler for the image with id: smileyFace
3. Select the ID of the screen you want to change to. In this case, when the smiley face is clicked we want to change to the screen that says "goodbye."
4. Key idea: Multiple Screens - One Coding Workspace. This is the code that handles a "click" event for an image that is on a different screen - the goodbyeScreen. You can't see that image or that screen right now because the screen isn't selected. However, the code for everything goes here in the coding workspace.
We'll practice making screens and adding code in the next few levels. Click Continue.
Student Instructions
Design Mode: Adding a Screen

Now you try it: Add a new screen and a button to the app we've started here.
NOTE: We've created one screen for you - the Hello Screen. You need to add a new screen - the new screen should look something like the example shown to the right.
Here are the steps:
- Add a new screen
- Drag out
 from the Design Toolbox.
 -
Or choose New Screen... from the pulldown menu at the top of the app display.
-
Set the background color
-
It doesn't have to be orange like the example
-
Add a Button
- A simple button is fine. You can embelish with an icon if you want.
- Optional: You can also add a text label saying "Goodbye!"
Click Run...but...you won't see much
- Because we haven't added code yet all you'll see is the (default) Hello screen
- You won't have any way to see the orange screen when the app is running.
Click Finish to move on to the next level where we'll add code
- Note: you can continue to work on your design on the next level too
Student Instructions
Adding Code: Switching Screens with setScreen

You Try it: Add event handlers to the buttons that use setScreen to switch to the other screen.
The result should be two-screen app which can switch back and forth between the "hello" and "go back" screens. See example at right.
- Add an onEvent handler for the smiley face image/button to respond to a "click"
-
Do it the easy way by inserting from design mode, or just drag an
onEventblock into the code workspace. -
Add
setScreeninto the event handling function - Make it switch to the other screen when the smiley face is clicked.
Run. Test. Debug
- Test to see if the clicking the smiley face switches screens
- If it doesn't work, retrace your steps and try again.
If it works, then repeat these steps for the "go back" button.
- The result should look something like the example on the right.
Student Instructions
Guided Example: Making a Multi-screen Chaser Game
In the last lesson we got some very basic functionality for a simple chaser game going. Now let's make version 2. Now that we know how to add screens and use console.log to help us debug problems, let's make our game a little more polished.
Here is the plan for what we're about to make:

1. Welcome Screen with button to start. Clicking on button takes you to game play screen.
2. Improve Chaser game so that you can lose by clicking on the background. Clicking on the target (banana) makes it jump around just like before. But clicking on the background (a large image) sends you to another screen.
3. Game Over Screen. Add a button inviting person to play again. Clicking it sends them back to the welcome screen.
We're going to make these 3 additions to the game one at a time, over the next 3 levels. We'll add the welcome screen first. Click Continue to try it.
Teaching Tip
Teaching Tip
The thing students are most likely to miss here is clicking Make Default to make the new screen they just made the default screen for the app.
Also you may need to collapse the instructions in order to see the "Screen" element in the design toolbox.
Student Instructions
Add A Welcome Screen
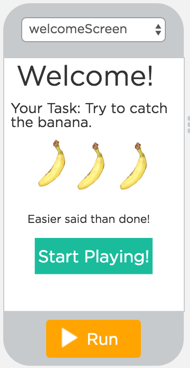
This is an example showing the elements of a welcome screen. Yours should not look exactly like this. Yours should be appropriate for your game.
Let's improve your "Chaser Game" by adding a welcome screen that shows when the app starts up, and that with a button to start.
- NOTE: we've imported the chaser game that you made in the last lesson. That's the starting point for this. You can continue with this lesson if you don't have it. But you'll need to make a screen for game play along the way.
Following the Event Driven Programming pattern:
- Design Mode
- Add a New Screen to the App
- Make this new screen the default screen
- Add a new Button to the screen that says "Start"
- Add text welcoming the user to the game.
-
Give the button and the screen meaningful IDs
-
Add an onEvent Handler for the Button
-
Insert a new onEvent block (easy way from Design Mode) for the "start" button
-
Add code to the event handling function
-
When the "start" button is clicked it should
setScreento the screen that plays the game. -
Run. Test. Debug.
Make sure that:
- When app starts up, your new welcome screen shows first
- When you click the "start" button it takes you to the game play screen
- Note: right now there's no way to get back to the welcome screen - it's okay, we'll add that later.
Teaching Tip
Teaching Tip
This may be a confusing step for students for two reasons:
1) We want the background image to be it's own UI element rather than just giving the screen a background image. -- we're doing this so that we can detect the difference between clicking on the target image, and the background. (The event listener for the screen triggers on every click, no matter what).
2) We're making the app respond to a click but not changing anything about the screen yet. We're only printing a message to the console. That's okay, here. We're doing this in small steps.
- The reason is that this is a good strategy for programming with UI elements. Using console.log is a simple half-step we can verify that we've properly set up the event handler to respond to the event we want. Console.log WILL print something if the event fires. If console.log doesn't print, then we know the event was never triggered and we can check: do we have the ID right? the event type? etc.
- Sometimes you can be too eager and add more code to the event handler, say to change the screen, and if it doesn't work you don't know what happened - did the event not fire? Or did is the code to set the screen wrong?
Student Instructions
Add a Full Screen Image to act as Background to Game

We want to be able to detect when the user misses clicking on the target. Since we know the screen itself registers every click no matter what, the only way to determine that the user missed the target is to add an image that takes up the full screen.
In other words we're trying to determine which of two images was clicked - the target, or the background - which is do-able since we know when images overlap only one will have a click event triggered.
- When the target is clicked, it jumps to a new location
- When the background image is clicked we will (eventually) switch to a new screen.
Following the Event-Driven Pattern...
- Design mode: Add a new image to the game
- and stretch it to fill the whole screen.
- Change the layering order (if necessary) so that the target image is in front of the full screen image.
-
(See example at right which shows an image that is stretched to the full size of the screen sitting behind the target image).
-
Add an onEvent handler for the full screen image with a simple console.log message
-
TIP: this is basically done for you if you add onEvent from Design Mode
-
Run. Test. Debug.
Make sure that with each click one of two things is happening. * When the target is clicked, it jumps to a new location (and optionally print a message to the console). * When the background image is clicked it should display a message to the console. * (See example console output at right).
- Project: Multi-Screen Chaser Game
- 15
Teaching Tip
Teacher NOTE:
We have marked this level as "submittable" but it is not intended as a significant project. The purpose is to give you an easy means for checking student work and that everyone made something.
You may choose to not have students submit it - so they can keep working on it.
If you wish to grade/score it recommend a simple check for requirements:
- At least 3 screens (Welcome, Game play, Game Over)
- Text, Images, Buttons are present
- No Dead Ends - There is a way to navigate to each of the screens (through game-play or clicking a button).
- Some effort put toward styling.
Student Instructions
Add a "game over" screen and finalize the game
-
Add a new Screen with a "game over" message and add a button to start over.
-
Add an event handler for the "Start Over" Button to send the user back to the Welcome Screen.
-
Add
setScreento the event handling function for the background image - When the background image is clicked, the user should be sent to the "game over" screen you just created.

Run. Test. Debug.
You should now have a 3-screen app with:
- A welcome screen
- A game play screen
- A "game over" screen
Avoid dead-ends -- the user should be able to get between all the screens appropriately, and play the game.
If it's not working:
- Retrace your steps
- See if you can figure out where things are going wrong
- Add extra
console.logstatements. - Ask a friend to help you out.
Stick with it until you get it!
Standards Alignment
View full course alignment
CSTA K-12 Computer Science Standards (2011)
CPP - Computing Practice & Programming
- CPP.L2:5 - Implement problem solutions using a programming language, including: looping behavior, conditional statements, logic, expressions, variables and functions.
- CPP.L3A:3 - Use various debugging and testing methods to ensure program correctness (e.g., test cases, unit testing, white box, black box, integration testing)
- CPP.L3A:4 - Apply analysis, design, and implementation techniques to solve problems (e.g., use one or more software lifecycle models).
- CPP.L3A:5 - Use Application Program Interfaces (APIs) and libraries to facilitate programming solutions.
CT - Computational Thinking
- CT.L2:12 - Use abstraction to decompose a problem into sub problems.
- CT.L2:6 - Describe and analyze a sequence of instructions being followed (e.g., describe a character’s behavior in a video game as driven by rules and algorithms).
- CT.L3A:1 - Use predefined functions and parameters, classes and methods to divide a complex problem into simpler parts.
- CT.L3A:3 - Explain how sequence, selection, iteration, and recursion are building blocks of algorithms.
- CT.L3B:4 - Evaluate algorithms by their efficiency, correctness, and clarity.
Computer Science Principles
1.1 - Creative development can be an essential process for creating computational artifacts.
1.1.1 - Apply a creative development process when creating computational artifacts. [P2]
- 1.1.1B - Creating computational artifacts employs an iterative and often exploratory process to translate ideas into tangible form.
1.2 - Computing enables people to use creative development processes to create computational artifacts for creative expression or to solve a problem.
1.2.1 - Create a computational artifact for creative expression. [P2]
- 1.2.1A - A computational artifact is anything created by a human using a computer and can be, but is not limited to, a program, an image, audio, video, a presentation, or a web page file.
1.2.3 - Create a new computational artifact by combining or modifying existing artifacts. [P2]
- 1.2.3A - Creating computational artifacts can be done by combining and modifying existing artifacts or by creating new artifacts.
1.2.4 - Collaborate in the creation of computational artifacts. [P6]
- 1.2.4A - A collaboratively created computational artifact reflects effort by more than one person.
- 1.2.4D - Effective collaboration strategies enhance performance.
- 1.2.4E - Collaboration facilitates the application of multiple perspectives (including sociocultural perspectives) and diverse talents and skills in developing computational artifacts.
5.1 - Programs can be developed for creative expression, to satisfy personal curiosity, to create new knowledge, or to solve problems (to help people, organizations, or society).
5.1.1 - Develop a program for creative expression, to satisfy personal curiosity, or to create new knowledge. [P2]
- 5.1.1B - Programs developed for creative expression, to satisfy personal curiosity, or to create new knowledge may have visual, audible, or tactile inputs and outputs.
- 5.1.1C - Programs developed for creative expression, to satisfy personal curiosity, or to create new knowledge may be developed with different standards or methods than programs developed for widespread distribution.
5.1.2 - Develop a correct program to solve problems. [P2]
- 5.1.2J - A programmer designs, implements, tests, debugs, and maintains programs when solving problems.
5.1.3 - Collaborate to develop a program. [P6]
- 5.1.3D - Collaboration can make it easier to find and correct errors when developing programs.
5.4 - Programs are developed, maintained, and used by people for different purposes.
5.4.1 - Evaluate the correctness of a program. [P4]
- 5.4.1C - Meaningful names for variables and procedures help people better understand programs.
- 5.4.1E - Locating and correcting errors in a program is called debugging the program.
- 5.4.1F - Knowledge of what a program is supposed to do is required in order to find most program errors.
- 5.4.1M - The functionality of a program is often described by how a user interacts with it.
CSTA K-12 Computer Science Standards (2017)
AP - Algorithms & Programming
- 3A-AP-16 - Design and iteratively develop computational artifacts for practical intent, personal expression, or to address a societal issue by using events to initiate instructions.