Session 4: Introduction to App Lab
35 minutes
lesson exploration
Purpose
This session is designed to get participants comfortable with App Lab. Concepts covered in this session should feel familiar to participants as they connect to concepts covered in Units 3 and 4. App Lab is included in Unit 4, however, if participants do not teach Unit 4 they won’t have seen this tool since Workshop 2. This session is intended to ensure all participants have a baseline understanding of App Lab before the model lesson and curriculum investigation later in the day. Level types are also introduced in this session as a seed planting exercise. These level types will be revisited later in the workshop.
Objectives
- Participants are familiar with the “Code” tab in App Lab
- Participants are able to set the properties of UI elements using code
- Participants are able to compare and contrast multiple ways to take input
Supplies & Prep
Room Setup:
- Participants are seated in pairs
- Create 4 level definition posters:
- Predict Level - students are asked to read working code, discuss with a partner, and predict what it will do before running the code themselves
- Programming Level - students complete targeted tasks that are focused on specific skill building as a way to practice and build a specific skill from a lesson
- Assessment Level - programming levels that can be used to assess students’ mastery of the target skills of the lesson.
- Map Level - standalone resources that provide information on particular concepts of programming structures
Facilitator Supplies:
- Your local copy of the CSD Workshop 4 Slides Template
- Your local copy of the CSD Workshop 4 Notes Template
- Poster paper
- Markers
Teacher Materials:
- Computer
- Journal
- Pen
Agenda
App Lab Warm Up (6 minutes)
Designing Screens with Code (17 minutes)
Input (12 minutes)
Facilitation Guide
App Lab Warm Up (6 minutes)
(1 minute) Context Setting
Remarks
As we begin to dig into Unit 6, we will start with an introduction to App Lab. We used App Lab in Unit 4 to create app prototypes. In Unit 4, we focused most of our time in the Design tab of App Lab. In Unit 6, we will primarily be using the Code tab within App Lab. As an introduction and refresher to this tool, we will complete some of the introductory activity levels within Unit 6. We will start with the Warm Up from Unit 6 Lesson 2.
(5 minutes) UI Element Properties
Facilitator Tip
If most participants don't seem to remember how screens like this one are created in App Lab or haven't done this before, you may need to review:
- UI Elements
- IDs
- Properties
- Events
Display: Show participants this example image
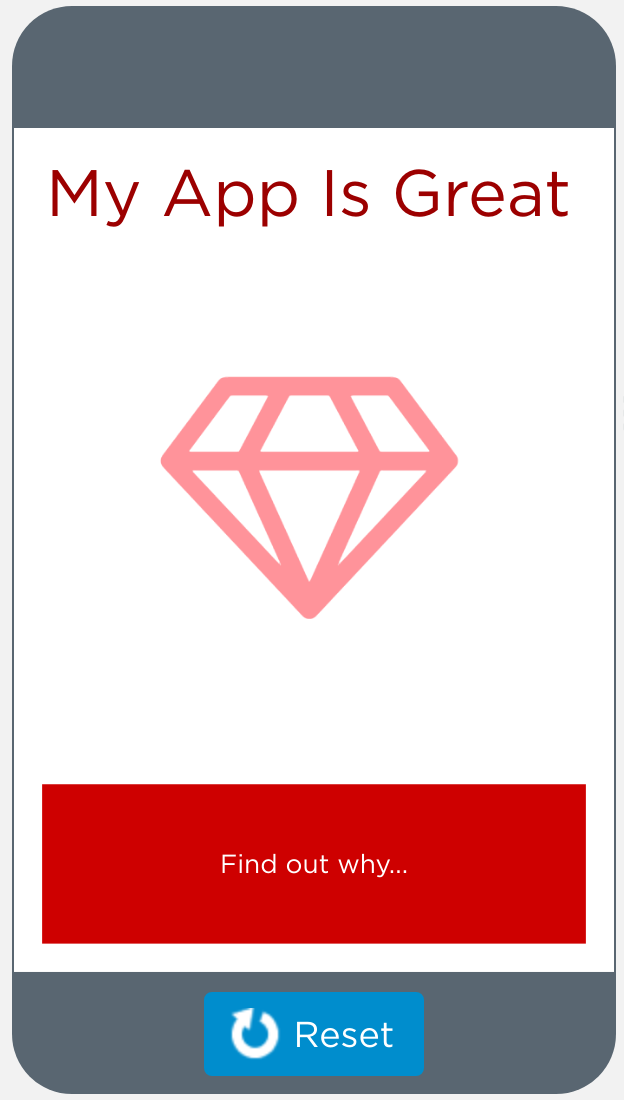
Discussion Goal
The goal of this discussion is to prime participants to think about the properties of various design elements. Reminding people of terms, such as the ID or properties of an element, and how you can use them would be good things to pull out here.
Discuss: How would you describe to somebody else how to recreate this screen? What specific details would they need to know about each design element?
- (2 minutes) Partner Discussion
- (3 minutes) Whole Group Share Out
Designing Screens with Code (17 minutes)
(2 minutes) Unit 6 Lesson 2
Facilitator Tip
A subtheme of this workshop is understanding lesson structure and course specific pedagogy. Participants will dig into this sub theme later in the workshop, but this session is an opportunity to model the implementation of various activity levels within a bubble progression as a way to plant a seed for future discussions. Although the facilitator will model a specific implementation strategy for each level, this is nott a model lesson. Participants will still be wearing their teach hats and facilitators will where their facilitator hats. The instructions for moving through this level progression mimic the model lesson along with the recommended implementation for the selected level types.
- Have everyone navigate to Unit 6 Lesson 2 Level 1 in Code Studio.
- Voice over the Lesson Overview
- By reading and changing the content on the screen of an app, the class starts to build apps that only need a single screen. Even with just one screen, these techniques allow for lots of user interaction and functionality.
- Voice over the Lesson Overview
Remarks
As we familiarize ourselves with the functionality of App Lab, we are also going to look at 4 common level types that students will engage with throughout Unit 6: predict, programming, map, and assessment. In this session we are engaging in activities while wearing our “teacher hats”. We will revisit these level types again later in the day during the model lesson wearing our “student hats”. We will begin with predict level.
The facilitator reads and displays a poster with the definition of a predict level.
- Predict Level - students are asked to read working code, discuss with a partner, and predict what it will do before running the code themselves
(4 minutes) Predict Level
- (3 minutes) Have participants complete the Predict Level (Bubble 2).
- Participants to read the working code independently
- Participants discuss the code with a partner and predict what they will do before running the code themselves
- After running the code, participants discuss as a table to make sense of how the code works
- (1 minute) Point out the “For Teachers Only” tip under the answer. (For many programming activities in this unit, design mode elements have already been created. One helpful tip for students is that they can hover over any of these elements to see the element’s id.) Demonstrate this hover feature.
(2 minutes) Programming Level
- The facilitator reads and displays a poster with the definition of a programming level.
- Programming Level - students complete targeted tasks that are focused on specific skill building as a way to practice and build a specific skill from a lesson
- Participants complete Level 3 with a partner
(5 minutes) Assessment Level
- (1 minute) The facilitator reads and displays a poster with the definition of an assessment level.
- Assessment Level - programming levels that can be used to assess students’ mastery of the target skills of the lesson
- (2 minutes) Participants complete Level 4 with a partner
- (1 minute) The facilitator points out to the “Key Concepts” tab and display the mini rubric.
- (1 minute) Participants discuss with a partner:
- Prompt: How do you or could you use these mini rubrics with your students?
(4 minutes) Map Level
- The facilitator reads and displays a poster with the definition of a map level.
- Map Level - standalone resources that provide information on particular concepts of programming structures
- Participants navigate to the Map Level in bubble 5.
- Facilitator Note: DO NOT have participants read the entire level. Instead have the information displayed as you facilitate sense making. Participants can refer to the Map Level as a resource during the discussion.
- Example discussion prompts:
- What have we learned so far about designing screens with code?
- Why might this be useful?
- Can you think of a time when you might use this type of code?
- Facilitator Note: The purpose of this sense making activity is to allow participants the opportunity to stop and process what they have learned so far and share with the group. The act of processing is what is most important here. It is not necessary that participants have read every word of the resource or that they have committed the contents to their memory. Participants can return to this resource in future levels using the “Help & Tips” tab.
- Example discussion prompts:
Input (12 minutes)
(7 minutes) Comparing Sample Apps
Display: Facilitator opens up to the levels for Unit 6 Lesson 4 while participants navigate to the same lesson on Code Studio using their own device. For each of the “input samples” (Levels 2 and 3), ask the whole group to look at the code and identify:
- Where is the input coming from? (e.g. keyboard, mouse, etc)
- What input value is the program looking for?
- How will the program respond to input?
(5 minutes) Summarizing Difference Between Events and Draw Loop
Discussion Goal
Participants may have different ways of explaining the differences, but Game Lab’s draw loop model works sequentially, with each line of code running after the other, and the draw loop running over and over very quickly in a sequence. Inputs are only checked when that line of code is run. App Lab’s event model is continuously checking for inputs once an event handler is created.
Prompt: What is the difference between the way that Game Lab and App Lab handle inputs?
- (2 minutes) Independent Reflection
- (3 minutes) Whole Group Share Out
Facilitator Tip
Try to get multiple explanations so participants have the opportunity to hear the difference between programming conventions of these tools from multiple perspectives. Make sure they are comfortable moving forward, especially since we are going to be using events throughout Unit 6.