Lesson 1: Introduction to Event-Driven Programming
Overview
Students will be introduced to a new feature of App Lab: Design Mode. Design Mode allows students to easily design the User Interface (UI) of their apps using a drag-and-drop editor. Students learn how to create UI elements they have seen before such as images, text labels and buttons, but they will see many more options for styling these elements with colors, font sizes and so on. Students also learn how to add event handlers - code that listens for and responds to user-events. Students also explore some common errors that come up in event-driven programming and will learn some important skills for debugging programs, chief among them being responding to error messages. Students end the lesson by creating the foundation of a simple "chaser game" which they will add onto in the next lesson.
Purpose
Most modern applications are interactive, responding to when users click buttons, type in a textbox, tilt the screen, swipe between screens, etc. In every instance, the user’s action is generating some kind of event and the program responds by running an associated block of code. Programming a modern application is therefore typically an exercise in creating a user interface and then defining what will happen when the user interacts with that interface.
The "event-driven" mindset of programming can take a little getting used to. Often when learning, you write sequential programs that run from start (usually the first line of the program) to the end, or to some point when the program terminates. In an event-driven program your code must always be at the ready to respond to user events, like clicking a button, that may happen at any time, or not at all. More complex event-driven programs require interplay and coordination between so-called "event handlers" - which are functions the programmer writes, but are triggered by the system in response to certain events.
This lesson is a first step toward getting into this mindset. Certain high-level programming languages and environments are designed to make certain tasks easier for a programmer. Being able to design the user interface for an app using a drag-and-drop editor makes designing a stylish product much faster and easier. App Lab has a way to make the User Interface elements quickly and easily, leaving your brain more free to think about how to write the event handlers.
Agenda
Getting Started (10 Minutes)
Activity (45 Minutes)
Wrap-up (10 Minutes)
View on Code Studio
Objectives
Students will be able to:
- Use Design Mode to user interface (UI) elements to a screen.
- Create a simple event-driven program by creating user-interface elements with unique IDs and attaching event handlers to them.
- Recognize debugging and responding to error messages as an important step in developing a program.
- Debug simple issues related to event-driven programming
Links
Heads Up! Please make a copy of any documents you plan to share with students.
For the Students
Vocabulary
- Callback function - a function specified as part of an event listener; it is written by the programmer but called by the system as the result of an event trigger.
- Event - An action that causes something to happen.
- Event-driven program - a program designed to run blocks of code or functions in response to specified events (e.g. a mouse click)
- Event handling - an overarching term for the coding tasks involved in making a program respond to events by triggering functions.
- Event listener - a command that can be set up to trigger a function when a particular type of event occurs on a particular UI element.
- UI Elements - on-screen objects, like buttons, images, text boxes, pull down menus, screens and so on.
- User Interface - The visual elements of a program through which a user controls or communicates with the application. Often abbreviated UI.
Introduced Code
Teaching Guide
Getting Started (10 Minutes)
What events do familiar apps use to be interactive?
Discussion Goal
Begin the transition to events and event-driven programming by building on existing knowledge of elements and behaviors that are common to most modern applications.
Prompt:
- Take out a piece of paper or journal
- Draw a rectangle representing the screen of a mobile device
- Take one minute to sketch out what a screen in your favorite app looks like
Give students a minute to sketch
- Now make a quick list of everything on that screen that you can interact with as a user.
- Finally, write down one action-and-reaction of the app: one thing you do, and how the app responds.
Teaching Tip
Technical knowledge of how modern applications work is not necessary to run this discussion, and the conversation itself should avoid being overly technical. For now, the point is to get the language of "events" out in the open.
- Apps have elements on the screen that you can interact with (i.e. cause user-generated events)
- Apps respond to these events in various ways.
You want to be on the lookout for types of events we can program with like: mouse click or movement, typing keys on the keyboard, etc. in combination with types of screen elements you can perform those actions on like: buttons, menus, text fields, images, etc.
-
Allow students an opportunity to share their sketches and lists with their classmates before asking a few students to share with the entire class.
-
Ask students to share their lists of screen elements and how apps respond.
-
Likely events will include things like:
- clicking a button
- swiping a screen
- dragging your finger
- tilting a phone
- pressing a key, etc.
-
Modern apps are interactive because they can respond to this and other forms of user input (i.e., human-generated events).
Remarks
We may not understand all the technical details yet, but it seems clear that most applications we use respond to events of some kind.
Whether we’re clicking a button or pressing a key, the computer is sensing events that we generate in order to determine how the application should run.
Today, we’re going to start exploring how event-driven programming makes this possible.
Activity (45 Minutes)
Transition to Code Studio:
Wrap-up (10 Minutes)
Share chaser games
Share Applications:
Use a Gallery Walk, Pair-Share, or other strategy to allow students to share their Chaser Games with each other. Encourage students to note design features they would want to include in future applications they create.
Remarks
Today we were actually introduced to two tools that will help us build increasingly complex applications. The first was Design Mode, and hopefully it was quickly apparent how powerful this tool is for creating visually appealing and intuitive user interfaces without cluttering up your code. The second tool was onEvent which is the general command for all event-handling in App Lab.
Event-driven programs are an important concept in programming, but we've just gotten our feet wet. In the next lesson we'll go further by adding multiple screens, and getting better at debugging.
- Lesson Overview
- Student Overview
- Intro to Design Mode in App Lab
- 2
Teaching Tip
You might consider skipping this video (and coming back to it later) in the interest of time.
- Students should see it at some point but it is not essential to understanding or completing this lesson.
- The video provides a general overview of the purpose of Design Mode and a little behind-the-scenes detail of what it's doing.
- You may want to watch or show this video AFTER the lesson to tie things together.
- You may want to ask students to watch it outside of class.
Student Instructions
You do not need to watch this video to understand or complete this lesson - it is merely here if you are interested in getting a general overview.
In this lesson to get started we will only use a few of the features depicted.
Student Instructions
Welcome to Design Mode
In App Lab "Design Mode" lets you drag and drop User Interface (UI) elements into the app and then add code to respond when a user interacts with those elements. It's kind of two-step process, but we'll learn all about it in this lesson.
To start let's just look at Design Mode and add a single UI element (a button) to our app. We'll add code later on.
1. You'll see a new set of switches above the app area that let you flip back and forth between "Design Mode" and Code Mode".
2.Adding an element is as easy as dragging and dropping it into the app where ever you want. Once it's on the app screen you can reposition it, resize it and change lots of other properties about it
3.The Properties tab shows you everything you can change about the look and feel of a UI element. Note: the properties tab is context sensitive which means that the set of properties you see depends on what you click on in the app.
4.The element ID is important because it's how you refer to the element in your code. We'll discuss element IDs later on.
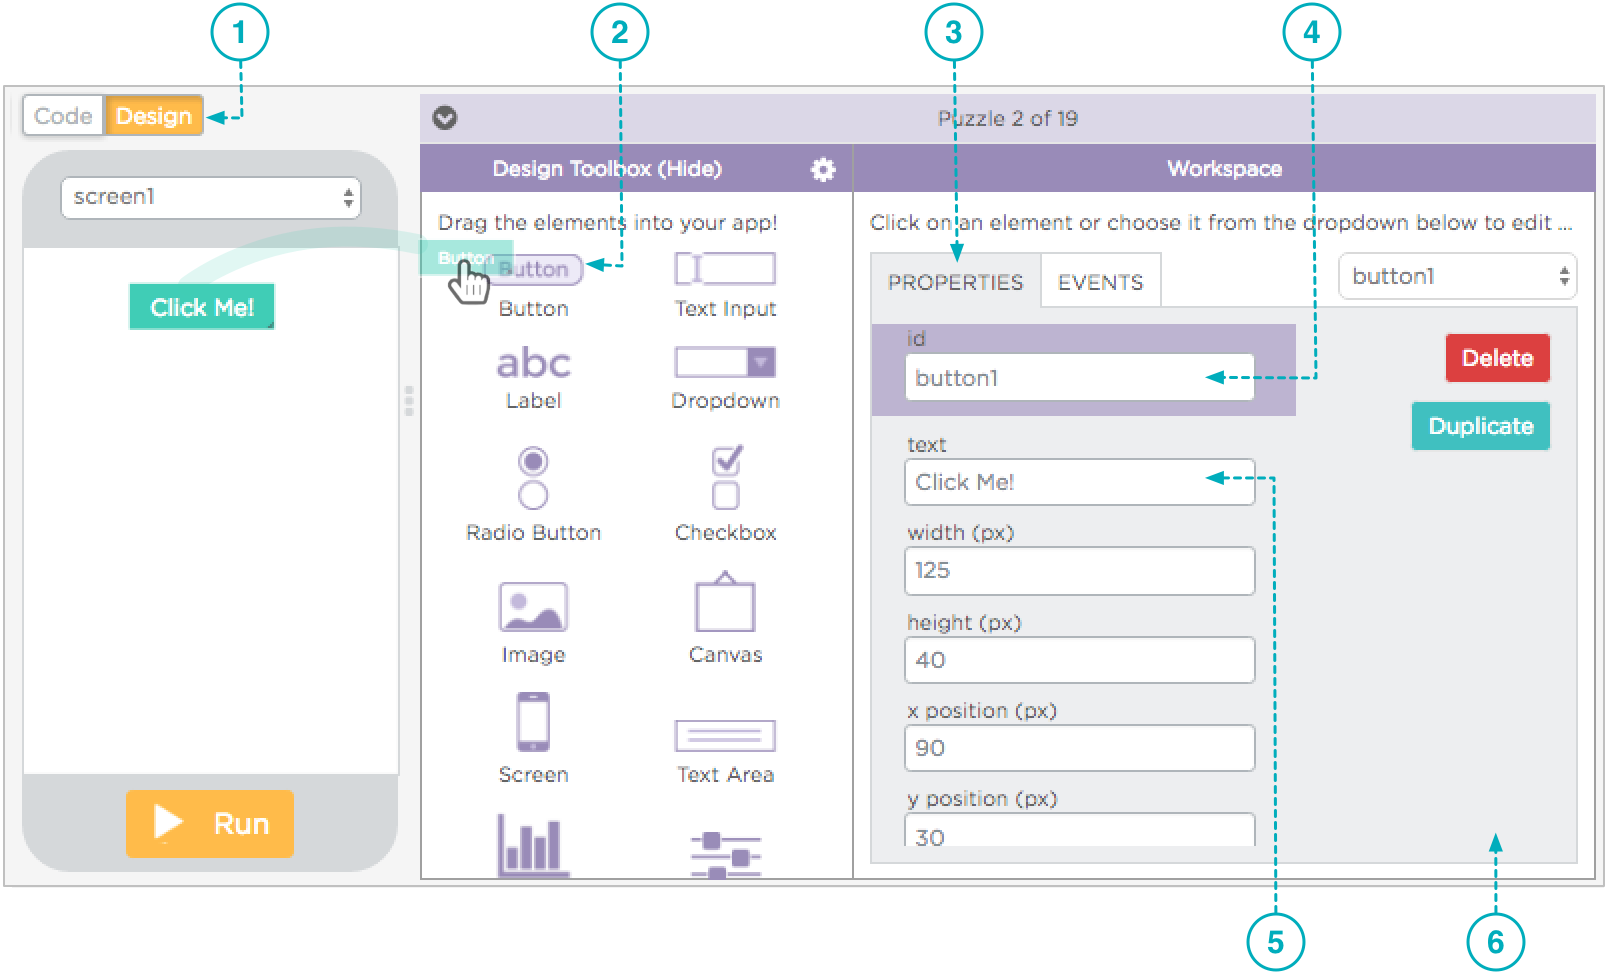
5.You can make the text that the user sees on the button text be whatever you like.
6.Note: Scroll down to see other properties for a UI element might be "hiding" down below.
Vocabulary
User Interface (UI) - The "User Interface" or UI of an app refers to how a person (user) interacts with the computer or app. There are common patterns to user interfaces that you probably know about just from experience:
- UI Elements or objects, like buttons, images, text boxes, pull down menus, screens and so on.
- UI Events or controls, like click, scroll, move mouse, type keyboard key, etc.
Student Instructions

Design Mode
You Try it: Add a large red button to your app using Design Mode.
- Switch to Design Mode
- Drag a button onto the app screen
- Change the text to say "Click Me!"
- Make the color of the button red.
Student Instructions
Event-driven programming
App Lab apps work by adding code to respond to certain events that occur in a program. It's App Lab's way of saying "Hey! something just happened!". Your code can then respond to each of these events.
Collectively, the coding tasks involved in making your app respond to events by triggering functions are called Event Handling.
In App Lab all event handling starts by adding a special block of code called onEvent. Here is how to do it:
1. Switch into Code Mode
2.
Drag an onEvent block from the toolbox into the workspace.
3. Use the pulldown menu to select the ID of the UI element you want to setup to respond to some event. The IDs of all UI elements added in design mode will be listed here.
4. Use the pulldown menu to select the type of event you want to respond to. (Just use "click" for now).
5. Add code inside the function that you want to run when the user triggers the event. The function will run once every time the user triggers the specific event.

A small example - move turtle forward on "click"
It's important to understand in Event-Driven programming that:
- Users trigger events - Events occur when users click a button, tap the screen, move the mouse, type a key on the keyboard, etc.
- Events trigger code - When an event occurs or "fires" it can be used to trigger a particular javascript function.
App Lab's onEvent block is a type of event-handling function called an Event Listener. It wraps all of the setup up you need to do event handling into one command that has several parts. Here is an example with everything labeled:
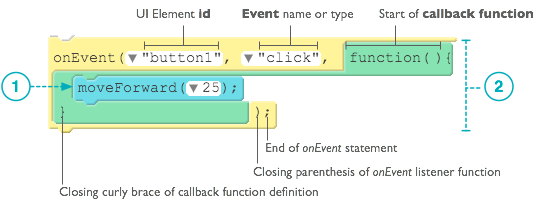
1. Code to execute when callback function is triggered when the user clicks button1. In this case, simply move the turtle forward 25 pixels. Event handling code will typically be more than one line. This is just a simple example to start.
2. Notice that this function, unlike others we've seen, does not have a name. It is also called a callback function which is an odd term. A callback function is only different from a normal function in that you don't call it directly from your code. Instead a callback function is called by the system at the time the specified event occurs. Callback functions are a common pattern in a lot of event-driven programming.
You'll try this next!
Student Instructions
onEvent
You try it! - Make the turtle move forward when the button is clicked.
- Add an
onEventblock - Set the id of your button
- Add
moveForwardto the function definition - Run the program to make sure it works.
- Try changing the event type to something like "mouseover" and see what happens. Not all event types will work with buttons but it's fun to play a little bit.
Once you've got the program responding to some event, congratulations! You've just made your first interactive app.
Click Finish to move on to the next problem.
Teaching Tip
Quick Tip:
Sometimes instructions in an App Lab level are longer and take up a lot of the screen
- Remind students that you can always collapse and expand instructions quickly by hitting the arrow that looks like this:

Student Instructions

Practice! Add another button
Now that you know the pattern try it out. Add a 2nd button to the screen that turns the turtle to the left when clicked. The finished product should look similar to the image shown here.
Remember the steps:
- Design Mode: drag another button onto the screen
- Switch to Code Mode: add an onEvent block to the code
- Add code inside the function to make the turtle turn left
- Run. Test. Debug
Need Help? [Click Here]
Here is an example of adding other button to make the turtle turn left
1. Add a UI element to the screen in Design Mode
2. Add another onEvent block to the code. Note: you need new onEvent block for every event you want to capture.
3. Add code to the event handler function you want.

4. Debugging Tip: if you hover your mouse over a UI element while in code mode, it will show you the ID of the element. This very useful when you have a lot of elements on the screen.
- Event-Driven Programming Patterns
- 8
Teaching Tip
Teaching Tips
Key Idea:
- There is a pattern to how these programs are constructed and developed in App Lab.
Key Behavior:
-
Setting up the expectation that programs don't work on the first try. The Run-Test-Debug cycle is part of programming practice. As you get better you learn to write a small amount of code, verify that it works and then move on.
-
You can do a lot as a teacher to model this expectation. We call it acting as the "lead learner" in the classroom. In the face of some problem or uncertainty, rather teacher-as-source-of-all-knowledge you model the behavior of a good learner, who says "I don't know, but with some effort and attention to detail, together, I'm sure we can find out."
Student Instructions
Event-Driven Programming Patterns
Now you're getting the hang of it!
What you have just done once will become a familiar pattern to you. When making event-driven apps in App Lab you usually go through the following steps:
Step 1 - Design Mode
Add a UI element (or a few) in Design Mode
Step 2 - Add onEvent to Code
Set the id and event type to listen for some event on that element.
Step 3 - Write the code for the event handling function
The code describes what you want the app to do WHEN the specified type of event happens on the specified ID.
Step 4 - Run. Test. Debug.
If the program doesn't work at first (this is very common) try-try again
Debugging
We haven't had a ton of practice with debugging yet. But if you have ever written any code and it threw an error, or didn't work for any other reason and you dug in and figured out why and fixed it, you were debugging.
We'll do some debugging practice later on.
The next tip we'll learn about will help make debugging easier for you later on.
Don't Worry!
Even for professionals, it's very common to go through several cycles of run-test-debug to get it right even for very small programs or pieces of code. It's the nature of the business.
In the next few levels we'll practice this pattern of creating event-driven programs and also debugging.
- Rules About Choosing Good IDs
- 9
Student Instructions
Choosing Good IDs
Good IDs are meaningful and descriptive.
Just like good names for functions, you will want an ID to describe the intended purpose of the element.
For example, if you have many buttons in your program, you will want to give each an ID that describes what the button does.
So, instead of this:
button1andbutton2
You might make IDs that convey not only that it's a button but what you intend the button to be used for, like:
forwardButtonandleftButtonorfwdBtnandleftBtnorforwardBtnandleftBtn- it's up to you!

Rules About IDs
In making descriptive and meaningful IDs there are some rules about IDs you need to know. IDs...
- are case-sensitive
- cannot contain spaces.
- must begin with a letter (A-Z or a-z) and may be followed by any number of digits and letters.
- can contain hyphens ("-"), underscores ("_"), colons (":"), or periods (".").
Why no spaces?
Many computer systems do not allow function names and IDs to contain spaces. We typically use camelcase in our lessons.
You've already seen several examples like this: moveForward, onEvent, turnLeft, etc. It's important to realize that camelcase is a style convention, not a hard and fast rule of JavaScript.
Case-sensitive?
This means there is a difference between LeftBtn and leftBtn (notice the Capital L on the first one).
These differences seem annoying at first, but you get used to it, and actually learn to appreciate the fact that the computer requires such precision.
There are a few common styles for capitalizing and spelling multi-word IDs:
- "Camelcase" --
aCamelcaseNameMightLookLikeThis - Underscores --
Some_people_like_to_use_underscores_to_separate_words - dashes --
Others-like-to-use-hyphens-or-dashes
Whatever you choose is up to you. It's your style. It just helps to be consistent.
- Descriptive IDs
- 10
Student Instructions
Descriptive IDs
You try it - give your buttons descriptive and meaningful IDs rather than the default button1, button2 and so forth.
After you change the ID in Design Mode remember to:
- Change the event handler code so that it correctly references the new IDs of the buttons
- Run - Test - Debug the program to make sure it works, and debug any problems.
Reminder: Rules About IDs [click to expand]
In making descriptive and meaningful IDs there are some rules about IDs you need to know. IDs...
- Event Types
- 11
Student Instructions
Play with different event types

If you haven't yet, you should experiment with different event types with your onEvent blocks. The ones that will work best here are mouse-related ones such as:
* click
* mousemove
* mousedown
* mouseup
* mouseover
There are some events that capture keystrokes from the keyboard. These are interesting, but they do not work easily with buttons. We'll stick to mouse events for now, and get to keys later.
Be sure to experiment with each of the ones that start with "mouse...".
Once you've have played a little bit, click Finish to move on.
Teaching Tip
Teaching Tips
You may want to pause at this point to go over and provide encouragement related to:
- Key Behavior and Attitude about Debugging
- Common Types of Errors
Try This
Here's an off-the-wall metaphor you might consider trying with your students: programming and debugging is like getting dressed up to go out. (stay with me).
-
You put on some clothes that you think will look good but then you have to look in the mirror, make some adjustments and decisions, maybe even realize you need to go a different direction entirely, and so on -- you are debugging your outfit.
-
Writing a program is initially is like throwing on some clothes, and running the program is like looking in the mirror for the first time. You do it to see what it looks like, knowing that you're going to have to make some adjustments.
-
But looking in the mirror frequently to see what everything looks like together actually speeds up the process. Getting ready to go out, putting on makeup or combing your hair without looking in the mirror would not only slow things down, it's foolish.
-
The Run. Test. Debug. pattern of behavior is part of the programming process, just like using a mirror is part of making yourself presentable.
Understanding that debugging is part of the problem solving process is a key understanding and behavior we want to see from students. Many early programmers express frustration when code they write doesn't work the first time, or report that the "computer hates me!". Or that if they write a program that doesn't work or has problems that they are "dumb" or that they'll never get it. This is exactly the wrong attitude to have.
Writing a program is not like solving some big problem with blinders on and then checking at the end to see if you were right. It's a process of writing and making adjustments.
Common Types of Errors
You might point out to students that:
-
Syntax Errors are the kinds of problems that show errors in the console. In the grand scheme of things syntax errors are easy problems to solve because the computer is telling you it can't understand something, you just have to find out what it is.
-
Logic Errors can be much harder to solve because the computer doesn't report anything wrong at all. The program just doesn't do what you think it should or want it to. Tracking down these kinds of errors is much harder, and requires some practice to get used to it. We suggest some techniques in the levels that follow.
Student Instructions
Learning How to Debug Programs
Debugging is a skill and an art. With practice you learn how to write relatively bug-free code and more importantly you learn about yourself and the kinds of errors you typically make.
But learning how to debug takes some time and getting used to, and you will learn about the different kinds of things that can go wrong when you write programs.
It bears repeating:
Debugging is part of the problem-solving process of programming.
- Rarely does code work exactly the way you want the first time.
- If you write some code and need to work out a few bugs that does not mean you are bad programmer - actually the opposite might be true.
Be a Pro! Even professionals do not expect to write bug-free code on the first
- Instead they get in the habit of running their code, checking their assumptions, and making changes as needed. Programming isn't a fixed set of steps.
- It's a creative and continuous cycle of writing, testing, and improving code.
Don't Worry! We'll Practice.
- With practice you eventually stop making certain kinds of errors that beginners run into, but there's always something around the corner that needs to be worked out.
Common Types of Errors
In the next few levels we'll practice debugging a few common types of errors. They generally fall in two categories:
Syntax errors
- Things you misspelled or wrote in such a way the computer doesn't understand what you're trying to say
- Usually the computer spits out an error message of some kind that is a clue about what it can't understand
- Fix these with careful reading of the lines that have errors
Logic errors
- The program runs but doesn't do what you think it should.
- Can be tricky to fix because there might not be an error message
- Fix by retracing your steps, being humble, and trying to understand why the computer is interpreting what you wrote the way it is.
Click Continue to start practicing
Student Instructions
Debugging Event-Driven Programs: IDs
You Try it: Checking IDs -- Your first debugging task will be to verify that the button IDs match the event-handlers. You'll also see error messages in the "Debug Console"

- Run the program and inspect the error messages in the Debug Console.
- NOTE: an error message only indicates where the computer ran into trouble. It doesn't tell you the root cause of the problem, necessarily.
- Investigate -- Use the error message as a clue to investigate the possible problem.
- Fix it -- Make a change that you think will fix the problem.
- Run the program and verify that not only are there no error messages but the program works as intended (turtle moves forward on button click).
- Didn't work? - repeat the steps above. And stick with it! You'll get it eventually.
Remember: You can see the ID of a UI element by just hovering your mouse over it.
Hint? [click here]
There are two ways to fix this:
Student Instructions
Debugging Event-Driven Programs: IDs
Try another one! -- This one is trickier, but very common.
- Run the program and inspect the messages in the Debug Console for clues.
- Investigate - track down what the root of the problem might be.
- Fix it the program and correct the errors so that it works as intended.
- Run the program and verify that both buttons have the intended functionality.
- Repeat as necessary until the program works as intended
Hint? [click here]
Student Instructions
Debugging Unexpected Behavior
Predict - Observe - Reflect
To understand a new piece of code good programmers often try to first make a prediction about what will happen before running the program.
By forcing yourself to make a prediction (it doesn't matter if you're right or not) you are immediately alerted to any unusual or unexpected behavior and you can ask yourself, "Huh? why did it do that? Was that supposed to happen?" It might not be an error, but you gain invaluable insight and actually learn faster.
Predict: For the code that is here, what will happen when the "Forward!" button is clicked?
- Study the code - This program has two event handlers listening for events on the same button?
- Force yourself to make a prediction! - "I don't know" is not a prediction!.
Here are some options to think about:
- There will be an error in the console immediately after hitting run
- There will be an error in the console but not until you hit the button
- Program does nothing
- turtle only moves forward
- turtle only turns left
- turtle move forward then turn left
- turtle turn left then move forward?
- something else?
Observe: Once you've made a prediction, close these instructions and run the program to observe what happens.
Reflect: Was your prediction correct? If not what about your mental model might need to change? Talk about it with a classmate and experiment with the code to make sure you understand what is happening.
Student Instructions
Debugging Logical Errors
Sometimes you can write a program that generates no errors but still does not work as intended.
This is the result of logical errors in your code, and making a prediction can help find these nasty little buggers too.
Once again we've introduced an error or two (a logical error this time) for you to debug.
- Investigate the code and make a prediction - What should happen here?
- Run the program and experiment to see what's wrong.
- Reflect - were you right? Why or why not?
- Fix it - make it work as intended.
- Repeat as necessary
Teaching Tip
Teaching Tip
This might be a good reference to project at the front of the room for students as they work on the last few levels.
Student Instructions
Goodbye, Turtle!

Using the turtle as a form of output was helpful as we learned about UI elements and event handlers.
But it's time to move on. Goodbye, fair turtle! We'll miss you.
Typically when you handle an event your code makes changes to UI elements to make a computation or update the app display in some way. Since we only have one UI element right now, we'll just add code to change it every time we click it.
setPosition and Screen Dimensions
The setPosition command (now added to the Toolbox) lets you move UI elements to an arbitrary position on the screen (and optionally set the size at the same time). Here is the generic form which shows that: for a given UI id, you can explicitly set the x,y location on the screen as well as the width and height.

The little arrow on the right side mean that some of the parameters are optional. You can click the arrows to collapse or expand the available parameters.

You (perhaps obviously) need to plug actual numbers into these parameters of setPosition for it to have any effect. The numbers for setPosition x and y coordinates of the screen. This is similar to the turtle's moveTo(x,y) command.
Remember:
- 0,0 is the top left corner.
- Specify a location by how many pixels from the left and down from the top of the screen it is.
- The screen is 320 by 450 pixels.
- You can hover over the screen to see the x,y coordinate of any point.

Student Instructions
Using setPosition

Now you try it - use setPosition to move the button to the middle of the screen when clicked.
We've set up a small project for you with a button (id: moveBtn) already added in design mode.
- Add an
onEventblock - Drag a
setPositioncommand into the event handler function - Set the x,y coordinate so that the button ends up in the middle of the screen.
- You'll need to experiment a little bit to find coordinates that work for you.
- Hover over the screen to find a good starting point.
Tip: when you see a command that is linked like this: setPosition click it! -- it will show you other hints.
Once you've got the button moving to the middle of the screen click Finish to move on to the next challenge.
Student Instructions

Using setPosition and randomNumber

Now you try it - instead of using a fixed value, you use randomNumber to set the x and y coordinates for setPosition. Now you'll have to chase the button all over the screen!
- Make it so that the button could jump anywhere on the visible screen each time it's clicked.
- Extend it: if you want to get really nuts, you could add back in the width and height parameters of setPosition and make the size of the button also change randomly with each click!
Once you've got the button jumping around the screen. Click Finish to move onto the next level.
- Using Labels
- 20
Student Instructions
Design Mode: Add a label

Well, now we have the beginnings of a little game! Time to go back to design mode to start embellishing our program.
You try it: - Add a text label that says "Try to Catch the Button!"
- Switch back to design mode
- Drag a label on the screen

- Set the text to be something like "Try to Catch the Button!"
- Set any other properties or styles of the text label that you want.
- How Images Work
- 21
Student Instructions
How to Add Images in Design Mode
Adding an image UI element in design mode is relatively simple. But you have three options for how to get the image you want.
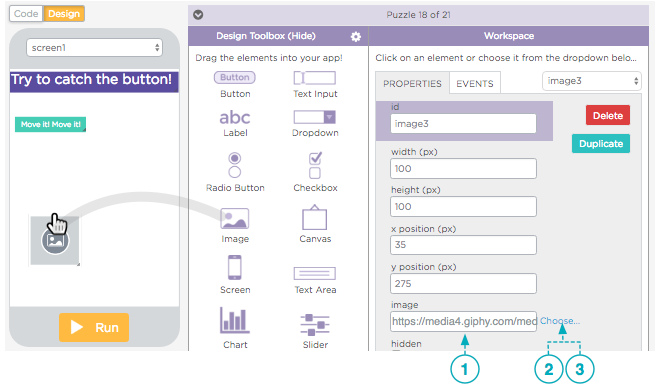
1. Copy and paste the URL of some image that already exists on the web into this box.
2. Click Choose... to upload your own image.
3. Or click Choose... to use a Pre-Loaded Icon
Enter a URL of an image on the web

There are several ways to get the URL of an image.
A common technique (shown at right) is to find an image you like on a web page and then right-click (or ctrl-click) and choose an option that says something like "Copy Image Address" then you can paste it into the text box in App Lab.
If you're unsure, you can also choose an option like "Open Image in New Tab" which isolate the image by itself and the URL will show in the address bar, which you can copy/paste into App Lab.
Common Mistake: Using the URL of an image search web site rather than a URL of the image itself.
- Make sure you get the path to an actual image file - something that ends with .jpg, .gif or .png.
- A URL that starts like this:
https://www.google.com/search?q=cat&espv=2&biw=1497....is probably wrong.
Upload your own images
If you have saved images on your computer you can upload them into app lab's asset manager. Just click Upload File and follow the dialogs on screen.
For images the file must be of type: .jpg, .png, or .gif
Once you've uploaded the image then you need to Choose it to set the image to that file. If you add multiple images you'll see them all listed every time you upload a file and you can choose to use any file that you've already uploaded.
Use a Pre-Loaded Icon
App Lab comes with a set of handy single color icons (black icon, white/transparent background) that you can use for buttons or graphics, whatever you like. You can also change the color of the icon after you add it to the app.
The trickiest part is that you need to find and click on the "Icons" tab once the asset manager pops up.

Click Continue to try it!
- Chaser Game v.1
- 22
Student Instructions
Add an Image and Make a Chaser Game!

Now You Try it - add an image to your app and modify the code so that the image jumps around the screen rather than the button. Your little game should have:
- Text on the top of the screen with a title or instructions for what to do.
- An image that "runs away" (moves randomly) based on some mouse event.
Tips:
* Hint - the easy way to do this is to simply change the IDs in onEvent and setPosition to respond to the image instead of the button.
* Remove the button from the app after the image is working. We don't need it anymore.
* Change the label text so that the instructions make sense for your game.
* The game is even more fun if you use the mouseover event instead of click
Optional Extensions:
* Make the background interesting
* Add another image that runs away.
* See what happens with the commands hideElement and showElement
* Have two UI elements where interacting with one controls or does something to the other.
Finalize your "Chaser Game v.1" and click Finish.
- Note: We'll revisit this game in the next lesson where you can improve it. This is just version 1
- Quick Check-In
- 23
Student Instructions
This level is an assessment or survey with multiple questions. To view this level click the "View on Code Studio" link.
Standards Alignment
View full course alignment
CSTA K-12 Computer Science Standards (2011)
CL - Collaboration
- CL.L2:4 - Exhibit dispositions necessary for collaboration: providing useful feedback, integrating feedback, understanding and accepting multiple perspectives, socialization.
CPP - Computing Practice & Programming
- CPP.L2:5 - Implement problem solutions using a programming language, including: looping behavior, conditional statements, logic, expressions, variables and functions.
- CPP.L3A:3 - Use various debugging and testing methods to ensure program correctness (e.g., test cases, unit testing, white box, black box, integration testing)
- CPP.L3A:4 - Apply analysis, design, and implementation techniques to solve problems (e.g., use one or more software lifecycle models).
- CPP.L3A:5 - Use Application Program Interfaces (APIs) and libraries to facilitate programming solutions.
CT - Computational Thinking
- CT.L2:12 - Use abstraction to decompose a problem into sub problems.
- CT.L3A:1 - Use predefined functions and parameters, classes and methods to divide a complex problem into simpler parts.
- CT.L3A:3 - Explain how sequence, selection, iteration, and recursion are building blocks of algorithms.
Computer Science Principles
1.1 - Creative development can be an essential process for creating computational artifacts.
1.1.1 - Apply a creative development process when creating computational artifacts. [P2]
- 1.1.1B - Creating computational artifacts employs an iterative and often exploratory process to translate ideas into tangible form.
1.2 - Computing enables people to use creative development processes to create computational artifacts for creative expression or to solve a problem.
1.2.1 - Create a computational artifact for creative expression. [P2]
- 1.2.1A - A computational artifact is anything created by a human using a computer and can be, but is not limited to, a program, an image, audio, video, a presentation, or a web page file.
- 1.2.1B - Creating computational artifacts requires understanding and using software tools and services.
- 1.2.1E - Creative expressions in a computational artifact can reflect personal expressions of ideas or interests.
5.1 - Programs can be developed for creative expression, to satisfy personal curiosity, to create new knowledge, or to solve problems (to help people, organizations, or society).
5.1.1 - Develop a program for creative expression, to satisfy personal curiosity, or to create new knowledge. [P2]
- 5.1.1A - Programs are developed and used in a variety of ways by a wide range of people depending on the goals of the programmer.
- 5.1.1B - Programs developed for creative expression, to satisfy personal curiosity, or to create new knowledge may have visual, audible, or tactile inputs and outputs.
5.1.2 - Develop a correct program to solve problems. [P2]
- 5.1.2J - A programmer designs, implements, tests, debugs, and maintains programs when solving problems.
5.4 - Programs are developed, maintained, and used by people for different purposes.
5.4.1 - Evaluate the correctness of a program. [P4]
- 5.4.1A - Program style can affect the determination of program correctness.
- 5.4.1C - Meaningful names for variables and procedures help people better understand programs.
- 5.4.1D - Longer code blocks are harder to reason about than shorter code blocks in a program.
- 5.4.1E - Locating and correcting errors in a program is called debugging the program.
- 5.4.1F - Knowledge of what a program is supposed to do is required in order to find most program errors.
- 5.4.1H - Visual displays (or different modalities) of program state can help in finding errors.
- 5.4.1K - Correctness of a program depends on correctness of program components, including code blocks and procedures.
- 5.4.1M - The functionality of a program is often described by how a user interacts with it.
CSTA K-12 Computer Science Standards (2017)
AP - Algorithms & Programming
- 3A-AP-16 - Design and iteratively develop computational artifacts for practical intent, personal expression, or to address a societal issue by using events to initiate instructions.
CS - Computing Systems
- 3A-CS-03 - Develop guidelines that convey systematic troubleshooting strategies that others can use to identify and fix errors.