Lesson 17: Linking Prototype Screens
Overview
Question of the Day: How can I combine screens to create a complete digital prototype?
In this lesson teams combine their digital prototype screens into a single app, which they can then link together using code. They share their project’s import URLs with each other, then import each teammate’s screen into their own app. Each student works independently to add events to their code to link the screens together, completing their digital prototype.
Purpose
This lesson is the final step in creating their digital prototypes, which they will then test and adjust in the next few lessons. Team Working skills are emphasized in deciding how to communicate their project URLs with each other, and design skills are emphasized when each student has imported their screens and is continuing to build their app.
Assessment Opportunities
-
Integrate all components from collaborative work into a final computational artifact.
Code Studio: See rubric on bubble 3.
-
Create a digital prototype that incorporates the user flow for a computational artifact
Wrap up: Student solutions should allow the user to click through several of the proposed tasks for the apps.
Agenda
Warm Up (5 min)
Activity (35 min)
Wrap Up (5 min)
View on Code Studio
Objectives
Students will be able to:
- Integrate all components from collaborative work into a final computational artifact.
- Create a digital prototype that incorporates the user flow for a computational artifact
Links
Heads Up! Please make a copy of any documents you plan to share with students.
For the Teachers
- Unit 4 The Design Process - Slides
Teaching Guide
Warm Up (5 min)
Discussion Goal
Goal: This prompt is a review of yesterday’s lesson. Try to draw out that there are several steps to complete in this process:
- import the screen your teammate created
- add an event handler to your code using the button ID
- use the
setScreenblock to change to the new screen
Getting Prepared
Distribute: Make sure each team has their materials available.
Journal
Prompt: Today we will be combining all of our digital screens into a single app. Based on yesterday’s lesson, what are the steps it will take to get a button on your screen to click and change to a screen that a teammate created?
Discuss: Have students journal on their own, then discuss in a group then share as a class.
Remarks
Today we will be combining all of our screens to create our digital prototypes! By the end of this lesson, each person on your team should have their own working version of your app that we will use for testing and feedback tomorrow.
Question of the Day: How can I combine screens to create a complete digital prototype?
Activity (35 min)
Teaching Tip
Debugging Screen Imports: There are several potential stumbling blocks that teams may run into during the import process:
- Miscommunicated urls: The sharing URLS are long and complicated, so students will need a shared location where they can copy/paste their urls
- Conflicting screen IDs: Importing a screen with the same ID as an existing one will allow you to overwrite the existing screen. This is particularly troublesome when students leave the default screen ID "screen1"
- Conflicting element IDs: If students have properly namespaced all of their elements this shouldn't be an issue, but any elements that have the default ID or share an ID with an existing element will prevent a screen from importing
Working Independently: Once teams move to the programming phase of this project, it becomes much more difficult for students to collaborate on the same app. The design phase is the primary opportunity for all students to collaborate on the app - after this teams will still be working together, but each student will be working on their own copy of the app. Encourage students to use this as an opportunity to be creative and add personal style decisions to their personal version of the team app.
Combining Project Screens
Prepare: Give teams a few minutes to review the state of their screens, identifying any remaining work to be done before combining them. Once they are ready, have students share their screen import URLs according to the plan they made at the end of yesterday’s lesson.
Code Studio: Have students log into their computers and open Code Studio. The first level has students import all of the screens from their teammates. The next level has students add the code for the event handlers so students can click through each screen.
Circuate: Monitor students as they complete the tasks above. Teams may be in different stages of development - some teams may still need support finishing their screens, some teams may need help sharing their screens with each other, and some teams may need help adding the events to their code. Regardless of each team’s progress, provide support and encouragement to help teams progress and move to the next steps of their prototype development.
Share: Give students a chance to share their prototypes with each other and do some initial testing. Because every student is now working on a separate version of the team app, each app will likely be slightly different.
(Optional) Share Via Phone: Depending on the norms and rules of your classroom, you may decide to make a temporary exception and allow students to test their apps on their own devices. App Lab is modeled after the apps we use on our phones, so it can be incredibly exciting for a student to load the app they made on their own device. To do this, students press the “Share” button in the upper-left corner of their project and then press “Send to Phone”. This opens a menu where students can send the app to their device via a text message, or scan a QR code. These instructions are also in the slides for this unit - if you decide to skip this step, make sure to also delete this slide from the presentation.
Wrap Up (5 min)
Teaching Tip
Testing Outside of Class: Now that each student has their own copy of the app, they can share the app with friends and family outside of the classroom. This is especially true if you’ve allowed students to share the app to their phones. Encourage students to do some initial sharing and testing outside of class. This helps get some initial feedback on the app, but also gives students a chance to share their excitement and hard work with their community.
Team Debrief
Remarks
Now that we have our digital prototypes, it’s time to test them! Tomorrow we’ll do another round of user feedback, where you will have a chance to test each other’s apps. Right now, each team member has their own version of the team app. For tomorrow, we need to pick one of these versions that we will use for testing
Discuss: Have teams discuss with each other which team member’s app they will use for testing tomorrow. If several students have apps “complete enough” for testing, teams can use a random process to make a decision (such as flipping a coin or rolling a dice).
- Lesson Overview
- Student Overview
Teaching Tip
Catching Up
If students missed the previous lesson, or were unable to complete the home screen, you can have them import this completed version of the home screen https://studio.code.org/projects/applab/Y3yxoz85-vy5Hpq8R4qOTQ/. See the Screen Import Map for details.
Student Instructions
Adding a New Screen
To complete your app, you're going to need more than just a home screen. Each card that you created in your paper prototype is represented by a "screen" in App Lab. To create more screens, just click the dropdown at the top of the app display and select "New Screen..."

Do This
- Create a New Screen and give it the ID "about".
Student Instructions
Click to expand
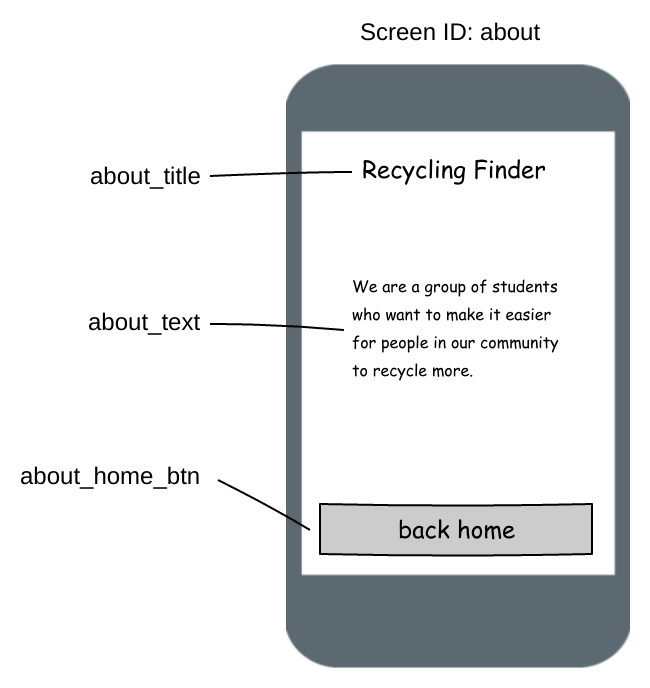
Design the About Screen
To add elements to your new About screen, you'll need to first select it from the screens dropdown.
Do This
- Complete the About screen using the prototype to the right.
- Use the screens dropdown to switch between your Home and About screens.
Student Instructions
Click to expand
Screen Import
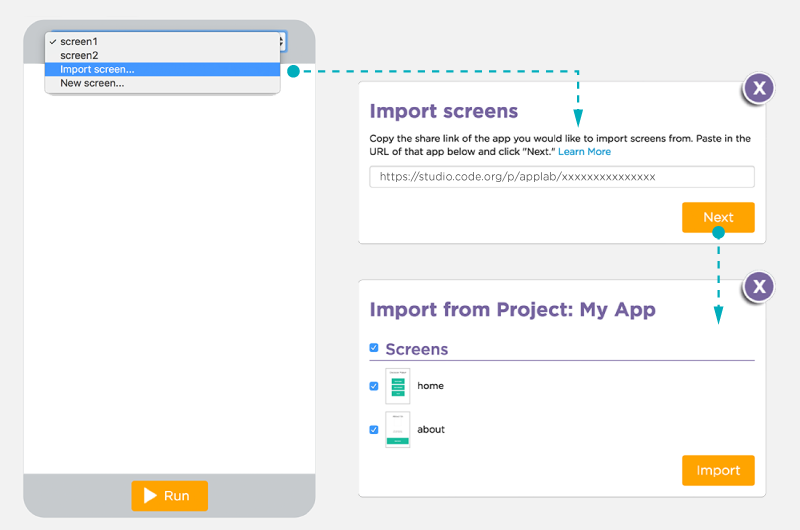
In addition to adding new blank screens, you can import screens from "Import Screen..." To import a screen from someone else, you'll need them to give you the sharing URL.
Note: Screens you import must not share any IDs with elements already in your app!
Do This
Another student has created a search results screen that you can import into your app. Their app's share link is https://studio.code.org/projects/applab/XkcpDVj8MJWQvUr9OSgIlA/
- Select "Import Screen... from the screens dropdown.
- Copy and paste the above url into the import screens dialog.
- Select the screen you wish to import.
- Click Import to import the screen.
- Use the screens dropdown to switch between your Home, About, and Search screens.
Student Instructions
Contact Screen Import
Yet another student created a Contact screen that you can import into your app. Their share link is https://studio.code.org/projects/applab/QUAOln68kifScEwQauwNqw/
Do This
- Select "Import Screen... from the screens dropdown.
- Copy and paste the above url into the import screens dialog.
- Select the screen you wish to import.
- Click Import to import the screen.
- Use the screens dropdown to make sure your app has Home, About, Contact, and Search screens.
- Multi-Screen Apps
- Teacher Overview
- Student Overview
Cards to Screens
To simplify the prototyping process, teams can think of each card that they created in the Paper Prototyping as a separate screen in the App Lab iteration of their app. In reality, screens that are very similar can often be developed as a single screen with content that changes based on user interaction. In the next lesson students will see some examples of how that could work, but it's not expected that they incorporated that kind of functionality in this project.
- Importing Screens
- Teacher Overview
- Student Overview
Promoting Teamwork
The following levels will prepare teams to merge all of their separate screens into a single app. There are two potential stumbling blocks that teams may run into during the import process:
- Miscommunicated urls: The sharing URLS are long and complicated, so students will need a shared location where they can copy/paste their urls
- Conflicting screen IDs: Importing a screen with the same ID as an existing one will allow you to overwrite the existing screen. This is particularly troublesome when students leave the default screen ID "screen1"
- Conflicting element IDs: If students have properly namespaced all of their elements this shouldn't be an issue, but any elements that have the default ID or share an ID with an existing element will prevent a screen from importing
Once teams move to the programming phase of this project, it becomes much more difficult for students to collaborate on the same app. The design phase is the primary opportunity for all students to collaborate on the app - after this teams will still be working together, but each student will be working on their own copy of the app.
Student Instructions
Button Events
With our screens in place, it's time to start actually programming the app so that it responds to button clicks. For each button on each screen, you'll want to add an onEvent block that watches for that button to be clicked and responds appropriately. To start off with we'll just watch the home_search_btn button and print something to the console when it's clicked
Do This
You're now in Code Mode (you can use the buttons above your app to switch between Code Mode and Design Mode). This is where you can write the code that will respond to users interacting with your app.

- Drag out an
onEventblock from the code toolbox. - Select
home_search_btnfrom the "id" dropdown. - Drag out a
console.logblock from the variables drawer. - Run your app.
- Click the Search button and look for messages in the console.
Student Instructions
Changing Screens On Click
The setScreen block will change your app to whichever screen you specify. If you place a setScreen block inside an onEvent block, you can program your buttons to change to the correct screen.
Do This
Using the onEvent block that you've created, make your program change to the "search" screen when the home_search_btn is clicked.
Assessment Opportunities
Create an event that detects and responds to user input
Extensive Evidence
Each button links to the correct screen in the prototype.
Convincing Evidence
Several of the buttons in the prototype link to the appropriate screen.
Limited Evidence
There is at least one event in the prototype that can be trigged to produce some sort of response.
No Evidence
There are no events in the prototype.
Student Instructions
Wire Up the Other Buttons
Now that you've made one button work, just follow the same pattern for all of your others.
Do This
- For each button, create an event that links to the appropriate screen when the button is pressed.
- Run your app and test that all of the buttons work.
- Responding to User Input
- Teacher Overview
- Student Overview
Just the Facts
There's a lot to consume here and many of the details about how events work in App Lab are not totally necessary to understand for our needs in this unit. If students are struggling with how programming works in App Lab, focus on these essentials:
- There is no
drawloop that runs forever - The
onEvent()block specifies:- an element ID
- an event (such as "click" or "mouseover")
- code that should be run when the event occurs (this code is technically an anonymous callback function, represented by the green block)
- Code inside
onEvent()blocks runs any time the specified event occurs
Compared to Game Lab
In Game Lab, we might use the following code to check if a sprite named "button" was clicked and do something about it:
function draw() {
    if (mousePressedOver(button)) {
        // Do something
    }
}
In App Lab, given a button with the ID "button", we could write the following code to achieve the same goal:
onEvent("button", "click", function () {
    // Do something
});
In the App Lab example, the function is just another argument passed to the onEvent function, it just so happens that the argument must be a function itself. We could also define the function separately and write this same program as follows:
function doSomething() {
    // Do something
}

onEvent("button", "click", doSomething);
In the second example, notice that when we pass the function doSomething to the onEvent function we don't include the parenthesis at the end. This is because we're actually passing the whole function as an object.
- Changing Screens
- Teacher Overview
- Student Overview
Limited Programming Required
The goal of this unit is to get students thinking about the role design plays in developing a product and to help them build empathy for end users. This is not a programming focused unit, and the extent to which students will be expected to program is represented in its entirety here. Students will get a chance to delve deeper into App Lab, and to learn more about how onEvent works, in unit 6.
Teaching Tip
Breaking for the Day
Depending on how much time you have in class, this can be a great point to break for the day. This and the next level can be quite time consuming, so if you are running short on time, consider jumping to the Screen Pair activity described in the Extension Activities for this lesson.
Team Time
Though students are working on their individual copies of their team app at this point, encourage teams to be active and vocal through this portion of the lesson. Any issues that students encounter when importing their teammates' screens can only be resolved through teamwork, and will likely be a problem for all members of the team.
Student Instructions
Back To Your App
Now that you've had some practice with importing screens, it's time to start working on your team's app.
Do This
Each member of your team is going to create their own copy of the app, with all of the team members' screens imported in. This will be your copy of the app, and the copy that you will start to add code to in the next lesson. (Don't forget that you'll also need to import your own screen into this project.)
- Collect all of the sharing urls for your team's pages, including your own
- Each team member can find the share url for their own screen by going back to the last level of the previous lesson, or by finding the screen in their projects directory
- Import each of the screens, one at a time
- If you run into an ID error with one of the screens, discuss the issue with the screen's creator so it can be fixed and imported
- Delete the default "screen1"
- Set the main screen as the default
Don't worry about adding any code at this point; we'll get to that in the next level.
Assessment Opportunities
Integrate all components from collaborative work into a final computational artifact.
Extensive Evidence
All screens from each team member are included in the project, and each button links to the appropriate screen.
Convincing Evidence
All screens from each team member are included in the project, and most buttons link to the appropriate screen, but there may be minor errors that prevent all buttons from working.
Limited Evidence
Screens from multiple team members have been incorporated into the project, and at least one button links to another screen.
No Evidence
No buttons link to other screens in the project.
Student Instructions
Linking Screens
With all of your screens in place you can start adding events that will change the screens. When you're done with this step you'll actually have an interactive prototype!
Do This
For each screen of your app:
- Find all of the button IDs
- For each button, add an event handler that watches that ID
- In each event handler, use
setScreen()to move the the right screen - Test it all out!
Depending on the number of screens and buttons your app has, this can be a pretty involved process. Make sure that you test your work often, using console.log() blocks to debug any strange behavior with your app. When you think you've got the whole thing working, compare your app with other members of your group to see if they work the same.
Standards Alignment
View full course alignment
CSTA K-12 Computer Science Standards (2017)
AP - Algorithms & Programming
- 2-AP-13 - Decompose problems and subproblems into parts to facilitate the design, implementation, and review of programs.
- 2-AP-14 - Create procedures with parameters to organize code and make it easier to reuse.
- 2-AP-15 - Seek and incorporate feedback from team members and users to refine a solution that meets user needs.
- 2-AP-16 - Incorporate existing code, media, and libraries into original programs, and give attribution.
- 2-AP-18 - Distribute tasks and maintain a project timeline when collaboratively developing computational artifacts.
- 2-AP-19 - Document programs in order to make them easier to follow, test, and debug.
IC - Impacts of Computing
- 2-IC-22 - Collaborate with many contributors through strategies such as crowdsourcing or surveys when creating a computational artifact.