Lesson 15: Build a Digital Prototype
Overview
Question of the Day: How can I design a digital prototype from a paper prototype?
Having collaboratively developed a paper prototype for their apps, groups now divide and conquer to begin work on an interactive digital version based on the paper prototype. Using the drag-and-drop design mode of App Lab, students individually work through a progression of skill-building levels to learn how to build digital versions of a paper prototype. From there, each group member builds out at least one page of their app in App Lab, to be later combined into a single app.
Purpose
This lesson introduces students to the design mode interface of App Lab, and to the process of translating a paper prototype to digital. They'll use this as a tool to iterate on their paper prototypes, first by building up an exemplar app screen, and eventually building up to an interactive app prototype by the end of the lesson.
Assessment Opportunities
-
Create a digital prototype of an application screen
Code Studio, level 2: See rubric. You may need students to turn in their paper prototypes, or circulate while students are working on the project, to ensure that the digital and paper prototypes are consistent.
Agenda
Warm Up (5 min)
Activity (35 min)
Wrap Up (5 min)
View on Code Studio
Objectives
Students will be able to:
- Create a digital prototype of an application screen
Preparation
- Have extra copies of the Screen Design Activity Guide available for students
Links
Heads Up! Please make a copy of any documents you plan to share with students.
For the Teachers
- Unit 4 The Design Process - Slides
For the Students
- Screen Design (2021) - Activity Guide
Teaching Guide
Warm Up (5 min)
Discussion Goal
Goal: This is a quick task that helps transition students back into completing their Screen Design activity guides, or be prepared to jump into today’s activity of designing these screens in App Lab. This is one last check that each team is preparing their IDs for a successful implementation in App Lab.
Getting Prepared
Distribute: Make sure each team has their materials available, including their paper prototypes and Screen Design Activity Guides from yesterday.
Team Check-In
Prompt: Lay out all of the Screen Design Activity Guides your team has completed so far. It’s okay if not every screen is finished yet. Look over the IDs for each screen and check that:
- Each screen has a name that contains only letters and no spaces
- Each ID starts with the screen name
- All of the IDs are unique across all the screens
Discuss: Students don’t need to write anything down for this prompt - they can complete it as a group via discussion.
Remarks
Preparing our screens is an important step that will make our digital prototypes more organized and save us time when preparing screens in App Lab. Today we will finish planning for any remaining screens in our app, then spend most of our time building these screens in App Lab.
Question of the Day: How can I design a digital prototype from a paper prototype?
Activity (35 min)
Screen Design Planning
Do This: Have students complete any remaining Screen Design Activity Guides for their app’s screens, focusing on planning the ID names. If some team members finish before others, you can suggest that they help their other teammates finish their remaining screens.
Teaching Tip
Multiple Screens: At this point, students haven’t learned how to add multiple screens to their apps - this happens in the next lesson. However, if a student is in charge of designing multiple screens for their team, you can show them how to add a new screen from Design Mode so they can complete all of their screens on this single level.
Building Screens in App Lab
Code Studio: When students have finished their Screen Designs, have them log into Code Studio. There is a single level for students to design the screen for their app.
Circulate: Monitor students as they build their screens in App Lab, answering questions and providing feedback to students on their design. Encourage students to use their teammates as resources, getting quick feedback or asking questions. Most of the class will be spent with students designing their screens.
Sharing Designs
Share: If there is time, have students share their screens with the class, focusing on the different designs that teams created for their apps.
Wrap Up (5 min)
Discussion Goal
Goal: There is no single right answer to this prompt - the goal is to reflect on the process of converting a paper prototype into App Lab. Students may notice that the elements in App Lab make certain types of designs more difficult - for example, it’s hard to have curves or wavy lines as part of the design. Students may also realize that their paper prototypes were too “compact” with too much information on one screen - when they tried to recreate in App Lab, the text or icons may have been too small to read.
Collect: Collect all the materials from each team in a safe storage location.
Journal
Prompt: How did your initial paper designs change when you recreated them in App Lab? What kinds of adjustments did you have to make?
Discuss: Have students journal individually first, then have students share with a partner before asking a few students to share with the class.
- Lesson Overview
- Student Overview
- Intro to Design Mode
- Teacher Overview
- Student Overview
Discussion Goals
The purpose of this video is to give students a quick tour of design mode in App Lab, which they will be using for the rest of the unit. Students should know how to switch to design mode so that they can create the user interface of the app. They should also recognize the various elements that can be added in design mode. These are similar to those that they saw in the activity guide for Paper Prototypes, two lessons previously.
Questions to Consider
- Where in App Lab can you design the user interface of your app?
- What are some types of elements that you can add to your app?
Teaching Tip
Students will be using App Lab to create a simple prototype for their app. Students who want to go further in making their apps functional can learn more about App Lab, watch demo videos, and work through tutorials at https://code.org/educate/applab.
Student Instructions
Click to expand
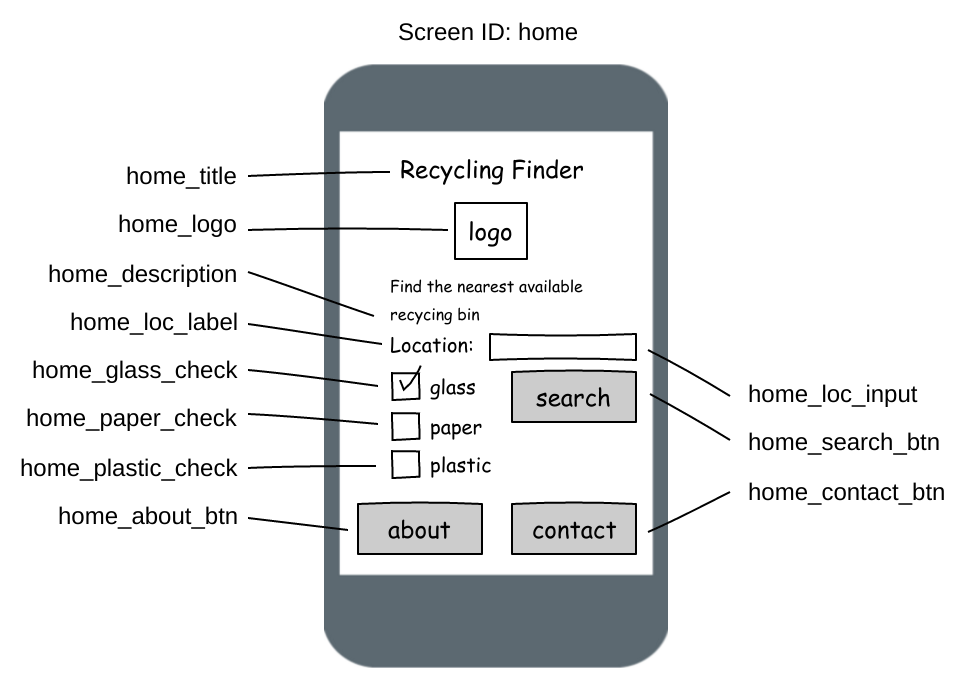
Creating a digital prototype
Using the prototype to the right (click the image to enlarge it) you're going to create a digital prototype of the example app "Recycling Finder". We've already added a few of the elements for you, including the title, but it doesn't look quite right yet. We'll go over each element of this as we go, but for now let's just focus on the title.
Do This
- Make sure you are in Design Mode, the switch appears above your app window on the left.
- Click on the title text to view its properties.
- Change the property "text" to "Recycling Finder".
- Change the "font size" to make the title larger.
- Change the "text alignment" so the title is centered on the screen.
Note: Make sure you click "Run" before moving on to save your progress.
Student Instructions

Click to expand
Adding more text
Each screen of your app is composed of multiple design elements. You can drag out elements from the "Design Toolbox" on the left side of the workspace. To add more blocks of text, just drag out additional "label" elements.
Do This
- Drag out a new "label" element and place it where the "home_description" text should be.
- Change the id to match the prototype (home_description)
- Change the field "text" to match the prototype.
- Resize the text area by clicking and dragging the bottom right corner.
- Change any other properties to make the text look like you want it to.
Student Instructions
Click to expand
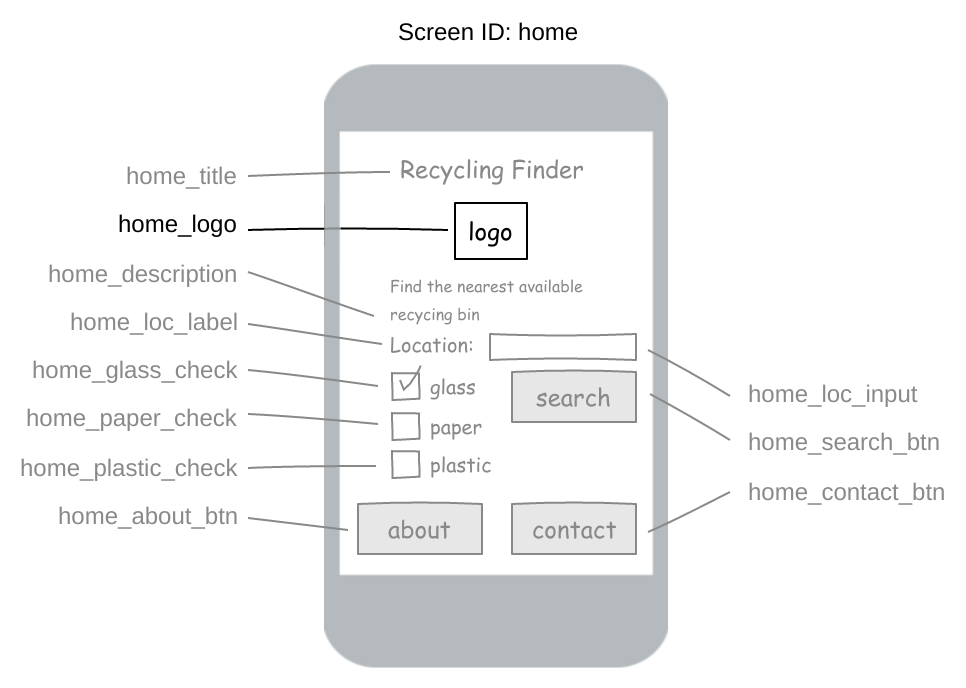
Adding images
The prototype just has a plain black square where the logo should be - let's add an image to spice it up. The "image" element allows you to either upload an image from your computer or select from a library of graphic icons.
Do This
- Drag out a new "image" element and place between the description and the title.
- Change the id to match the prototype.
- Click the "Choose..." link next to the "image" field.
- Select the "Icons" tab and choose an icon for your logo.
- Change the color of the icon using the "icon color" field.
Student Instructions
Click to expand
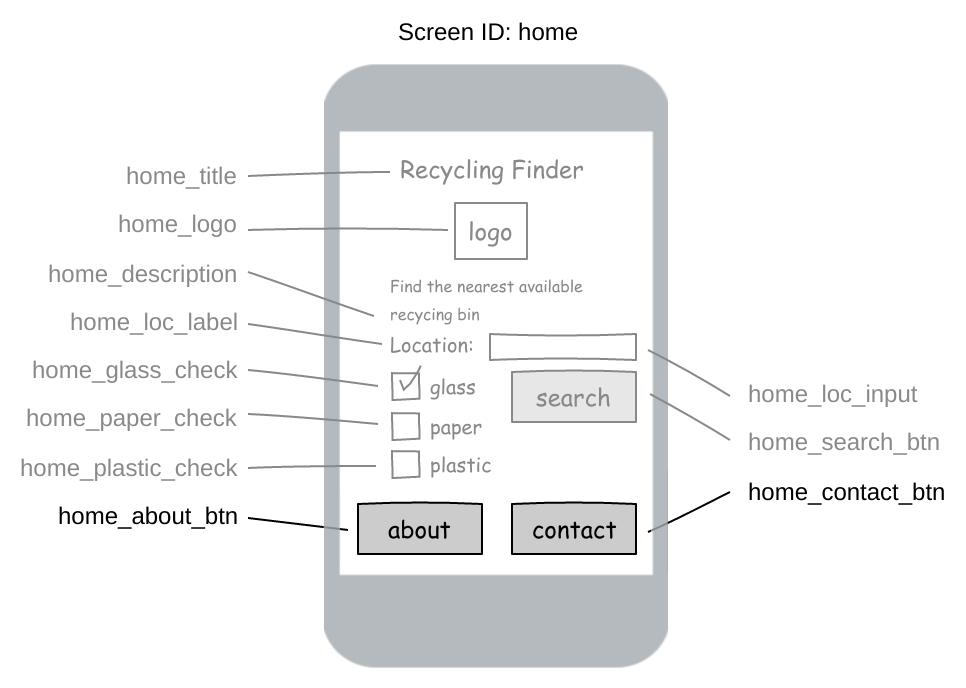
Adding buttons
Buttons allow your user to interact with your app. This prototype screen will need three buttons (each shaded gray on the prototype.) We've already added the Search button, so you just need to add Contact and About.
Do This
- Drag out a new "button" element for each of the two remaining buttons.
- Change the ids to match the prototype.
- Change the text to match the prototype.
- Modify other properties to make the screen look like you'd like.

- Tour of Design Mode
- Student Overview
Student Instructions

Click to expand
Making a Search Box
The search box in our prototype can be created using a "Text Input" element. This is a box that your user can type into, and later your software can read what was entered and do something with it.
Do This
- Add a Text Input element.
- Change the id to match the prototype.
- Add a Label with the text "Location" next to your text input.
Student Instructions

Click to expand
Checkboxes
The type of recyclables you're searching for can be set using "Checkbox" elements. We already added a checkbox and label for glass, so you just need to add ones for paper and plastic.
Do This
- Add a Checkbox for each of the options.
- Change the ids to match the prototype.
- Add labels to describe each checkbox.
Assessment Opportunities
Select the appropriate input element for a given type of information.
Extensive Evidence
All of the given elements are included on the screen, and their properties have been set such that the screen looks very similar to the example image.
Convincing Evidence
Almost all of the given elements are included on the screen, including at least one text element, button, text input, image, and checkbox that were not in the starter project.
Limited Evidence
Some of the given elements are included on the screen, including at least one text element and one button that were not in the starter project.
No Evidence
Very few of the given elements are included on the screen.
Student Instructions
Click to expand
Finishing Touches
By now you should have a fairly complete (though non-functional) digital version of the paper prototype we started with. All that's left to do is check back over your paper prototype and add any final touches you might have missed.
Do This
- Check over the prototype to make sure you've included everything.
- Read through your IDs and fix any that aren't descriptive.
- Clean up any rough edges by resizing or moving around elements.
- Design Mode Elements
- Teacher Overview
- Student Overview
Developing Good Programming Habits
Following clear and consistent naming conventions is an important habit to develop, but the benefits are rarely immediately obvious to students. It really pays off in the long term to be a stickler for well named IDs, particularly because it will save your own sanity when it comes time to read your students' programs, but it will also simplify the process of combining each student's screen into a full team app.
- Design a Screen for your App
- Teacher Overview
- Student Overview
Namespacing
Ensuring that all students are both creating unique IDs for all elements and properly namespacing them will go a long way towards avoiding issues in the next lesson, so it pays to be a stickler here. You can provide students with the optional Screen Design Activity Guide to keep track of their element IDs.
Working together, apart
Even more so than the the paper prototyping activity, it is easy for students in this lesson to forget that they need to consider how their choices affect their team. Encourage active discussion among teams as they design screens to ensure that they are all working towards a common goal.
Mocking Up Your App
Now that you have some practice laying out elements in App Lab, you can start working on mocking your own app. With your group, divvy up the screens so that everyone is working on a different screen.
Because you'll be dividing the work up, you'll want to do some planning ahead of time to decide on a common look and feel for your pages. For example, you'll want to agree on things such as:
- Where do navigation buttons go?
- What colors will you use for backgrounds, text, and buttons
- What's the general style and layout?
Namespacing
In the next lesson you will combine all of your team members' screens into one app. To make sure that the IDs on one page don't conflict with another you'll need to include a unique namespace for your page. This will be something you add to the beginning of every id so that your element ids don't conflict with others when you merge everyone's screens together. Your namespace should be the ID of your screen with an underscore at the end. For example, if you are making the home page, you might use "home_" as your namespace - leading to ids such as:
- "home_title"
- "home_loginButton"
- "home_logo"
- App Project: Screen Design
- 13
Assessment Opportunities
Create a digital prototype for an application screen.
Extensive Evidence
The digital prototype is a good recreation of the paper prototype, with only very minor inconsistencies.
Convincing Evidence
Most elements in the paper prototype have been recreated in the digital prototype, but there may be some inconsistencies with layout, sizing, or a few minor missing elements. Inconsistencies would not affect the functionality of the prototype.
Limited Evidence
Some elements of the paper prototype have been recreated in the digital prototype, but there are enough inconsistencies to affect the functionality of the prototype.
No Evidence
There are no elements in the digital prototype, or the elements are not consistent with the paper prototype.
Student Instructions
Mocking Up Your App
Using your paper prototype, create a digital version of your screen using the Design Mode elements you've learned about.
Do This
- Rename the screen to match your namespace.
- Use the built-in elements to lay out your app screen, giving each a proper ID
- For example, if your namespace is
home_you might create IDs like:home_titlehome_login_buttonhome_logo
- For example, if your namespace is
- For any components of your app that can't be recreated with the built in elements you can either:
- Redesign to utilize built in elements
- Find an image to use in place of your element
- Draw the element using your preferred image editor
- Make sure that you and your teammates are regularly looking at each other's designs to ensure consistent style
Standards Alignment
View full course alignment
CSTA K-12 Computer Science Standards (2017)
AP - Algorithms & Programming
- 2-AP-13 - Decompose problems and subproblems into parts to facilitate the design, implementation, and review of programs.
- 2-AP-15 - Seek and incorporate feedback from team members and users to refine a solution that meets user needs.
- 2-AP-16 - Incorporate existing code, media, and libraries into original programs, and give attribution.
- 2-AP-18 - Distribute tasks and maintain a project timeline when collaboratively developing computational artifacts.
- 2-AP-19 - Document programs in order to make them easier to follow, test, and debug.
CS - Computing Systems
- 2-CS-01 - Recommend improvements to the design of computing devices, based on an analysis of how users interact with the devices.
IC - Impacts of Computing
- 2-IC-22 - Collaborate with many contributors through strategies such as crowdsourcing or surveys when creating a computational artifact.