Day 1

CSD 2019-20 Workshop 1 - 1 Day

Agenda Walkthrough Resources

In place of the agenda walkthough video, we now have a series of resources designed to help facilitators familiarize themselves with the workshop agenda.

  • Agenda Comparison Video
    This video is a high level overview of how the 2019 agenda compares to the 2018 agenda. We recommend watching this video before reading the agenda. slides

  • Workshop 1 Goals and Theme Video
    This video introduces the theme for workshop 1 and outlines how the theme unfolds throughout the workshop. We recommend watching this video after reading the agenda. slides

  • Opportunities for Equity
    This resource calls out opportunities for a facilitator to create an equitable workshop environment and ways for teachers to create an equitable classroom environment in a programming unit. We recommend reviewing this resource after reviewing the agenda for workshop 1.

  • Essential Content
    It is important for facilitators to be familiar with all content in Unit 3 before facilitating workshop 1. This resource identifies specific lessons of focus within workshop 1. We recommend reading this resource after reading the full agenda. This resource is especially recommended for new facilitators or facilitators that are new to CS.

Printing Agendas

There are two ways to get a PDF of the whole detailed agenda. The second one takes a few more steps but makes a nicer formated PDF.

  1. PDF of Detailed Agenda
  2. Go to https://curriculum.code.org/plcsd-19/q1/compiled. When you get to that page right click. From the menu that pops up click print. From there you should be able to print or save it as a PDF.

For the high level agenda(like one on the right) that is printable and editable go to:

Google Sheet View of High Level Agenda

  • Covering content that is scheduled for weeks 10 - 16 (unit 3) of the year.Workshop should be 5 - 8 weeks into the school year. Err on the earlier side.
  • If you are planning for a two day workshop, use the Crafting 2-day Academic Year Workshops Guide as a resource to modify two one-day agendas into a 2-day agenda that meets the needs of your cohort.

Goals

  • Time to share/discuss highlights and concerns from your classroom
  • Time to discuss region specific concerns or interests
  • Prepare to teach upcoming lessons. Try activities and discuss each type of lessons teachers will see in unit 3.
  • Reflect on classroom practices and continue to grow and transform teaching practice
  • Build the community of teachers
  • Discuss how you have been addressing assessment in your classroom and look at future assessments to plan for ways to assess student learning in the future.
  • Reflect on the student needs that come up in your classroom, how you have had to adapt to those needs, and what needs you are still in need of more ways to support.

Prepping for Sessions

Review Past Workshop(s)

Review how things went during your Previous Workshop

  • Review your feedback from teachers in the Workshop Dashboard to see what needs you can address and how you can continue to improve you local workshops
  • Talk about feedback for each other in how you can better prepare for the workshop together, how you run certain sessions, and other ways you can grow as individuals and a team
  • Make a plan together for actions you are going to take during this workshop to improve

Supplies

Provided By Regional Partner Teachers Should Bring
Room set up for table groups of 4-5 teachers
Room with reliable wifi
Power Strips
Projector
Speaker System
24 Pens
2 Easel Pads
10 Large 3x4 Post-it Notes
16 Medium 3x3 Post-it Notes
12 Small 1x2 Post-it Notes
8 sets 8-pack Markers
Blue Painter's Tape
Scissors
Printed Curriculum Guide
Journal
Computers

Connect with your regional partner

Prior to the workshop find time to meet in person or virtually with both facilitators and the regional partner to discuss:

Subject Conversation Points
Supplies
  • Go through the list of necessary supplies together
  • Make a plan for when different supplies will be set up/provided
Online Workshop Dashboard
  • Look at the registration. Are teachers signed up? What do you need to do to make sure all the teachers are registered?
  • Make sure facilitators are added on the workshop so you will be able to take attendance
Venue
  • Discuss the set up of the space
    • What does the room look like?
    • What does the table set up look like?
    • Will the space have a projector? Do we need to bring certain type of hook ups?
    • Will the space have a sound system? If not how do you plan to play videos during the week?
    • Is the other course workshop co-located?
  • How do we get into the building?
  • Are there any directions about parking or locating the space?
Workshop Timeframe
  • What time are we scheduled to start with teachers?
  • What time are we scheduled to end with teacher?
  • What time can we come in to prep in the morning?
  • What time can we stay to debrief till in the afternoon?
Food
  • What food will be provided for participants during the workshop?
  • What time will food be set up?
  • Is there a separate room for lunch?
Agenda
  • Is there any local material to cover during this workshop?
  • How long do you anticipate it taking to cover the material (Check that the time suggested fits within the amount of Local Flex Time for this workshop)?
Staff
  • Will someone from your organization be on site for the day of the workshop?
  • If yes, who is the staff member and how should we contact them if needed?
  • If no, who should we contact in case something comes up during the workshop that we need your organizations support with?

Review Materials

On your own review the following materials so you are familiar with the details of each.

Facilitator Materials Teacher Materials

Make a plan

You should go through every session to make a plan for how you and your co-facilitator will support each other in running the session.

Use the Session Planning Template to guide your planning.

Don't forget to check the pre-survey results to determine what lessons to focus on during the TTL progression. The survey gets sent out to teachers automatically 10 days before the workshop. You can view the results on the Workshop Dashboard.

Create Materials For Region

  • A copy of the CSD - Workshop 1 - Slides Template - 2019 for the workshop, that you have updated according to your needs.
  • A copy of the CSD - Workshop 1 - Notes Template to share with teachers
  • Set up a section for your workshop participants to join (if everyone is already in one together from summer then you are all set!):
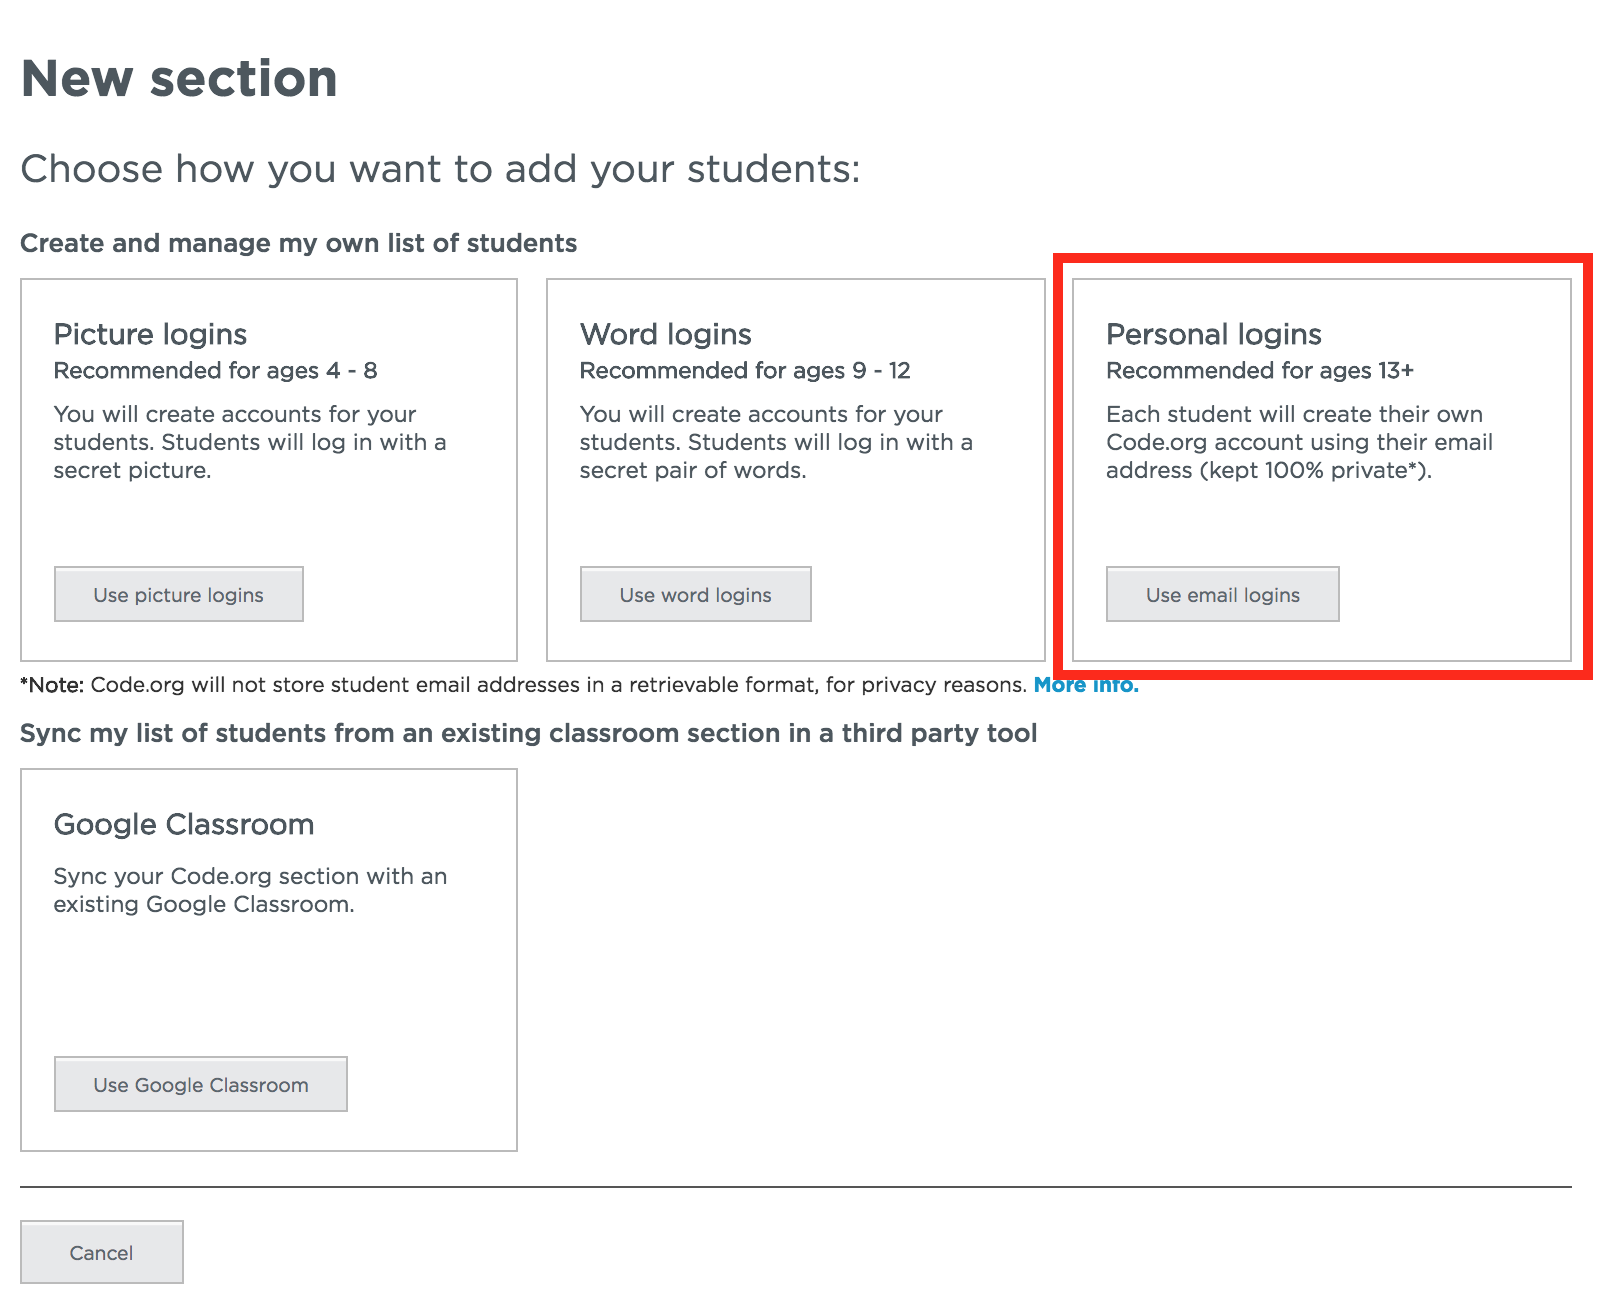
    1. Create a new section using the email login type

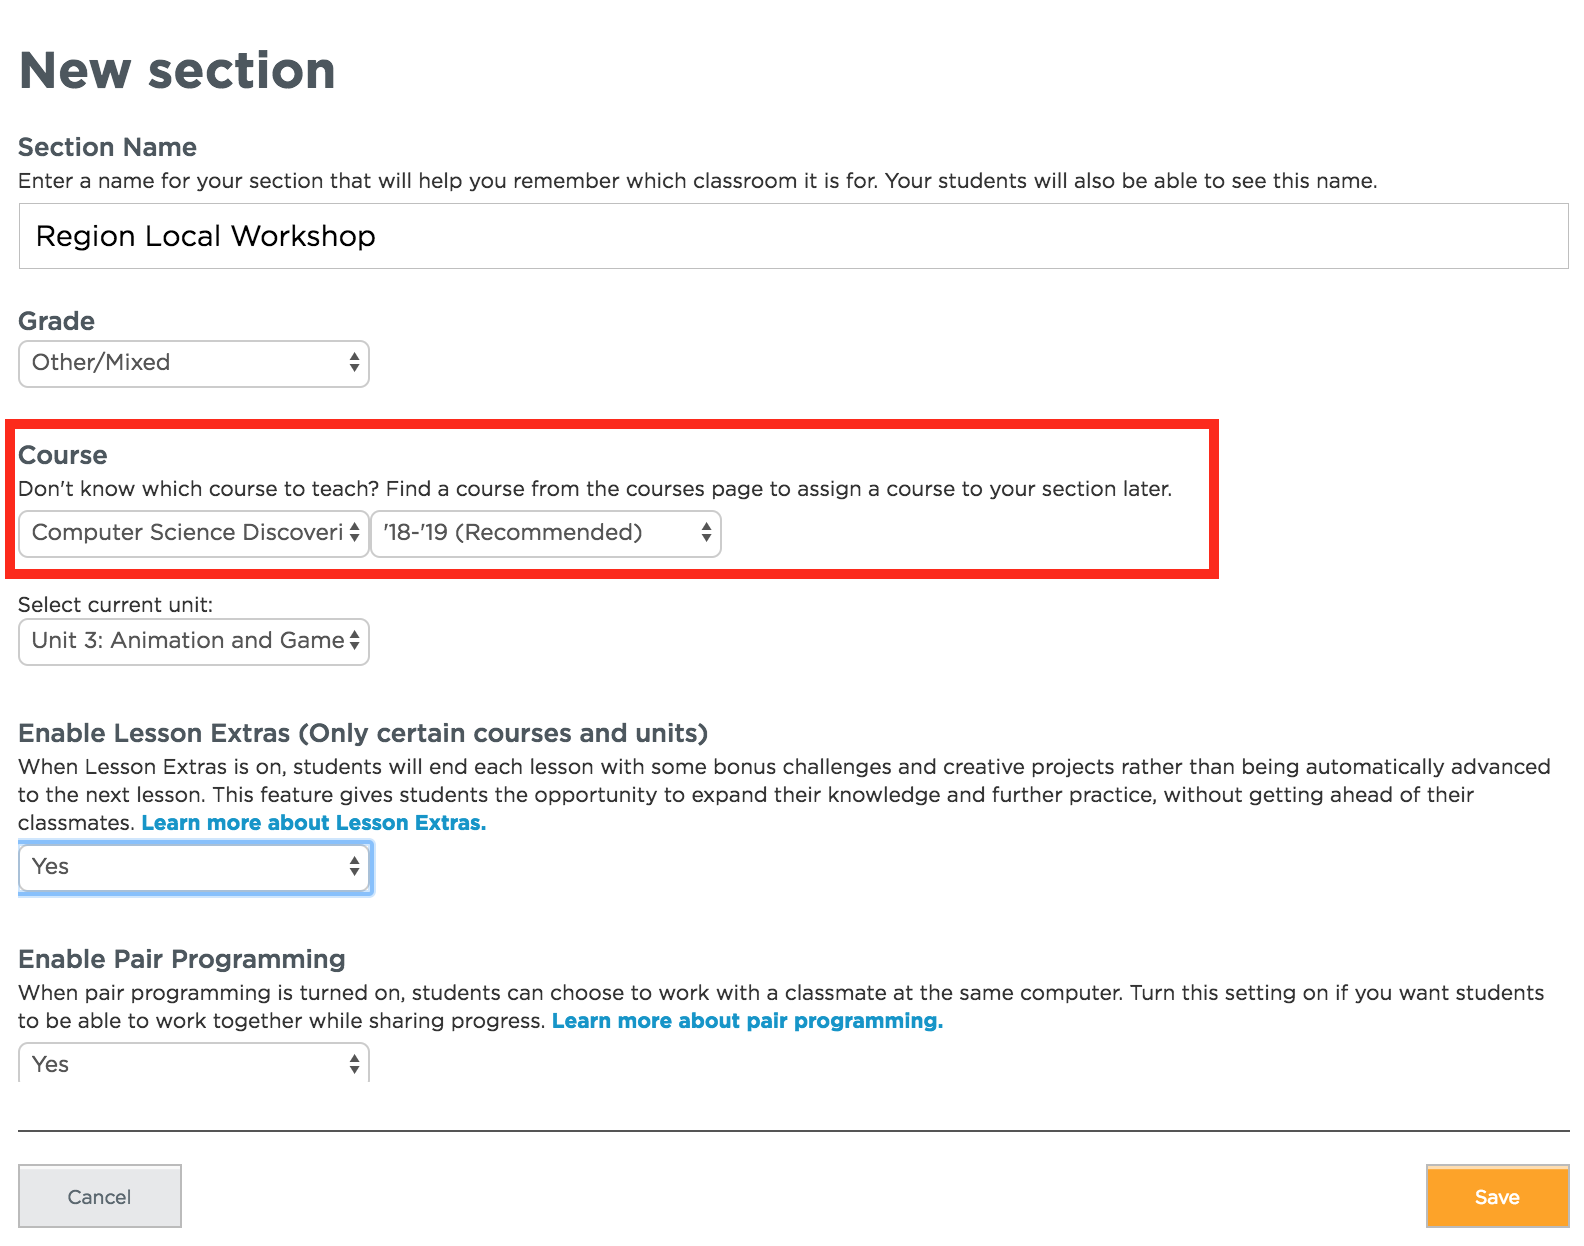
    2. Make sure it is assigned to CS Discoveries for 2019-20

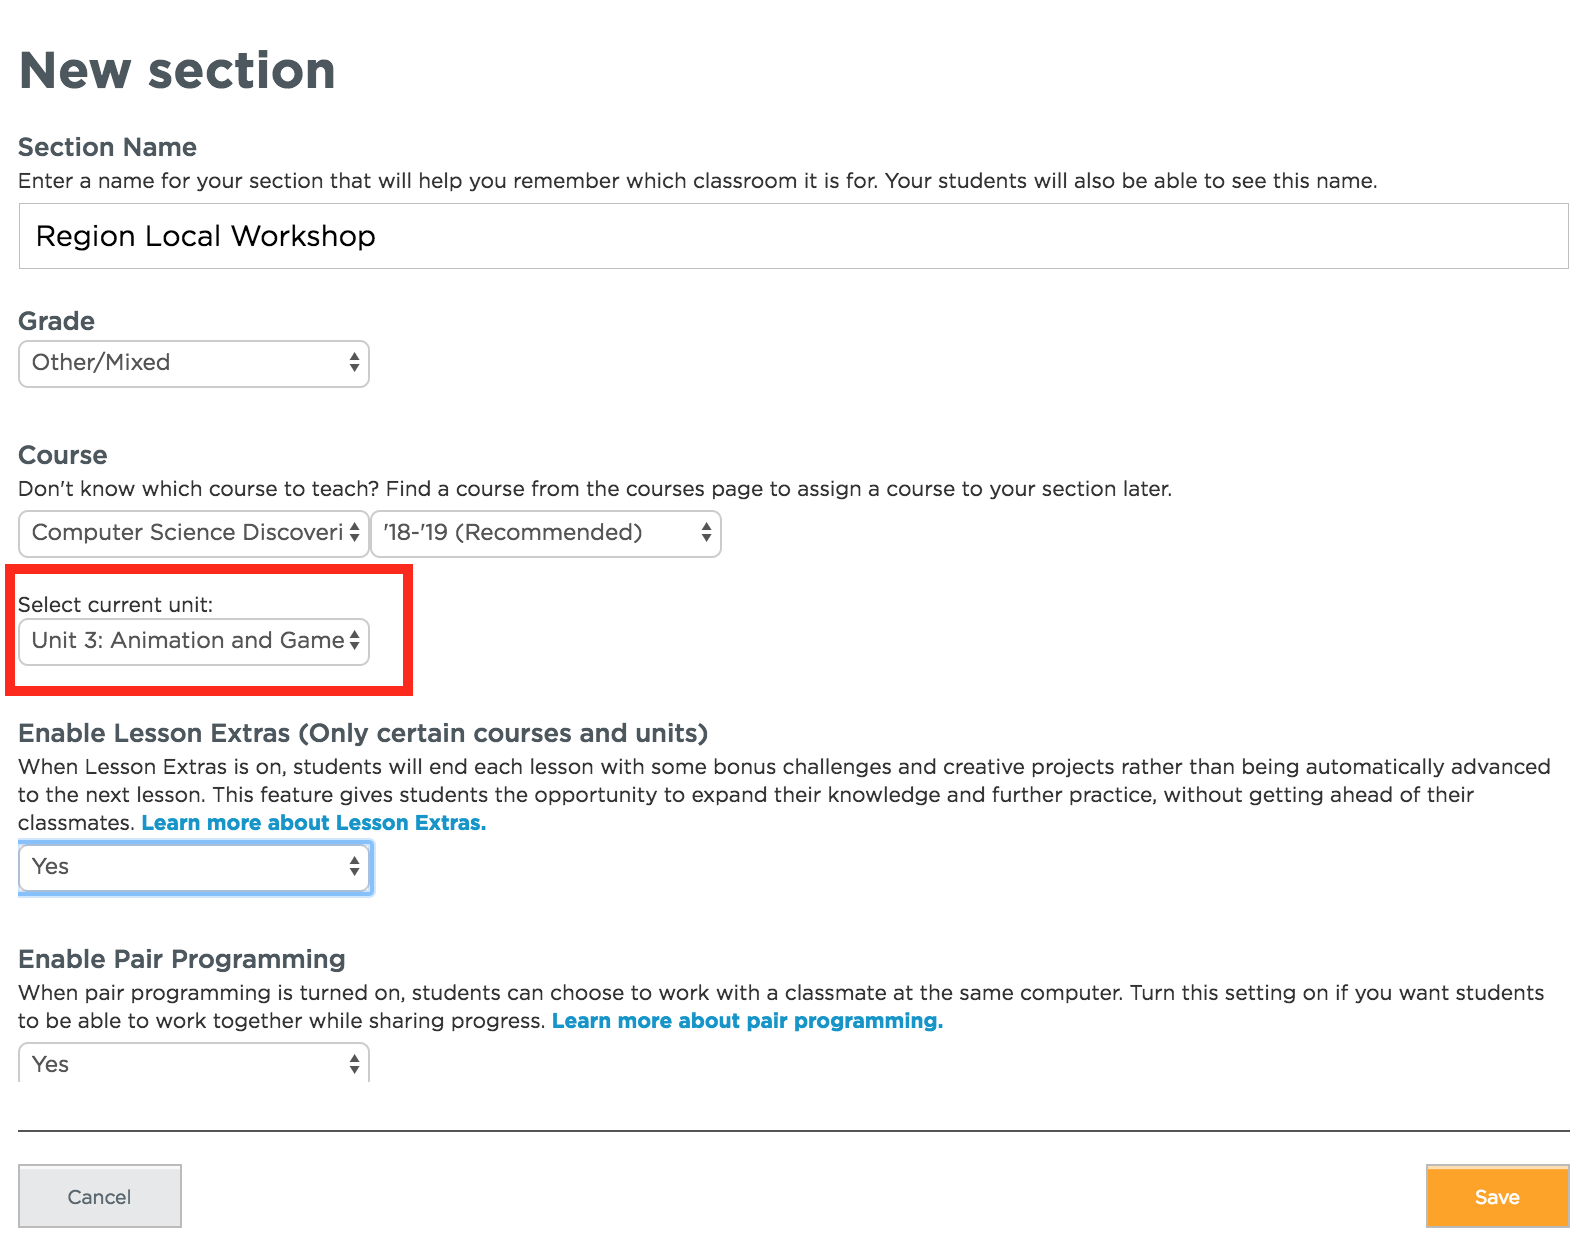
    3. Assign the course to Unit 3

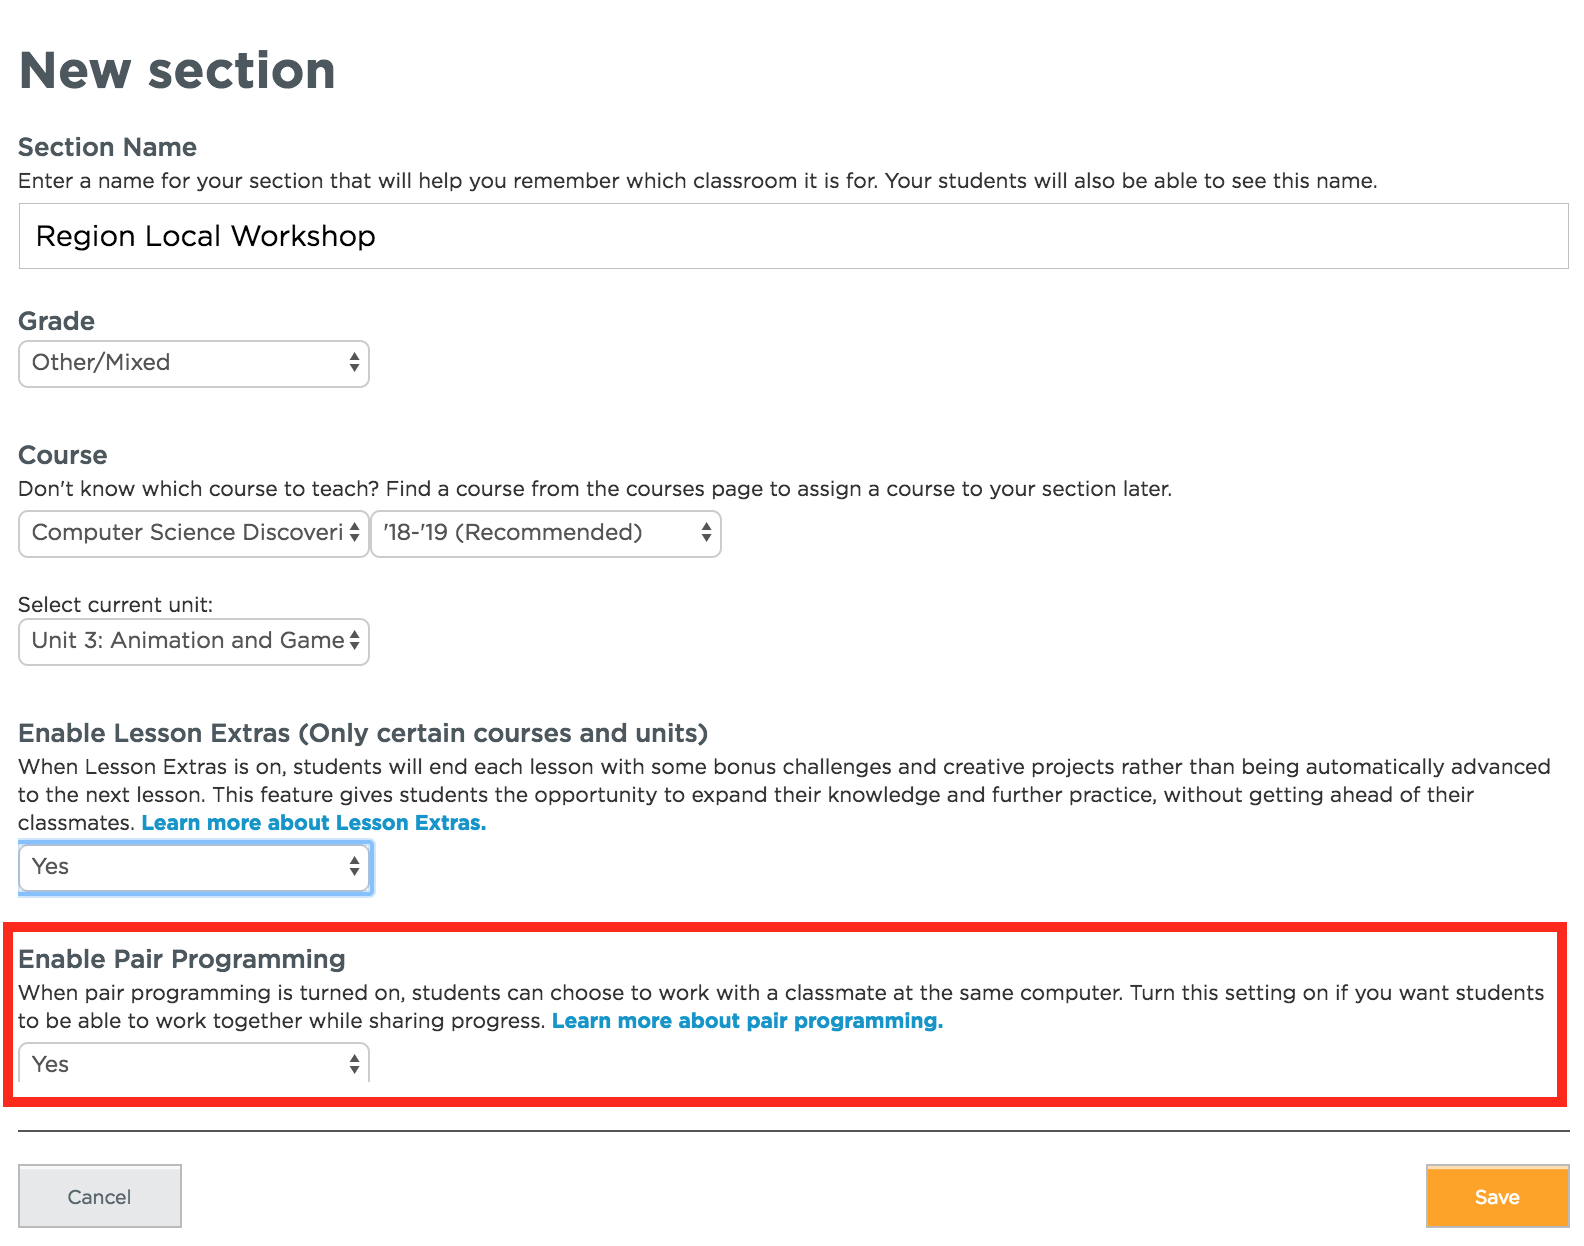
    4. Enable Pair Programming for that section

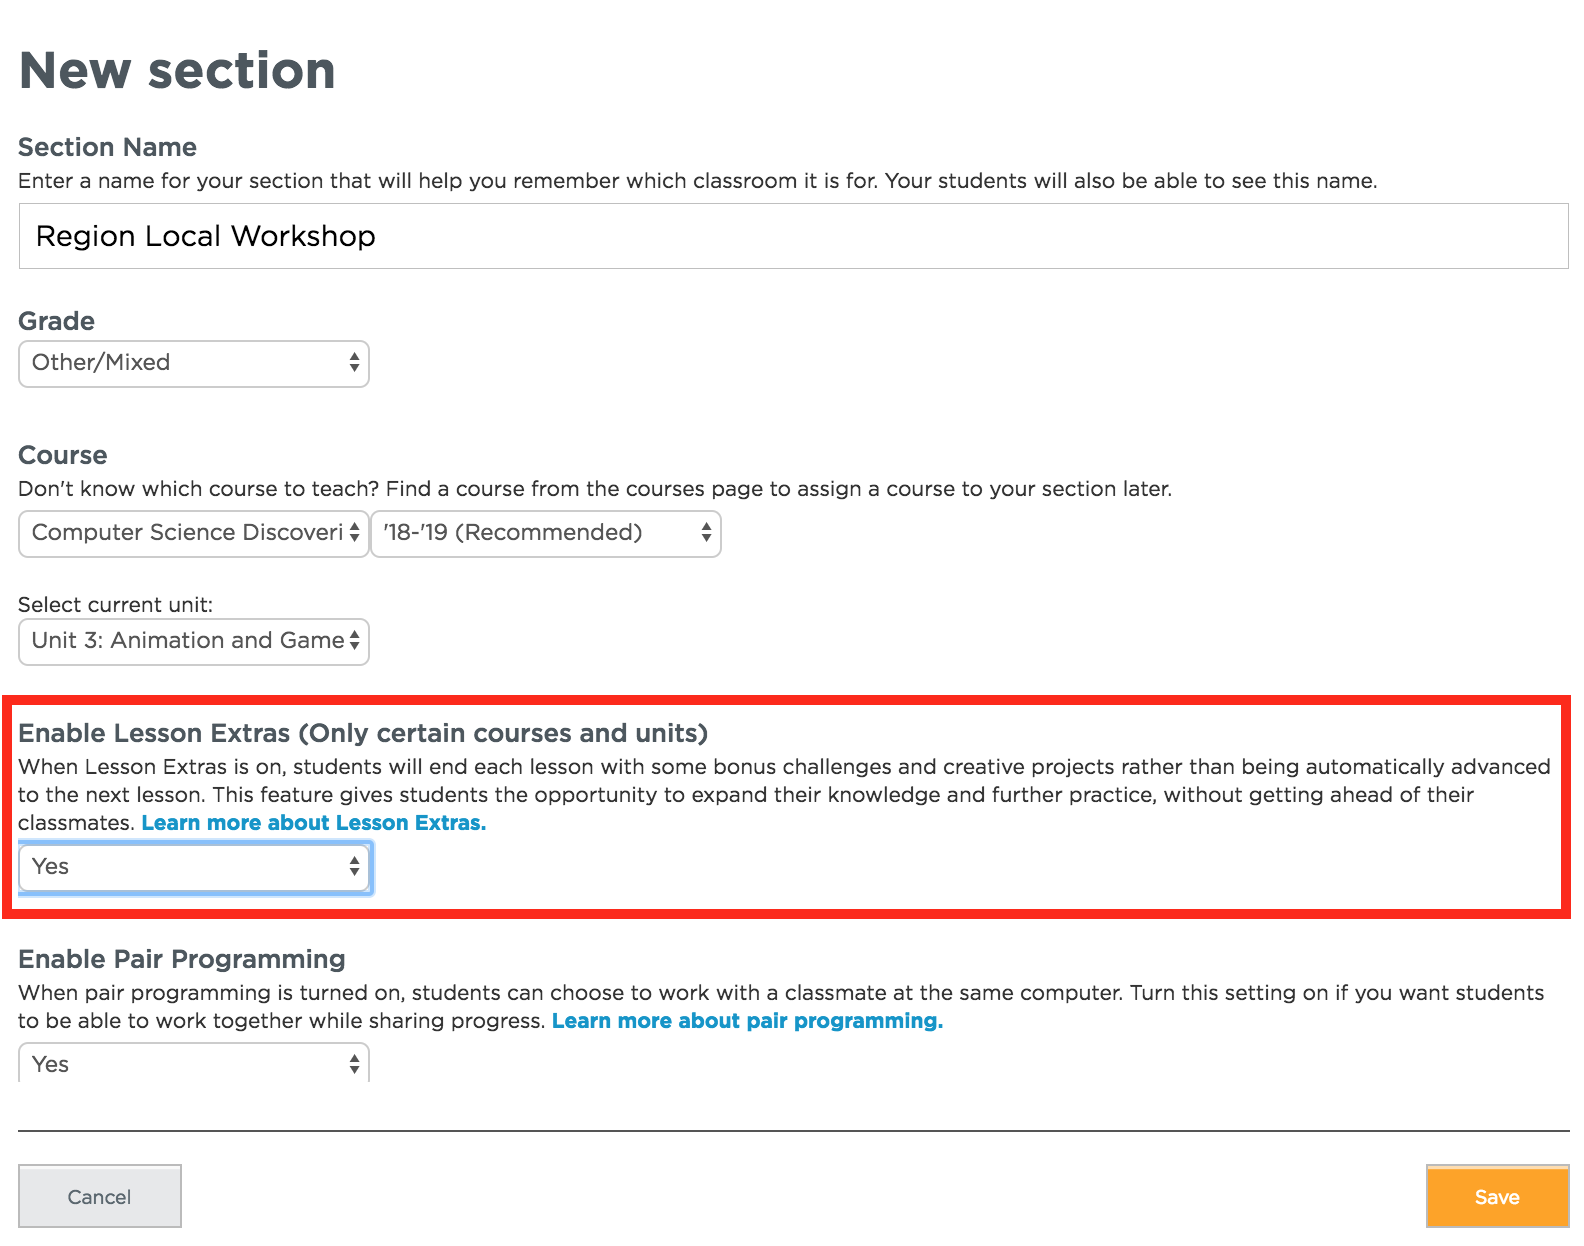
    5. Enable Lesson Extras for that section

First Morning Of Workshop

Room Setup

Using the supplies provided by regional partner set up the room. In the agenda we will call this the "Normal Breakout Room Set Up".

  • Tech
    • Reliable guest wifi - check this as early as possible
    • Projector (separate table for projector)
    • Speaker System
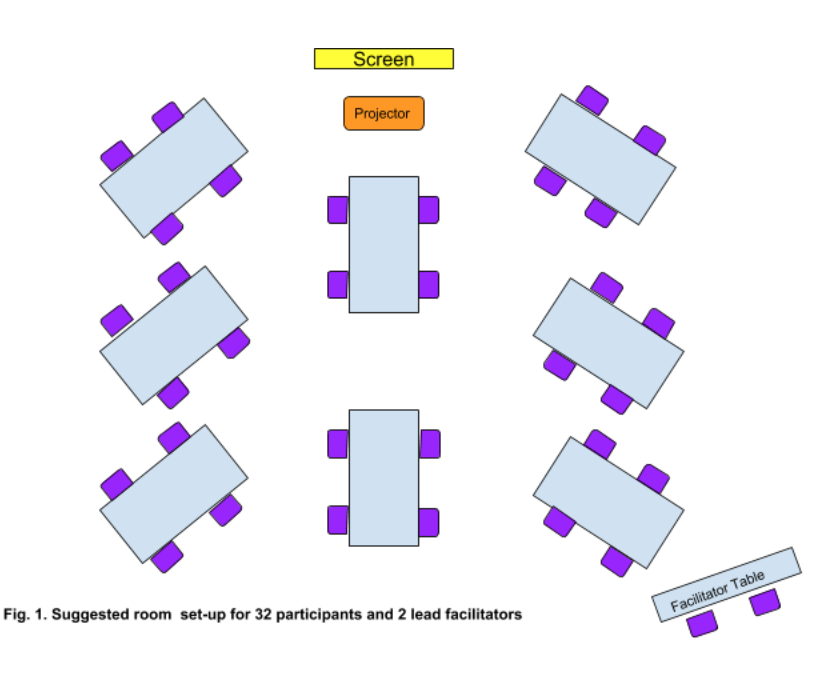
  • 8 Teacher Tables (for 32 teachers) with:
    • 4 chairs at each table
    • Table angled toward projector screen
    • Surge protectors in middle of each table
    • 4-5 post-it note pads of different sizes
    • 3-4 Pens
  • Facilitator Table:
    • Located in the back of the room
    • 2-3 chairs at table (need chairs for lead facilitators and apprentices)

Create Posters

  • Posters up for people to add post-its to as they come in
    • Question Parking Lot - For people to put up questions they have.
    • “Where are we now” - On a piece of chart paper or on the board create a histogram for teachers to add where they are in the curriculum. Remind teachers to take out their Curriculum Guides as a guide to unit progressions.

Concerns?

If you need to raise concerns before or during the workshop about issues that require immediate attention (internet, health issues, etc.) you should contact your regional partner.
Session 1: Workshop Opener

50 minutes

discussion-based | speed dating

Purpose

Bring participants together to kick off the workshop and reflect on how things are going in the classroom. This is a place to check in on specific lesson that people have already taught, as well as pacing and teaching practices that were recommended or discussed in the previous workshop.

It is common to surface concerns during this session that can be revisited and addressed throughout the workshop.

Objectives

  • Teachers have communicated where they currently are in the curriculum. This information should hopefully match the information you received in the pre-workshop survey results.
  • Teachers are aware of the theme for the day
  • Misconceptions and existing questions have been asked and answered
  • Teachers are thinking about how things are going and what they want to work on/get help with

Supplies & Prep

Room Setup (using the supplies provided by regional partner):

  • Posters up for people to add post-its to as they come in
    • “Where are we now” - On a piece of chart paper or on the board create a histogram for teachers to add where they are in the curriculum. Reminder teachers to take out their Curriculum Guide as a guide to unit progressions.
    • Question Parking Lot - For people to put up questions they have.
  • Posters ready for Warm up and Check In:
    • “Role of the Teacher” - On a piece of chart paper, create a poster that has the words “Role of the Teacher” written in large letters.
    • "Things we know..." - On a piece of chart paper, create a poster that has the words “Things we know...” written in large letters.

Facilitator Supplies:

Teacher Materials:

Agenda

Workshop Opening Logistics (10 minutes)

Warm Up and Check In (40 minutes)

Teaching Guide

Workshop Opening Logistics (10 minutes)

Teaching Tip

Ways to Prepare for Session:

  • Reflect on teacher needs at the last workshop — what were the most common concerns? How can you check in on those concerns here?
  • Making a plan with your co-facilitator for how you plan to divide up roles during the session

As Teachers Walk In

Have a slide up at the front of the room to direct teachers to:

  • Add post-its to "Where are we now" poster
  • Kick off the Question Parking Lot chart by having participants add in anything they need to talk about when they walk in the room

(2 minutes) Attendance

Have everyone complete the attendance for the day

  • On the online workshop dashboard find your workshop
  • Follow the instructions found on your facilitator landing page to start the workshop.

(3 minutes) Introductions

Introduce yourselves to the room so they know who you are. Teachers enjoy knowing facilitators background so make sure to share some key details of who you are. Also take a few minutes to let the participants introduce themselves. (It has been a long time since the summer, and you might have some new participants.)

(5 minutes) Norms

Set up group norms for the day. Have participants share ideas to add to a norms poster in the room. If there is something that does not come out naturally facilitators may want to add their own ideas too.

Warm Up and Check In (40 minutes)

(2 minutes) Theme Introduction

Create a poster with the words “Role of the Teacher” in large letters. You will draw attention to this poster now, but you will not add anything at this point. The group will add to this poster throughout the day.

Remarks

Our learning today will be focused around an overarching theme: The Role of the Teacher. As you might have already experienced this year, the role of the teacher changes frequently in a CS classroom. Throughout the day we are going to identify the various roles of the teacher in a CS classroom and pair them with teaching strategies that you can use in your own classrooms.

One role of the teacher that we discussed together in the summer workshop is the role of the teacher as lead learner. As lead learner, the teacher’s role in the classroom is to model and encourage good learning strategies. A part of this is helping students find, develop, and use resources to support their learning. As we move through the day we are going to add to this poster to create a resource that we will all be able to use as a reference as we plan for the roles we will play in our own classrooms. During our time together today, keep this theme in mind as you reflect on the role of the teacher in various aspects of Unit 3. After each activity, we will add these ideas to our poster.

Teaching Tip

NOTE: While discussions are happening, one facilitator should circle the room while the other reads over the post-its on the wall from the "As Teachers walk In" activity. During this time, the facilitators are pulling out the topics to discuss in the whole-group share out. Likely example topics are assessments, facilitating discovery without telling students the “right” answer”, learning material along with your students, etc.

Consider having one facilitator run the discussion while the other takes notes in a google doc that is open to all participants (so they have the notes after the fact)

Discussion Goal

The goal is to jog memories and think concretely about the lessons they’ve done so far and what’s coming soon.

(3 minutes) Personal Reflection

Have teachers reflect on their own on the following and be ready to share with someone else. They don't need to answer every question but use these questions to jog their memory.

  • How have your students responded to the lessons you’ve already taught?
  • What adaptations have you made for your student needs?
  • Were there any concepts or activities in Units 1 or 2 that were challenging for you or for your students?
  • What concerns or issues do you have about the topics that are coming up soon?
  • What questions do you have/what do you want to talk about?

Teaching Tip

Some teachers have expressed feeling uncomfortable because of the name speed dating. If you would like to use a different term for it thats totally fine. One you might consider is speed networking.

(10 minutes) Speed Date Warm Up

Have participants “speed date” their responses to the prompts above, looking for advice or ideas questions or issues.

NOTE: here, speed dating means getting up and talking to someone new about your thoughts. Recommend doing 3 rounds of 3 minutes each, where participants check in with someone new for each round

(5 minutes) Share Concerns at Table

Head back to tables and share your concerns + what you learned from others

Goal: bubble up what needs to be addressed by the whole group. Jot down questions or topics on post-its and hold up for facilitators to collect

Facilitators should take the post-its and decide what issues folks are having that others in the room can help solve. Other post-it notes that may be appropriate to answer later in the day can be tabled on the question parking lot.

(15 minutes) Group Discussion

  • Facilitators prime the discussion with topics that have been brought up so far in the day, and put them to the group for everyone to answer. The goal is to pull out widely-held questions and to check in with groups on the following:
    • What student needs have you encountered and what strategies have you found that help meet those needs?
    • What’s happening with your students who are new to CS? Are they disengaging? What we can do to address that?

Teaching Tip

As lead learner, the role of the teacher is to activate prior knowledge and help students articulate their learning.

(5 minutes) Activate Prior Knowledge

Facilitator creates a poster with the words “Things we know...” in large letters.

  • (2 minutes) Independent Journaling Prompt: Think back to the summer workshop and experiences you have had teaching this course. What CS concepts have you learned so far?

  • (3 minutes) Group Share Out: Facilitator adds concepts to the “Things we know…” poster during the share out. Leaving this session, display this poster in the room. Participants can reference this resource throughout the day.

Remarks

Now that we have reflected on where we have been, it is time to continue building. As we continue to build, remember to use “Things we know…” poster as a reference resource.


If you are interested in licensing Code.org materials for commercial purposes, contact us.

Session 2: Previously, on Unit 3

15 Minutes

facilitator presentation

Purpose

This session is designed to highlight concepts from Unit 3 that will be necessary to engage in the remainder of the day. The session begins with a quick reminder of the concepts introduced in the summer workshop followed by an introduction to the concept of variables. This overview is necessary to ensure participants are ready to engage in the upcoming model lesson.

Objectives

  • Review concepts from Unit 3 in preparation for the model lesson

Supplies & Prep

Room Setup (using the supplies provided by regional partner):

  • Participants seated in pods

Facilitator Supplies:

Teacher Materials:

Agenda

Review of Unit 3 Concepts from Summer Workshop (3 minutes)

Introduction to Variables (10 minutes)

Set Up for Model Lesson (2 minutes)

Teaching Guide

Review of Unit 3 Concepts from Summer Workshop (3 minutes)

  • Show the Unit 3 timeline and highlight the lessons that were covered in the summer workshop
  • Remind teachers of the content in the lessons they have explored so far
    • Lesson 2: Students are introduced to the grid in an unplugged lesson. They practice placing shapes on a 400 by 400 grid.
    • Lesson 3: Students continue to explore the concept of using grids to place shapes as they transition into Game Lab for the first time. The are also introduced to sequencing.
    • Lesson 4: This lesson extends the drawing skills to include width and height and introduces the concept of random number generation. The class learns to draw with versions of ellipse() and rect() that include width and height parameters, use the background() block to fill the screen with color, and use the randomNumber() block.

Introduction to Variables (10 minutes)

Teaching Tip

Show the video from U3L5 bubble 2 in Code Studio. (The title in the slide deck is a link to Code Studio.) This will allow you to easily transition to the variable example that you will demo.

(4.5 minutes) Variables Video

Show the variables video.

(1.5 minutes) Variable Example

The facilitator demos the activity in bubble 3 to ensure participants understand that a variable holds information and can be accessed using a label. Numbers, text, and colors can all go into variables, as well as more complicated data structures that students will see later in the course.

Teaching Tip

This overview can be a lot of information for a new to CS teacher. Let participants know that they will have time after lunch to explore the curriculum.They can return to this lesson and complete the full bubble progression. (This lesson is not specifically called out in the curriculum exploration, but participants can make the choice to return to it if they choose.) Additionally, there will be an opportunity to explore an unplugged lesson involving variables if they would like to explore the concept further. Also show participants that can always refer to the Help & Tips tab within Code Studio if they are unsure of a concept.

(4 minutes) Introduce Variable Creation and Naming

The facilitator uses the map levels in bubbles 7 and 10 to discuss creating, using, and naming variables (Remind participants that they will be able to access this content in the “Help & Tips” tab of Code Studio:

  • A variable lets you store a single value in your computer's memory with a descriptive name. Using variables lets you easily refer to the same value many times in your program or save a number that you'd like to refer to later.
  • Variable labels should be meaningful, but you can choose almost any label you like. There are just a few rules and guidelines to be aware of.

Remarks

By the end of this lesson, students should feel comfortable using variables in a program to store a piece of information that is used multiple times.

Set Up for Model Lesson (2 minutes)

(1 minute) Set the Scene

Remarks

When we return from break we will be engaging in a Model Lesson. In the past we have done TLOs or Teacher-Learner-Observer sessions, but this will be different. We are just going to focus on two “hats” this time a “teacher” and “learner” hat. I (or my facilitator) will be acting as the teacher and you all will be acting as learners. After we are done with this Model Lesson we are going to have a conversation about some of the pedagogy in the model lesson with a focus on the role of the teacher.

(1 minute) Pre-Break Reminders

There is a 10 minute break between this and the next session. Remind teachers how long they have for a break before they head out.


If you are interested in licensing Code.org materials for commercial purposes, contact us.


If you are interested in licensing Code.org materials for commercial purposes, contact us.

Session 4: Model Lesson Unit 3 Lesson 6

40 minutes

Purpose

This model lesson is intended to model pedagogy. The facilitator will model best practices within a model lesson while demonstrating the collaborative classroom culture CS Discoveries is trying to create.

Objectives

  • Identify teaching when and how to implement various teaching strategies
  • Develop empathy for the student experience in a new programming lesson
  • Create a sprite in Game LAB

Supplies & Prep

Room Setup:

  • Participants are seated in pairs for pair programming
  • “Sprites…” Poster - On a piece of chart paper, create a poster that has the word “Sprites” written in large letters.

Facilitator Supplies:

Teacher Materials:

  • Laptops
  • Journals
  • Pens

Agenda

Warm Up (10 minutes)

Activity (30 minutes)

Wrap Up (5 minutes)

Teaching Guide

Warm Up (10 minutes)

(10 minutes) Warm Up

Remarks

“Put your hats on and Let’s get ready to go!”

How Much Information?

Discussion Goal

The goal here is to get students thinking about all of the different values that go into drawing a single shape on the screen, and how many more values they may need to control a more detailed character in a program. If learners are struggling to come up with ideas, you might use some of the following prompts: How do you tell a shape where to go on the screen? How do you tell a shape what size it needs to be? How do you tell a shape what color it should be? What about its outline? What if you wanted to change any of those values during your program, or control other things like rotation?

Think, Pair, Share: So far we've only written programs that put simple shapes on the screen. Come up with a list of all of the different pieces of information that you have used to control how these shapes are drawn.

  • (1 minute) Think: individual reflection
  • (2 minutes) Pair: discuss with a partner
  • (4 minutes) Share: share and discuss with the whole group

Prompt: What if we wanted to create programs with more detailed images, maybe even characters that you could interact with? What other pieces of information might you need in your code?

Remarks

Today we'll learn how to create characters in our animations called sprites. These sprites will be stored in variables, just like you've stored numbers in the past, but sprites can hold lots of pieces of data, which will allow you to create much more interesting (and eventually animated!) programs. This is a long lesson, so we will not complete the entire lesson within the time we have for class today.

Activity (30 minutes)

(5 minutes) Video and Discussion

Video: Watch the video introducing sprites as a whole group. (2:37)

Discussion Goal

Sprites are a very complex concept, and students may have difficulty understanding exactly what they are. The most important aspect for students to understand is that sprites allow them to organize a lot of information about something that they want to draw to the screen.

Discussion:

  • Create a poster with “Sprite” written in large letters
  • Ask the group, “What do we know about sprites so far?”
  • Add to the poster as learners share out

(3 minutes) Map Level

  • (1 min) Learners independently read the information in the bubble 3 map level

Teaching Tip

This exercise serves as a quick formative assessment. The teacher is able to get quick pulse on the general understanding within the room and clarify misconceptions in real time. (Role of the Teacher: ongoing assessment of student understanding)

  • (2 min) Ask the group, “What else should we add to our sprite poster?”
    • Add to the poster as learners share out

Teaching Tip

Make sure to model the role of the teacher within this plugged lesson:

  • Ongoing formative assessment
  • Direct students to reference resources
  • Guide students through the debugging process
    • Celebrate bugs!
    • Don’t debug for the learner
  • Time keeper for pair programming

(5 minutes) Bubbles 4 - 6

Teaching Tip

Having learners complete these bubbles independently instead of pair programming is an intentional choice. The goal here is to ensure all learners understand the basics of creating sprites before they transition to working with a partner.

Transition: Move learners onto the bubble progression starting with bubble 4. Allow time for learners to work through the bubbles independently, stopping when they get to bubble 6.

Remind learners that they should use the Help & Tips tab as a reference if they run into difficulty.

Five minutes is budgeted for learners to work through bubbles 4 - 6. However, you should transition to the video as soon as learners begin reaching bubble 7. Learners can return to bubbles they have not yet completed after the video is shown to the whole group.

(5 minutes) Video and Discussion

Video: Watch the video introducing the animation tab as a whole group. (2:37)

Discussion Goal

Make sure learners understand that they will need to both create the image (or animation) in the Animation Tab and then add the animation to the sprite using the setAnimation block. Learners may be confused by the use of the word "animation" for single images, but in Game Lab, still images are considered "animations" with only one frame.

Discussion:

  • Ask the group, “What new things have we learned about sprites that we should add to our poster?”
  • Add to the poster as learners share out

Teaching Tip

Don’t forget to celebrate bugs! (Role of the Teacher: create a culture of debugging)

(12 minutes) Continue Bubble Progression

Transition: Allow learners to continue within the bubble progression. This time, learners should use the pair programming strategy to complete the activities. It is likely that learners will not finish the bubble progression within the time allotted. At a minimum, all learners should complete bubble 9.

Teaching Tip

If learners complete complete through bubble 18 before time is called, direct them to the flag at the end of the bubble progression for extension activities. (Role of the Teacher - plan for early finishers (differentiation))

  • During the activity, the facilitator should keep time and remind the learners to switch pair programming roles.
  • While learners are working through the bubble progression, facilitators should be circulating the room to check for understanding. Ask learners to talk through their code with you. Check to ensure that learners know why they sequenced their code the way they did.

Wrap Up (5 minutes)

Remind the class that they will have time to complete the activities within the lesson next class. Allow learners to share sprite that they have created with their table group.


If you are interested in licensing Code.org materials for commercial purposes, contact us.

Session 5: Model Lesson Reflection

20 minutes

discussion-based

Purpose

This session is designed to highlight choices and teaching strategies used in the model lesson. The goal is for participants to reflect on how they might implement similar strategies and techniques in their own classrooms.

Objectives

  • Understand how to make appropriate choices when delivering a lesson
  • Identify ways to incorporate formative assessment and referencing resources into a lesson
  • Understand how the role of the teacher changes throughout a programming lesson

Supplies & Prep

Room Setup:

  • Participants are seated in pairs

Facilitator Supplies:

Teacher Materials:

  • Journals
  • Pens

Agenda

Model Lesson Goals (7 minutes)

Highlight and Discuss Choices (6 minutes)

Role of the Teacher

Teaching Guide

Model Lesson Goals (7 minutes)

Remarks

Our goal in this model lesson was to demonstrate key pedagogical choices made in a lesson that help incorporate formative assessment and referencing resources.

(7 minutes) Think, Pair, Share

Prompt: “ What are examples of times in the model lesson when you noticed the teacher formatively assess student understanding and further develop the practice of referencing resources?”

  • (1 minute) Think: individual reflection
  • (2 minutes) Pair: discuss with a partner

Discussion Goal

There are two goals of this discussion:

  1. Participants recognize that formative assessment should be incorporated into lessons, even when students are primarily working on computers
  2. Participants are able to identify opportunities for formative assessment within a lesson
  • (4 minutes) Share: share and discuss with the whole group

Highlight and Discuss Choices (6 minutes)

Facilitator Note: After the group share out, highlight specific choices made during the model lesson and stress that these were not prescribed by the lesson plan, and are the sort of choice that a teacher can make for any lesson.

(2 minutes) Whole Class Video

The teacher utilized the discussion prompts in Code Studio to ensure students grasped core concepts before moving on in the bubble progression

(2 minutes) Pair Programming

Pair programming was only used in the second half of the lesson. This was an intentional decision to ensure that all learners understood the core concept of creating a Sprite before they moved to working with a partner.

(2 minutes) Create a Shared Reference Resource

Creating a shared reference resource served two purposes:

  1. Formative assessment - as learners suggested items to add to the poster, the teacher was able to listen for evidence of understanding and hints of misconceptions
  2. Referencing Resources - the “Sprite” poster will now serve as a resource that students can reference both during this lesson and later in the unit when they are working on their end of chapter project

Role of the Teacher

(1 minute) Journal

Prompt: What was the role(s) of the teacher in the model lesson? How did the role(s) of the teacher change throughout the lesson?

Discussion Goal

As the day progresses, the conversation around this topic should mature. At this point, if participants are answering with surface level responses, try to encourage deeper conversation. (Can you tell me a little more about that? Can someone expand on that idea? Are we starting to see any themes?)

(6 minutes) Share Out

As participants share out with the whole group, add to the “Role of the Teacher” poster from the opening session.


If you are interested in licensing Code.org materials for commercial purposes, contact us.

Session 6: Problem Solving and Debugging

45 minutes

discussion-based

Purpose

This session is intended to introduce participants to the Guide to Debugging as a resource for supporting students in the process of debugging. Participants will have the opportunity to practice debugging skills using strategies from the Guide to Debugging.

Objectives

  • Locate and utilize the Guide to Debugging as a resource
  • Practice the debugging process
  • Identify strategies to use to support students in the debugging process

Supplies & Prep

Room Setup:

  • Participants are in groups of two (same groups as the previous session)

Facilitator Supplies:

Teacher Materials:

Agenda

Opening Activity (16 minutes)

Practice Debugging (14 minutes)

Reflection (12 minutes)

Transition (3 minutes)

Teaching Guide

Opening Activity (16 minutes)

(1 minute) Opening Remarks

Remarks

As you likely noticed in the model lesson, as we begin adding more complexity to our programs in Game Lab, more opportunities for bugs arise. One common barrier to supporting students during a programming unit is knowing how to support them effectively when they encounter bugs while programming. After lunch we will transition more fully to looking at the curriculum, but first we dig deeper into the process of debugging in order to equip ourselves to effectively support students during the debugging process. We will also explore the role of the teacher in guiding students through the debugging process.

(7 minutes) Read the Guide to Debugging

  • Direct participants to the Guide to Debugging on the CSD curriculum landing page
  • Give time for participants to read and process the document
  • Warn participants that this is their first look at the document. They are not expected to master the concepts in this document upon first glance. This time is intended for them to familiarize themselves with the resource in order to be able to reference it appropriately during the following activity.

(4 minutes) Reflect and Discuss

In the model lesson we just completed, which of the steps from this guide did you find yourself taking when you encountered issues or bugs?

  • (2 minutes) share with your partner
  • (2 minutes ) whole group share out

(3 minutes) Show Debugging Video

Show the "How to Debug" video to the whole group.

(1 minute) Transitional Remarks

Teaching Tip

When learners complete the bug report in their journals, they are creating a resource that will be able to reference later if they encounter a similar bug. (Role of the Teacher: Help students organize their new knowledge in a way that can be accessed as a resource later)

Remarks

You will now have the opportunity to practice debugging with a partner. One partner will be the driver and one partner will be the navigator. The navigator should use the debugging guide as a resource to guide the debugging process. The driver will take direction from the navigator in making modifications to the Game Lab code. I will keep time and let you know when it is time to switch roles. For each bug, you will complete a bug report in your journal. Both the driver and the navigator should complete the bug report in his or her individual journal.

Practice Debugging (14 minutes)

Teaching Tip

Circulate the room and support participants as needed (be careful not to fix the bug for them, instead help them work through the process of debugging) Keep time (roles should change halfway through the activity) Keep Moving (It is important for the participants to see that the teacher plays an active role during a programming unit.) * Challenge participants that move through the activity to think through how they might create a culture of debugging in their classroom. It is important that every participant is successful at debugging at least one of the examples before you move on to the reflection. Support participants as needed.

  • Participants work in pairs to complete the bug examples. One partner will be the driver and one partner will be the navigator. The navigator should use the debugging guide as a resource to guide the debugging process. The driver will take direction from the navigator in making modifications to the Game Lab code. Participants will switch roles every 4 minutes. (The last round will only be two minutes).
  • Participants should complete a bug report for at least one example bug. This should be done in their journal. Each participant should write a bug report in their individual journals.

Facilitator Note The bug report worksheet is linked on the second page of the "Guide to Debugging." Have participants navigate to this document from the link within the guide to ensure participants know where this resource is located for future use.

Reflection (12 minutes)

(4 minutes) Pair Programming and Debugging

  • (1 minute) Journal: How does pair programming support the process of debugging?
  • (3 minutes) Table Talk: Discuss the journal prompt as a table. The facilitator should circulate and listen in. If large scale clarification is needed, the facilitator can bring the group together to discuss.

(4 minutes) Debugging Resources

  • (1 minute) Journal: If a student has gone through the entire debugging process and still has not been successful in finding and fixing a bug, what additional resources and supports can you use to guide your student?

Discussion Goal

It is important that participants leave this session feeling confident in their ability to guide students through the debugging process even if they are new to CS. This prompt is an opportunity to remind participants that they are a part of a larger CS community with extensive knowledge and resources.

  • (3 minutes) Whole Group Share Out: During this time, the facilitator should project the group notes document and write ideas directly into the document.

(4 minutes) Role of the Teacher

  • (1 minutes) Journal: What is the role(s) of the teacher in the debugging process?
  • (3 minutes) Whole Group Share Out: As participants share out with the whole group, the facilitators adds to the “Role of the Teacher” poster from the opening session.

Transition (3 minutes)

(2 minutes) Set the Stage for Curriculum Exploration

Teaching Tip

If there is only one facilitator, and there is a concern about the level of support that will be needed during the exploration, you might select to have all participants explore the same group of lessons. In this case, select lessons 7,8, and 9.

Remarks

After lunch, you will have the opportunity to further explore lessons in Unit 3. The goal of this time is for you to have a space to explore the curriculum in a way that meets your individual needs. There are two tracks of suggested lessons. One track is for teachers that are new to CS or do not feel comfortable with Game Lab. The second track is for teachers that are more comfortable with both CS and Game Lab. The session is designed for you to explore three different lessons. There is time built in for you to reflect on how you will implement each lesson in your classroom. While the goal is to expose you to multiple lessons, the more important goal is that you have the space to explore in a way that makes sense for their needs. If you choose to spend the entire time on one lesson, you will be given the opportunity to do so. However, we will still stop periodically to discuss classroom implementation of these lessons. In order to make the most out of these discussions, you should sit with a group of people that will explore the same units that you plan to explore.

Facilitator Note: Survey the room to determine levels of comfort. Next, designate areas of the room that will explore the same lessons during the exploration after lunch. Instruct participants to move the area that meets their comfort level during the break.

(1 minute) Lunch Time Announcements


If you are interested in licensing Code.org materials for commercial purposes, contact us.

Session 7: Lunch

60 min

break

Agenda

Lunch

Teaching Guide

Lunch

Teaching Tip

LOCAL FLEX TIME: If you need to add local flex time in this workshop, you can reduce lunch from 60 minutes to 45 minutes.


If you are interested in licensing Code.org materials for commercial purposes, contact us.

Session 8: Curriculum Investigation

lesson exploration

Purpose

The purpose of this session is for participants to investigate Unit 3 and reflect on how they will implement the lessons with their students. Although it is not possible to cover all unit content within the time allotted, core concepts are highlighted within this exploration. The overall goal of this session is for participants to reflect on the role of the teacher in a programming unit with a specific focus on how that role changes and stays the same throughout various lessons.

Objectives

  • Participants are exposed to core CS concepts within Unit 3 (variables, draw loops, booleans and user input)
  • Participants investigate a variety of lesson types and Game Lab features
  • Participants identify strategies they will use to implement selected lessons in their classrooms

Supplies & Prep

Room Setup:

  • Participants are sitting in pods with a group interested in investigating the same lessons based on comfort level with CS content and Game Lab

Facilitator Supplies:

Teacher Materials:

Agenda

Dig into Unit 3 (55 minutes)

Reflection / Share Out (10 minutes)

Teaching Guide

Dig into Unit 3 (55 minutes)

(15 minutes) Investigation Part 1

Teaching Tip

While the groups are working through their unit exploration, facilitators should circulate the room. While circulating:

  • Listen in on group conversations.
  • Ask probing questions to help participants land on the intended outcomes of the session.
  • Check for understanding of core CS concepts (animations, variables, draw loops, booleans, and user input). This can be done by either directly asking participants to explain a concept or by listening in on conversations within the group.

If participants are having difficulty understanding the content of a lesson, direct them to the Help & Tips section in code studio to find the appropriate resources. Make sure to call out the videos within this tab. Try to avoid directly explaining a concept until after the participant has accessed the reference resources.

Suggested for New to CS Teachers and Teachers New to Game Lab Suggested for Teachers who are Comfortable with Both CS and Game Lab
Unit 3 Lesson 7 - The Draw Loop

Investigation Goal:
* Use a draw loop to add movement to sprites in Game Lab

Investigation Task:
* Read the full lesson plan and complete bubbles 2 - 11 in Code Studio
Unit 3 Lesson 10 - Booleans Unplugged

Investigation Goal:
* Consider the logistics of implementing this unplugged lesson in your classroom

Investigation Task:
*Read the full lesson plan

(5 minutes) Discussion

After fifteen minutes, the facilitator brings the group’s attention to step 2 of the Unit 3 Curriculum Investigation - Activity Guide. Participants are instructed to discuss the prompts with a partner. After the five minute discussion, participants are encouraged to explore a new lesson.

Prompts:

  • Assessing student learning in the lesson: How can you assess if students have learned what they need to learn in the lesson?
  • Referencing Resources: How can you help students develop the skill of referencing resources in this lesson?
  • Debugging: Where do you think students might engage in debugging or problem solving during this lesson (think about specific levels or activities)? How can you support them with that work?
  • Acting as a lead learner: Identify spots in the lesson where you might be triggered into wanting to tell students what to do but can instead respond as a learner.

(15 minutes) Investigation Part 2

Suggested for New to CS Teachers and Teachers New to Game Lab Suggested for Teachers who are Comfortable with Both CS and Game Lab
Unit 3 Lesson 8 - Counter Pattern Unplugged

Investigation Goal:
* Explore the underlying behavior of variables

Investigation Task:
* Read the full lesson plan and complete the "Activity Guide" for the "Variables Unplugged" activity
Unit 3 Lesson 11 - Booleans and Conditionals

Investigation Goal:
* Understand how to utilize booleans and conditional if statements in Game Lab

Investigation Task:
*Read the full lesson plan and complete bubbles 2 - 11 in Code Studio

(5 minutes) Discussion

After fifteen minutes, the facilitator brings the group’s attention to step 2 of the “Curriculum Exploration Activity Guide”. Participants are instructed to discuss the prompts with a partner. After the five minute discussion, participants are encouraged to explore a new lesson.

Prompts:

  • Assessing student learning in the lesson: How can you assess if students have learned what they need to learn in the lesson?
  • Referencing Resources: How can you help students develop the skill of referencing resources in this lesson?
  • Debugging: Where do you think students might engage in debugging or problem solving during this lesson (think about specific levels or activities)? How can you support them with that work?
  • Acting as a lead learner: Identify spots in the lesson where you might be triggered into wanting to tell students what to do but can instead respond as a learner.

(15 minutes) Investigation Part 3

Suggested for New to CS Teachers and Teachers New to Game Lab Suggested for Teachers who are Comfortable with Both CS and Game Lab
Unit 3 Lesson 9 - Sprite Movement

Investigation Goal:
* Use a counter pattern to animate sprites in Game Lab

Investigation Task:
* Complete bubbles 2 - 8 in Code Studio
Unit 3 Lesson 12 - Conditionals and User Input

Investigation Goal:
* Move sprites in response to keyboard inputs in Game Lab

Investigation Task:
*Read the full lesson plan and complete bubbles 2 - 9 in Code Studio

Reflection / Share Out (10 minutes)

(5 minutes) Unit Reflection

Remarks

At this point, we have participated in four lessons from Unit 3 together (3 in the summer workshop + 1 model today) and you have investigated some lessons on your own. Now, let’s shift to think about the unit as a whole. Complete the last page of the “Curriculum Investigation Activity Guide” with a partner keeping in mind the unit as a whole and not individual lessons.

Teaching Tip

The goal of this reflection is for teachers to recognize that although their role might look different throughout the programming unit, the core role is the same. They are still the lead learner. As the lead learner, they are modeling how to use reference materials, helping students work through the process of debugging / problem solving, and keeping a constant pulse on student understanding through the use of formative assessment in order to help students translate their experiences into new knowledge.

Prompts:

  • Assessing student learning in the lesson: How can you assess if students have learned what they need to learn in the unit?
  • Referencing Resources: How can you help students develop the skill of referencing resources in this unit?
  • Debugging: Where do you think students might engage in debugging or problem solving during this unit (think about specific levels or activities)? How can you support them with that work?
  • Acting as a lead learner: Identify spots in the unit where you might be triggered into wanting to tell students what to do but can instead respond as a learner.

(5 minutes) Share Out

  • The facilitator asks one person from each table to share one reflection with the larger group
  • Project the notes page section that correlates with this activity. The facilitator adds ideas to the chart as participants share out. [add link]
  • The facilitator ends the activity by asking if anything should be added to the role of the teacher poster.

If you are interested in licensing Code.org materials for commercial purposes, contact us.

Session 9: Assessment

30 minutes

discussion-based

Purpose

The goal of this time is for participants to familiarize themselves with the unit 3 chapter 1 project expectations while gaining confidence in providing feedback to students using the provided rubric.

Objectives

  • Become familiar with the resources available to support assessment of a summative project
  • Gain comfort in applying the project rubric to assess student work

Supplies & Prep

Room Setup:

  • Participants will work in pairs with a partner that shares a similar grading method (ABC, standards based, mastery, non-graded, etc.)

Facilitator Supplies:

Teacher Materials:

  • Computer

Agenda

Warm Up (10 minutes)

Rubric Practice (15 minutes)

Reflection (5 minutes)

Teaching Guide

Warm Up (10 minutes)

(3 minutes) Introduction

Remarks

Up to this point, we have explored many of the main programming concepts within Unit 3 Chapter 1. Along the way, we have talked about how to integrate formative assessment in a variety of ways. Now we are going to shift to focus on summative assessment. Chapter 1 concludes with a cumulative project. In this session, our goal is to understand how to assess this end of chapter project using the provided rubric.

  • Participants navigate to U3L14 in Code Studio
  • Point out the exemplar resources in bubble 1

(8 minutes) Read and Discuss

  • Read the Lesson 14 project guide exemplar (3 minutes)
  • Discuss in table groups: What content and skills are being assessed through this project? (4 minutes)
  • Rapid Share Out: quick popcorn share of a few skills that come to mind for participants. (1 minute)

Rubric Practice (15 minutes)

Facilitator Note: This activity will likely look different for teachers who have different levels of comfort with CS content. Use the activity modifications as needed.

Teaching Tip

As you circulate, listen for participants that focus their attention on students losing points on the rubric. Although some teachers might naturally go to a space where a rubric is a way to assign points, try to refocus them on finding evidence to support a certain level of achievement. This simple shift in language helps teachers to feel more comfortable in their ability to give appropriate feedback to students. It is easier for a teacher to say there is not enough evidence to support a higher level of achievement than it is for a teacher to justify why a student “lost” points. This also refocuses the conversation around a growth mindset. (Role of the Teacher: Provide students with fair and accurate feedback on creative work in order to promote continuous growth)

Participant Instructions:

  • Navigate to bubble 1 of U3L14. Open the Sample Marked Rubrics document
  • Begin with sample one. Click on the link to view the sample project. Work with a partner to find evidence to justify why the project was scored the way it was scored on the sample rubric.
  • Continue this process with the remaining project samples

Activity Modifications:

  • When participants feel comfortable with the rubric, they can then try to assess sample projects using a blank rubric. They can then compare their assessment with the sample and discuss discrepancies with a partner.
  • Some participants might recognize a content area that they need to further explore before being able to apply a section of the rubric. Encourage them to use available reference resources to gain a better understanding of that content before returning to the rubric scoring exercise.
  • If participants move through this activity very quickly, ask probing questions about how they will incorporate project assessments into their classroom to prompt table discussions.

Reflection (5 minutes)

(2 minutes) Journal

Prompt: What role does the teacher play in summative assessment? How is this role different from formative assessment? How is this role the same as formative assessment?

Journal: Create a Venn Diagram in your journal to brainstorm your thoughts.

(3 minutes) Share Out

Discussion Goal

The goal is for participants to recognize that formative and summative assessment both serve the same purpose of providing students feedback on their learning in order to help them grow in their understanding of new content and development of new skills. They happen at different times in different ways, but the goal is the same. The goal is not the grade. The goal is growth.

The facilitator creates a Venn diagram on chart paper and adds ideas from the group share out. The facilitators ends by asking if there is anything from this share out that should be added to the “Role of the Teacher” poster.


If you are interested in licensing Code.org materials for commercial purposes, contact us.


If you are interested in licensing Code.org materials for commercial purposes, contact us.

Session 11: Unit 3 Conclusions and Connections

10 minutes

facilitator presentation

Purpose

The session is intended to provide a high level overview of course material not covered in PD. Participants will be introduced to key concepts from Chapter 2 of Unit 3 with a focus on concepts that build on content from previous units.

Objectives

  • Gain exposure to additional concepts in Unit 3

Supplies & Prep

Room Setup:

  • Participants are seated in pods

Facilitator Supplies:

Teacher Materials:

Agenda

Concepts that Build (10 minutes)

Teaching Guide

Concepts that Build (10 minutes)

Remarks

We have now explored lessons from chapter 1 of unit 3. Now we are going to take a quick look at how the concepts in chapter 2 build on the concepts from chapter 1.

Teaching Tip

This is a high level overview of material not covered in the workshop. It is not expected that teachers will walk away with a full understanding of these concepts. The goal is for teachers to know what is coming and feel confident that they have the skills necessary to teach Unit 3.

Facilitator Notes:

  • Display the Unit 3 calendar to highlight the lessons that have been covered so far.
  • It might be helpful to have participants use their curriculum guide as a resource for this session.
  • Briefly describes the new concepts that will be introduced in chapter 2 using the slide deck.

(4 minutes) Velocity and Abstraction

  • The facilitator introduces the concept of abstraction
    • Abstraction - a simplified representation of something more complex. Abstractions allow you to hide details to help you manage complexity, focus on relevant concepts, and reason about problems at a higher level.
  • Show the velocity video [Llink]
  • Whole Group Discussion: Discuss the abstraction example from the video (counter pattern is now under the hood of the velocity block)

(1 minute) Collision Detection

Game Lab uses the method isTouching to check whether one sprite is touching another sprite (the target). isTouching returns a Boolean, so it can be used inside a conditional to cause something to happen only when two sprites touch.

(1 minute) Functions

A function is a group of commands (blocks) that you give a name so you can use it over and over again.

(4 minutes) End of Unit Project

  • Give an overview of the project goals and expectations

    • The class plans and builds original games using the project guide from the previous lessons. Working individually or in pairs, the class plans, develops, and gives feedback on the games. After incorporating the peer feedback, the class shares out the completed games.
  • Show a sample project [Link]


If you are interested in licensing Code.org materials for commercial purposes, contact us.

Session 12: Scenarios

30 minutes

discussion-based

Purpose

Teachers will use scenarios to discuss common student needs classrooms, and how to deal with those needs.

Objectives

  • Teachers will develop concrete strategies for addressing student concerns in the course, as well as the student's role in the course
  • Teachers will learn new ideas and approaches from one another

Supplies & Prep

Room Setup:

  • None

Facilitator Supplies:

Teacher Materials:

Agenda

Warm Up (10 minutes)

Classroom Counseling Scenarios (20 minutes)

Teaching Guide

Warm Up (10 minutes)

(2 minutes) Preamble

Remarks

At the 5-day summer workshop, we started thinking about how to recruit and retain students, which is a topic we will re-visit throughout our time together this year. Right now we’re going to shift gears to think about concrete strategies for keeping students engaged in your classroom, which is a key element to supporting students more broadly. For this session we’ll be using some classroom scenarios that will give us shared context for discussion.

Remember the goal — at the 5 day summer workshop many people pointed out that CSD is designed to be for everyone. Note that such a goal doesn’t come by being passive, and getting students through the door is only half the challenge. Once they’re in the room, you have to work to keep them there. This will be our topic of exploration today.

(1 minute) Setup

  • In this scenario, you are teaching CS Discoveries.
  • You’re currently at the end of the first month of the year.
  • You’ve noticed one of your students, Jayden, is not participating in class discussions as much as they did at the beginning of the semester, and has taken on passive roles during in-class activities.
  • In response to Jayden’s recent behavior, you’ve decided to engage Jayden in a one-on-one discussion outside of class to learn more about what’s going on.

(2 minutes) Reflect and Write

Before you begin, we have three questions about what you anticipate.

  • What are your initial thoughts about what may be going on with Jayden?
  • What’s informing these thoughts?
  • What are your goals for your one-on-one with Jayden?

(5 minutes) Share and Discuss

Focusing on the third reflection prompt above, what is our goal for this 1:1 with Jayden?

  • Example goals include: to better understand why Jayden isn't as engaged in class anymore, to help Jayden get excited about class again, to understand what I can do as a teacher to change the classroom to better serve Jayden's needs, etc.
  • As a group, you need to decide on a set of goals for the counseling session. One facilitator should record these goals while the other organizes the discussion.

Classroom Counseling Scenarios (20 minutes)

(1 minute) Setup

Remarks

At your table, you’re going to work through a couple scenes that simulate the conversation between you and Jayden. Improvise how you would act as a teacher - don't feel like you need to answer in a certain way. You have probably had conversations like this before, and as you know, each conversation will likely be different. Just keep an open mind to the variety of ways to approach the situation.

Make sure everyone has an elbow partner to work with (or a group of 3 if odd numbers).

Remarks

There will be two quotes from Jayden, and you will have three minutes per quote to work with your partner to develop a response.

(7 minutes) Case Studies

Give elbow partners three minutes per quote from Jayden to develop a response. Guide teachers to develop responses that work towards the goals established by the group during the warmup.

  1. Jayden: “I really want to be a singer. What does computer science have to do with singing?”
  2. Jayden: “I don’t really see people like me working with computers anyway.”

(10 minutes) Discussion

Spend five minutes per Jayden quote sharing teacher responses. While facilitating the discussion, focus on:

  • Drawing out examples that correspond to the goals of the counseling session (as decided by the group at the start of the session).
  • Ask groups to share both teacher responses (direct quotes) and strategies for drawing out underlying issues with students

(3 minutes) Closing Thoughts

Remarks

As we think about recruiting new students to CS in our class, it’s important that we’re supporting those students once they’re there. Classroom counseling discussions like those we’ve practiced today are a good way to understand your students’ needs, and gives you space to provide individualized support.

Give teachers a minute to talk at their tables and take note of strategies and quotes shared today that they hope to take with them back to their classroom.


If you are interested in licensing Code.org materials for commercial purposes, contact us.

Session 13: Wrap Up

35 minutes

discussion-based | unconference

Purpose

This session begins by wrapping up the “Role of the Teacher” theme for the day. There is also time for facilitators to address specific needs of the teachers in their regions.

In addition, there is time allocated in this session for teachers to complete the workshop survey prior to departing.

Objectives

  • Teachers share final thoughts and ideas around the “Role of the Teacher” theme
  • Teachers will be able to ask region-specific questions.
  • Teachers will provide feedback on the workshop by completing the workshop survey.

Supplies & Prep

Room Setup:

  • None

Facilitator Supplies:

Teacher Materials:

Agenda

Theme Wrap Up (10 minutes)

Clear Question Parking Lot (10 minutes)

Wrap Up (15 minutes)

Teaching Guide

Theme Wrap Up (10 minutes)

(3 minutes) Journaling

The group returns to the “Role of the Teacher” poster that has been created throughout the day. The facilitator highlights a few key themes that have come out through this activity (try to highlight themes related to assessment, debugging / problem solving, referencing resources).

Prompt: Today we have focused on the role of the teacher in a CS classroom. We have seen that the role of the teacher changes often. In your journal, brainstorm ways that you can leverage your role as the teacher to support student learning in Unit 3 and beyond.

(8 minutes) Share Out

Teaching Tip

The “Role of the Teacher” poster is an example of a shared resource that can be referenced later. This is a strategy that teachers can use in their own classrooms. Take a picture of this resource and add it to the shared notes document.

Have participants share their ideas with the whole group.

Clear Question Parking Lot (10 minutes)

Clear Question Parking Lot

Go through the questions in the parking lot and make sure you provide closure by either responding, pointing to where the answer is, or letting them know another way to work on getting the answer.

Wrap Up (15 minutes)

Teaching Tip

Once you close the workshop, teachers should be able to access the survey either through an email or on their Professional Learning page. They can also find it via this link: studio.code.org/pd/workshop_survey/day/1.

(10 minutes) Survey

(5 minutes) Closing Thoughts

Wrap Up the Workshop

  • When will you see each other next?
  • What kind of reminders should people have leaving the day?

If you are interested in licensing Code.org materials for commercial purposes, contact us.

Session 14: Debrief

40 minutes

facilitator debrief

Purpose

Facilitators should use this time time to discuss the day, both good and bad, and then process the workshop survey feedback. Please take advantage of this time to make a plan for future workshops using that feedback. We suggest including your Regional Partner in this portion of the debrief if possible.

Objectives

  • Reflect on the day
  • Make a plan of how to address needs of teachers at between now and the next workshop.

Supplies & Prep

Room Setup:

  • None

Facilitator Supplies:

Teacher Materials:

  • None

Agenda

Reflection (30 minutes)

Make a Plan (10 minutes)

Teaching Guide

Reflection (30 minutes)

(15 minutes) Reflection on the Day

Meet with your co-facilitator(s) to debrief the day’s events. Have your Regional Partner join if possible.

Use page 31 in your Facilitator Handbook as your guide to check in on the rapport of your participants.

(15 minutes) Review Survey Feedback

  • What are a few positive things that teachers pointed out on the survey?
  • Are there any key learning objectives that received low or concerning scores?
  • What do you need to do to help teachers understand these objectives?
  • Are there any concerns brought up on the survey?

Make a Plan (10 minutes)

(10 minutes) Make a Plan

Decide on a few key takeaways for the next workshop.

  • What new goals do you have for yourself?
  • What new goals do you have in working with your co-facilitator?
  • What do you need to address with teachers during the next workshop?
  • Any other notes for you and your co-facilitator?

If you are interested in licensing Code.org materials for commercial purposes, contact us.