Lesson 7: Mini-Project: Your Personal Style
Overview
How can you express your personal style on a web page?
In this optional mini-project, students use what they have learned to create their own styled web page on a topic of their choice. The lesson starts with a review of the CSS that students have learned. They then begin their project by designing a web page and identifying which properties they will use to implement it. They create their web pages in Web Lab and share with the class. After engaging in a formal feedback process, they make final changes to their websites before reflecting on their process. This project can be completed in one day or expanded over several days, depending on the scheduling needs of the class.
Purpose
This project gives students more time to practice the content that they have already learned. It is intentionally open-ended and flexible to allow classes to spend one or several days, depending on the pacing needs of the students or the school calendar.
Agenda
Lesson Modifications
Warm Up
Activity
Wrap Up
View on Code Studio
Preparation
- Print a copy of the project guide for each student.
Links
Heads Up! Please make a copy of any documents you plan to share with students.
For the Teachers
- Your Personal Style - Slides
- Project Guide - Your Personal Style - Exemplar
- Peer Review - Your Personal Style - Exemplar
For the Students
- Your Personal Style - Peer Review
- Your Personal Style - Project Guide
- Your Personal Style - Rubric
Teaching Guide
Lesson Modifications
 Attention, teachers! If you are teaching virtually or in a socially-distanced classroom, please see these modifications for Unit 2.
Warm Up
Journal
Discussion Goal
This discussion allows students to share ideas for their websites, but it is not necessary for everyone to share if they prefer not to. The goal of the discussion is to start students thinking about the topic and encourage them to think of websites as a way to express themselves.
Prompt: What is special about your personal style that you would like to share with the world?
Allow volunteers to share out aspects of their personal style that they think are important.
Remarks
Websites allow us to share our style in creative ways. Today, we are going to work on using what we have learned about CSS to share our style with the world.
Question of the Day: How can you express your personal style on a web page?
Activity
Distribute: Give each student a copy of the Project Guide.
Step 1: Define - State your Goal
Students will already have described personal style in the warm-up, but this is a chance for them to refine what they want to say, or even change their minds about their website style.
Step 2: Prepare - Design your Page
As students answer questions about the design of the page, ensure that they are differentiating between the content of the page and the way that content is styled. After they have completed their designs, ensure that they can identify which CSS properties will be needed for different text on the web pages.
Teaching Tip
New Style, New Project: In order to create opportunities for students to develop a variety of projects and help emphasize their newfound CSS skills, this project is not linked to the previous HTML Mini-Project in Lesson 4. If students would like to build off of their previous work, they can return to their previous project and copy-and-paste their HTML Code into this project. Or, they can use this as an opportunity to build a completely new website to suit their personality.
Step 3: Try - Develop your Page
After you have checked the designs, allow students to log into code studio and code their pages. They will have a chance to review all of the tags they have learned before they start on their web pages. They can complete these activities as a review or use them as resources while they work on their projects.
Step 4: Reflect
Students should have a chance to think about what they liked best about their pages. You may also want to allow students to formally or informally present their work to the rest of the class.
Peer Feedback
As part of this project, you may give students the opportunity to give feedback to their peers using the Peer Review form. This will likely extend the project by at least one day.
Wrap Up
Discussion Goal
Use this share out to get students excited about the things that they will learn in upcoming lessons. If you create a poster, you may also want to cross off topics as you teach them. For topics that are not covered in the curriculum, you can point students to similar topics that are covered or, if appropriate, direct them to outside resources that will guide them in learning those skills.
Journal
How can you express your personal style on a web page?
Prompt: What's one thing that would make your web page better that you don't know how to do yet?
As students share out their ideas, put them on the board or a poster, and try to call out any skills that they will be learning in the next few lessons.
- Lesson Overview
- 1
Student Instructions
Here are some CSS properties that you may have seen in the past couple of lessons. You can use them to review the styles you might want for your web page.
Choose from the following activities:

Add a rule-set for the heading of this article.
Use CSS to change the color of the headings and paragraphs
Align the authors names to the right
Use CSS to change the font family of the headings and paragraphs
Change the size of the fonts for the paragraphs and headings using CSS
Student Instructions
::: details [What is a style sheet?]
A style sheet is a document that controls how a web page will appear. External style sheets are separate files that are linked to the HTML page.
:::
::: details [What is CSS?]
CSS is a language that controls the way content on a web site appears. It uses rule-sets to change the look of a page. Each rule set has a selector, which specifies which elements on the page will be affected, and the rules, which explain how to display the elements. Each rule consists of a property and a value for that property.
Here’s an example of a rule-set that makes the text in an h2 tag blue and cursive:
h2 {
   color: blue;
   font-family: cursive;
}
In this example, h2 is the selector, color and font-family are properties, and blue and cursive are the values for those properties.
:::
::: details [How do I create a new style sheet?] To create a new style sheet, click on the "Add CSS" button above the code area. :::
::: details [What should I name my style sheet?] You can name your style sheet anything, but it's better to choose a relevant name, such as "style.css" or "aboutmestyles.css" so that it's clear what the file is. Your file should always end in the ".css" extension. :::
::: details [How do I rename a file?] To rename a file, you can right click (or control click) on the file name and choose the "Rename" option. This will allow you to type in a new file name. Clicking on a file name after it is already highlighted will also allow you to rename the file. :::
::: details [How do I link a style sheet to a web page?]
To link a style sheet to a web page, open up the code for the web page. Inside the head tag, add the following code <link rel="stylesheet" href="style.css">. Then change "style.css" to the name of your style sheet.
:::
Add Heading Rule
Here is an opportunity to be creative and customize the heading.
# Do this * Add a rule-set for the heading.
Student Instructions
::: details [What is a style sheet?]
A style sheet is a document that controls how a web page will appear. External style sheets are separate files that are linked to the HTML page.
:::
::: details [What is CSS?]
CSS is a language that controls the way content on a web site appears. It uses rule-sets to change the look of a page. Each rule set has a selector, which specifies which elements on the page will be affected, and the rules, which explain how to display the elements. Each rule consists of a property and a value for that property.
Here’s an example of a rule-set that makes the text in an h2 tag blue and cursive:
h2 {
   color: blue;
   font-family: cursive;
}
In this example, h2 is the selector, color and font-family are properties, and blue and cursive are the values for those properties.
:::
::: details [How do I create a new style sheet?] To create a new style sheet, click on the "Add CSS" button above the code area. :::
::: details [What should I name my style sheet?] You can name your style sheet anything, but it's better to choose a relevant name, such as "style.css" or "aboutmestyles.css" so that it's clear what the file is. Your file should always end in the ".css" extension. :::
::: details [How do I rename a file?] To rename a file, you can right click (or control click) on the file name and choose the "Rename" option. This will allow you to type in a new file name. Clicking on a file name after it is already highlighted will also allow you to rename the file. :::
::: details [How do I link a style sheet to a web page?]
To link a style sheet to a web page, open up the code for the web page. Inside the head tag, add the following code <link rel="stylesheet" href="style.css">. Then change "style.css" to the name of your style sheet.
:::
Change Text Color
Change the color of both the heading and the text.
Do this
- Add a rule-set for the heading to make it a different color.
- Add a rule-set for the paragraphs to make them another color.
Student Instructions
::: details [What is a style sheet?]
A style sheet is a document that controls how a web page will appear. External style sheets are separate files that are linked to the HTML page.
:::
::: details [What is CSS?]
CSS is a language that controls the way content on a web site appears. It uses rule-sets to change the look of a page. Each rule set has a selector, which specifies which elements on the page will be affected, and the rules, which explain how to display the elements. Each rule consists of a property and a value for that property.
Here’s an example of a rule-set that makes the text in an h2 tag blue and cursive:
h2 {
   color: blue;
   font-family: cursive;
}
In this example, h2 is the selector, color and font-family are properties, and blue and cursive are the values for those properties.
:::
::: details [How do I create a new style sheet?] To create a new style sheet, click on the "Add CSS" button above the code area. :::
::: details [What should I name my style sheet?] You can name your style sheet anything, but it's better to choose a relevant name, such as "style.css" or "aboutmestyles.css" so that it's clear what the file is. Your file should always end in the ".css" extension. :::
::: details [How do I rename a file?] To rename a file, you can right click (or control click) on the file name and choose the "Rename" option. This will allow you to type in a new file name. Clicking on a file name after it is already highlighted will also allow you to rename the file. :::
::: details [How do I link a style sheet to a web page?]
To link a style sheet to a web page, open up the code for the web page. Inside the head tag, add the following code <link rel="stylesheet" href="style.css">. Then change "style.css" to the name of your style sheet.
:::
Align Text
We want the names of the authors to align to the right side of the page.
Do this
- Figure out which tag holds the authors' names.
- Add a rule-set for that tag to move it to the right side of the screen.

Student Instructions
::: details [What is a style sheet?]
A style sheet is a document that controls how a web page will appear. External style sheets are separate files that are linked to the HTML page.
:::
::: details [What is CSS?]
CSS is a language that controls the way content on a web site appears. It uses rule-sets to change the look of a page. Each rule set has a selector, which specifies which elements on the page will be affected, and the rules, which explain how to display the elements. Each rule consists of a property and a value for that property.
Here’s an example of a rule-set that makes the text in an h2 tag blue and cursive:
h2 {
   color: blue;
   font-family: cursive;
}
In this example, h2 is the selector, color and font-family are properties, and blue and cursive are the values for those properties.
:::
::: details [How do I create a new style sheet?] To create a new style sheet, click on the "Add CSS" button above the code area. :::
::: details [What should I name my style sheet?] You can name your style sheet anything, but it's better to choose a relevant name, such as "style.css" or "aboutmestyles.css" so that it's clear what the file is. Your file should always end in the ".css" extension. :::
::: details [How do I rename a file?] To rename a file, you can right click (or control click) on the file name and choose the "Rename" option. This will allow you to type in a new file name. Clicking on a file name after it is already highlighted will also allow you to rename the file. :::
::: details [How do I link a style sheet to a web page?]
To link a style sheet to a web page, open up the code for the web page. Inside the head tag, add the following code <link rel="stylesheet" href="style.css">. Then change "style.css" to the name of your style sheet.
:::
Change Font Family
Change the font family of both the heading and the text. There are several font families including cursive, fantasy, serif, and monospace.
Do this
- Add a rule-set for one of the heading types to make it a different font family.
- Add a rule-set for the paragraphs to make them another font family.
Student Instructions
::: details [What is a style sheet?]
A style sheet is a document that controls how a web page will appear. External style sheets are separate files that are linked to the HTML page.
:::
::: details [What is CSS?]
CSS is a language that controls the way content on a web site appears. It uses rule-sets to change the look of a page. Each rule set has a selector, which specifies which elements on the page will be affected, and the rules, which explain how to display the elements. Each rule consists of a property and a value for that property.
Here’s an example of a rule-set that makes the text in an h2 tag blue and cursive:
h2 {
   color: blue;
   font-family: cursive;
}
In this example, h2 is the selector, color and font-family are properties, and blue and cursive are the values for those properties.
:::
::: details [How do I create a new style sheet?] To create a new style sheet, click on the "Add CSS" button above the code area. :::
::: details [What should I name my style sheet?] You can name your style sheet anything, but it's better to choose a relevant name, such as "style.css" or "aboutmestyles.css" so that it's clear what the file is. Your file should always end in the ".css" extension. :::
::: details [How do I rename a file?] To rename a file, you can right click (or control click) on the file name and choose the "Rename" option. This will allow you to type in a new file name. Clicking on a file name after it is already highlighted will also allow you to rename the file. :::
::: details [How do I link a style sheet to a web page?]
To link a style sheet to a web page, open up the code for the web page. Inside the head tag, add the following code <link rel="stylesheet" href="style.css">. Then change "style.css" to the name of your style sheet.
:::
Change Font Size
Change the font size of both the heading and the text. You can specify the font size in terms of px (e.g. 16px).
Do this
- Add a rule-set for the heading to make it a different font size.
- Add a rule-set for the paragraphs to make them another font size.
Student Instructions
Check out how you can get even more colors by using RGB codes.
Choose from the following activities:
Learn about RGB and how it can be used to make custom colors.
Add RGB colors to a website.
Student Instructions
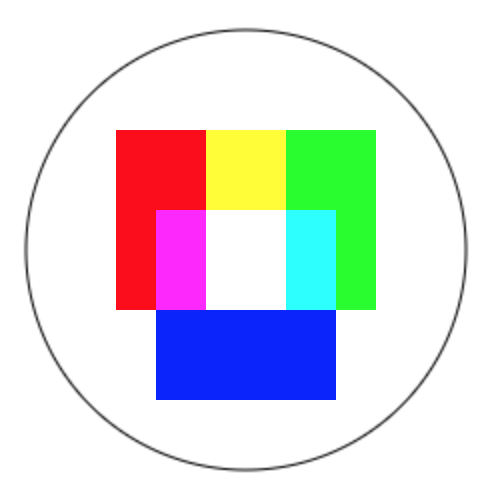
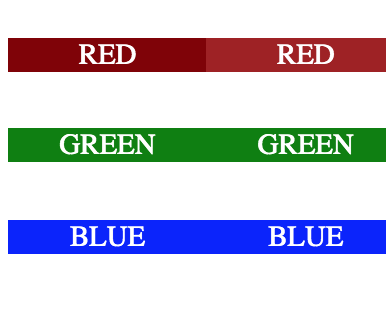
RGB Colors
All colors, whether they have names or not, can be described by the level of red, green, and blue light it takes to make them. This is called an RGB value (short for Red-Green-Blue). You can use the widget on your left to try out different RGB values and see what colors they make.
- Use the sliders to adjust the levels of red, green, and blue light.
- For each of the colors below, match it to its RGB value.
A) red: 216, green: 191, blue: 216 - rgb(216,191,216)
B) red: 255, green: 239, blue: 213 - rgb(255,239,213)
C) red: 250, green: 128, blue: 114 - rgb(250,128,114)
D) red: 70, green: 130, blue: 180 - rgb(70, 130, 180)
E) red: 107, green: 142, blue: 35 - rgb(107,142,35)
Student Instructions
::: details [How does the code work?] For the code to work, you need to both create a class and add elements to the class.
The class is created in the style sheet, with the following code.
.red0 {
  color: rgb(128,0,0);
}
This code creates a class called red0 and makes everything in the class our dark red, which has the RGB values of (128,0,0).
The code that adds a p element to the red0 class is <p class="red0">. The class="red0" inside the opening tag adds everything inside the tag to the class.
:::
::: details [What rules can be added to a class rule-set?]
A class rule-set can have the same rules as any other type of selector. If a rule does not apply to the content of the class (for example, using font-size on an element with no text), then the computer will ignore that rule, but still use the rules that work.
:::
::: details [Why does the selector have a period in front of it?] In CSS, a period in front of a selector means that the selector is the name of a class. If there is no period, it means that the selector is the name of an HTML tag. :::
::: details [Why would a web developer use classes?] A web developer uses classes when some elements should be styled differently than others, even if they are the same tag. Classes can also be used to give elements that have different tags the same style. :::
::: details [I used different RGB values, but mine work, too.]
Because RGB creates millions of different colors, some are so similar that people have a hard time telling them apart. That means that there are multiple RGB values that are close enough to work for our dark red color.
:::
Using RGB
You can use RGB values to get the exact color you want
Do This
- Find the CSS rule-set in the style sheet that gives the red words their style.
- Update the styles for the green and blue words to try different colors using RB codes.
- Add any other rules you'd like for your page.
- Add Content and Structure to Your Page
- 4
Student Instructions
Add HTML
Next, you should add the HTML to your page.
Do This
- Add HTML to make the page you sketched in your project guide.
- Add Style to Your Page
- 5
Student Instructions
Add CSS Styles
Next, you should add the styles to your page.
Do This
- Add CSS properties to make the styles you described in your project guide.
- Review Your Page
- 6
Student Instructions
Review your Page
Next, check to make sure your page has everything you want.
Do This
- Check to make sure all the content is there.
- Check that the HTML tags structure the content correctly.
- Check that the CSS properties style the content correctly.
- Make sure your code is organized, readable and free of bugs.
Standards Alignment
View full course alignment
CSTA K-12 Computer Science Standards (2017)
AP - Algorithms & Programming
- 2-AP-16 - Incorporate existing code, media, and libraries into original programs, and give attribution.
- 2-AP-19 - Document programs in order to make them easier to follow, test, and debug.