Lesson 15: Circuits and Physical Prototypes
Overview
In preparation for this chapter's final project, students will learn how to develop a prototype of a physical object that includes a Circuit Playground. Using a modelled project planning guide, students will learn how to wire a couple of simple circuits and to build prototypes that can communicate the intended design of a product, using cheap and easily found materials such as cardboard and duct tape.
Purpose
The goal of this lesson is both to model for students how thinking about the physical design of a product impacts the prototyping process, and to introduce a handful of practical skills that will make creating their final projects easier.
Agenda
Warm Up (5 min)
Activity 1 (30 min)
Activity 2 (30-45 min)
Activity 3 (30-45 min)
Wrap Up (15 min)
View on Code Studio
Objectives
Students will be able to:
- Create and debug simple circuits
- Develop an interactive physical protype that combines software and hardware
- Consider the needs of diverse users when designing a product
Preparation
- Gather prototyping materials, such as:
- Structural material (cardboard, construction paper, etc)
- Connective material (tape, glue, hot glue, etc)
- Construction tools (scissors, staplers, etc)
- Other materials (cups, binder clips, paper plates, etc)
- Prepare circuit wiring materials, such as:
- Alligator clip wires (included in Circuit Playground classroom kit)
- LEDs (included in Circuit Playground classroom kit)
- Other conductive material (wire, paper clips, foil, etc)
- (optional) Buttons or switches
- Print a copy of Physical Prototyping - Project Guide for each group of 2-3 students
- Prepare a model button to show the class
Links
Heads Up! Please make a copy of any documents you plan to share with students.
For the Students
- How Computers Work: Circuits & Logic - Video (download)
- Physical Prototyping - Project Guide
Vocabulary
- Circuit - A device that provides a path for an electric current to flow, often modifying that current. In computers, circuits allow for simple logical and mathematical operations using electricity.
- Prototype - A first or early model of a product that allows you to test assumptions before developing a final version.
Introduced Code
Teaching Guide
Warm Up (5 min)
Designing a Physical Device
Discussion Goal
The point of this short discussion is to get students thinking about how we might use a board like the Circuit Playground as part of a larger computing device. It's not important that we're able to completely replicate student's ideas with the board, but that we can start thinking about where the board could be used and where we might need to add additional functionality.
Prompt: If you could create any kind of computational device, what would it be? What would it do? How would people interact with it?
Share: After a few minutes of thinking time, have students share their ideas.
Discuss: How might a device like the Circuit Playground help us design and prototype some of these ideas? Consider picking a couple of ideas to put up on the board and list with the class which things features of a given device could be replicated with an element of the board, and which might require additional hardware.
Activity 1 (30 min)
Introducing the Smart Bike
Group: Place students into groups of 3-4.
Distribute: Give each group a copy of Physical Prototyping - Project Guide, and introduce the project. Give students a moment to look over the activity guide. This guide is similar to the one they will be using for their own final projects, but it's already been mostly completed, which allows for them to focus on how to implement the idea, instead of what the idea should be.
Discussion Goal
Students should be able to identify that almost all of the functionality (such as blinking lights, responding to button presses, and buzzing) can be done with the Circuit Playground as is. The major barrier we want to identify is how the physical requirements of the plan (such as placing the blinker lights on the ends of the handlebars) would require adding new hardware to the board. This is intended to tee up the next activity, in which students wire additional circuits onto their boards.
Discuss: Focusing on the description and sketch on the first page, how might we use the Circuit Playground to develop this prototype. Which elements are we currently unable to replicate with the board?
Display: Watch the How Computers Work: Circuits & Logic - Video (level two in the progression) as a class.
Remarks
The elements of our Circuit Playground are all made up of circuits so small that we can't even see most of them, but you can create a simple circuit on your own by attaching wires to the copper pads on the edge of the board.
Distribute: Wires, LEDs, and any other hardware you want available for this portion. Let the class know that before digging too far into building our prototypes, we'll need to learn how to add additional hardware to the board.
Transition: Head to Code Studio to work on the Simple Circuits section.
Activity 2 (30-45 min)
Teaching Tip
Sharing Boards? If you are sharing boards among multiple classes, you'll need to take that into consideration before groups start to build their projects. You may want to add a design constraint that the board must be easily removable from the design, or to create group sizes large enough to ensure that each group in every class has access to a board at all times.
Building the Prototype
Transition: At this point students should have put together the two additional LED circuits necessary for their turn signals. Now we're going to transition off of the computers for a bit to work on building that circuit into a physical prototype.
Distribute: Make available any remaining building materials that you've gathered, such as cardboard and tape.
Teaching Tip
To provide more student ownership and creativity, consider allowing students to modify the form (but not necessary functionality) of the smart bike controller. For example, they may want to turn it into something that the rider could wear, or something that works on skateboards or other modes of transportation. The import element here is that we work in a form that requires adding additional circuits to the board, instead of continuing to work solely within the contrainsts of the board's form.
Build: Allow groups some time to build their prototypes, using the board and LED circuits. While there's a lot of potential functionality that we could build at this point based on the guide, make sure that students are focusing on making the turn signals work.
Test: Once the basic prototype is built, have students test the code they wrote. It's not uncommon at this point to see new bugs that weren't present when testing the software alone. Encourage students to test all elements of their new circuits, ensuring that all of the connection points are solid, that the circuits are connected to the correct pins, and that the LEDs are oriented correctly.
Activity 3 (30-45 min)
Adding Inputs
Display: Put up the sketch on the first page of Physical Prototyping - Project Guide where the whole class can see it. The first prototype that we've constructed takes care of the turn signals, but now we're going to focus on the "horn" feature. Clearly we can use the buzzer to make the horn sound, but how can we control the horn?
Transition: Send students back to the online progression to learn about creating button circuits, which they will then add to their smart bike prototypes. This portion of the progression will take them all the way through finalizing their designs and submitting the code.
Wrap Up (15 min)
Sharing Designs
Share: Give each group an opportunity to share their designs. Take some time to notice and celebrate the differences in design - even in a situation where we are all working from the same plan, each individual will bring their own experiences and perspectives to the design of a product.
Discussion Goal
This discussion is intended to tie the physical design work students are doing now to the work they did in unit 4. Though we haven't explicitly asked students to spend the same amount of energy thinking about users and their needs in this project, it's still an essential element of good design. Push your students to consider how the design of physical computing devices brings new challenges and opportunities when it comes to designing for a diverse set of users.
Discuss: Using some of the specific design choices as an example, discuss with the class how their design choices impact the usability of their products. What assumptions did we make about our users, and how might our design choices have excluded or disadvantaged different user groups.
- Lesson Overview
- Student Overview
- Circuits and Logic
- Student Overview
Student Instructions
Make a Prediction
All of the devices that you've used so far are actually circuits connected to numbered pins! Look for #13 on your board to see which circuit is connected to pin 13, then read through this code and predict what will happen when the program is run.
Teaching Tip
Learning More About LEDs
We include LED sequins in the Circuit Playground classroom pack, but if you're careful you can use just about any LEDs you like. To learn more about pairing LEDs with the proper resistor, check out Adafruit's LED primer.
Student Instructions
Teaching Tip
Why Are We Talking Pins?
You may notice that in the early levels of this lesson students are programming in a much different way than they have before, directly manipulating pins. The digitalWrite() and pinMode() commands are useful to get our wiring set up quickly, but are not the core concerns of this lesson. As soon as students are comfortable wiring LED circuits we will introduce techniques to control those LEDs with the higher level commands that have been used up to this point (like led.on() and led.off()).
Student Instructions
Wire a Circuit
You can use any of the numbered pads to add additional circuits to your board. Let's use pin 2 to add another LED.
Do This
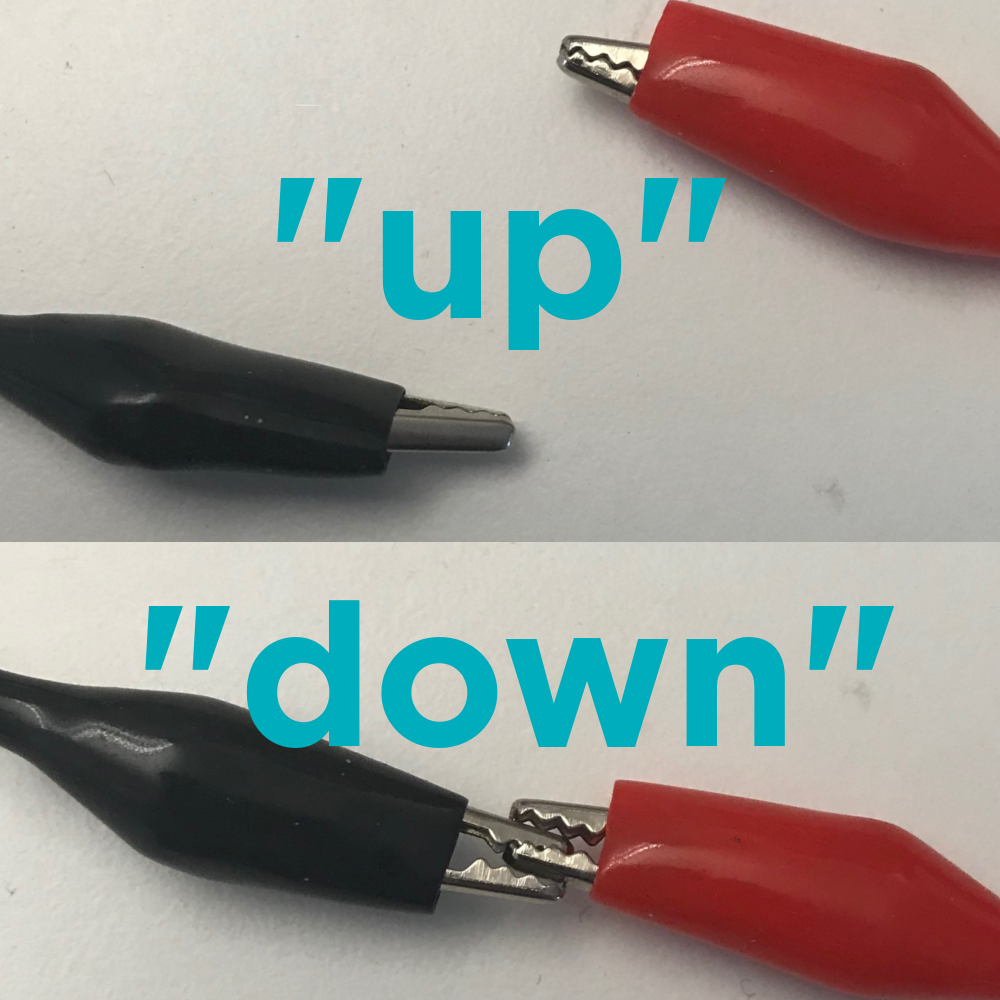
- Using a wire, connect pin 2 to the positive (+) side of an LED
- Using another wire, connect the negative (-) side of the LED to a ground (GND) pin (it doesn't matter which one)
- Run this program to test your circuit. If it worked, your LED should turn on.
Debugging Tip: LEDs only work if the electricity is flowing from positive to negative. If your LED doesn't light up, make sure that it's oriented the right way.
Student Instructions
Creating Board Objects
You might have noticed that the new blocks we're using are in a different toolbox drawer. The Circuit drawer contains all of the board objects that are built into the Circuit Playground, but when you start wiring your own circuits the Maker Toolkit no longer knows where everything is.
The new Maker drawer contains general purpose commands instead of ones that are customized for the Circuit Playground. In addition to the pinMode() and digitalWrite() commands you've seen, it includes commands to create new objects on the board that can be programmed in the same way as the blocks in the Circuit drawer. The var myLed = createLed() command, for example, creates a new LED object that behaves just like the led blocks you've been using.
Do This
Now that you're creating new board objects that we don't have blocks for, you'll need to work in text mode. You can still drag out blocks that you're familiar with from the Circuit drawer, you'll just need to change the name of the object.
- Keep your LED wired just as it was before (connected to pin 2)
- Make sure you're in text mode, not block mode.
- Drag out an
led.blink()block below the commentBlink myLed. - Replace the text
ledwithmyLed. - Test your code.
Student Instructions
Wiring Multiple LEDs
Using the createLed() block you can connect and control as many LEDs as your board has room for. Each LED needs to be connected to a separate numbered pin, but they can all share the same ground pin.
Do This
Leave the current LED connected to pin 2, but add another one to a numbered pin of your choice. For your new LED:
- Add a
var myLed = createLed()block. - Replace the variable label
myLedwith a unique label. - Make sure you're in text mode, not block mode.
- Add an
led.blink()command. - Replace the text
ledwith your new LED variable. - Test your code.
Challenge: Try adding a third LED and make all three LED blink at different intervals.
Student Instructions
Smart Bike - Blinkers
Using your planning guide, wire up the two LEDs that will serve as the blinkers. In order to make sure that the blinkers can be mounted at the end of the handlebars, make sure you wire them so that they can stretch out in opposite directions.
Do This
Using alligator clips, wire, or other conductive material, connect two LEDs to your board, one for each turn signal blinker.
- Hook up each LED to a different numbered pin on the board.
- Use the
createLed()block to create an LED object for each blinker.
Tip: Make your wiring easier by considering how your blinkers will be mounted when selecting a pin to use.
Student Instructions
Smart Bike - Blinker Controls
With your turn signal LEDs hooked up, you just need to program some buttons to control them. You may want to place buttons elsewhere on the bike to make controlling your turn signals easier, but for now we'll just use the built in left and right buttons.
Do This
- Add event handlers to blink the left turn signal when the left button is pressed.
- Add event handlers to blink the right turn signal when the right button is pressed.
- Test your code!
Hint: You'll need to be in text mode to make the blinkers work, since there are no built-in blocks for the elements that you add on to the board.
Student Instructions
Build Your Blinkers
Using the circuit you just built, return to your smart bike prototype and add the blinkers.
Student Instructions
Make Your Own Buttons
Similar to LEDs, buttons are a really simple circuit that you can add to your board pretty easily. Like LEDs, buttons should be wired from a numbered pin to a ground pin, but unlike LEDs, a button circuit should be disconnected in the middle. When you connect the circuit, it will produce a button press event.
Do This
- Grab two wires.
- Connect one wire to an open numbered pin.
- Connect the second wire to a ground pin.
- Update line 2 so that it's referencing the pin you chose.
- Run the provided code.
- With the program running, touch the unconnected ends of both wires together to "press" the button.
Tip: A button circuit can be made with many different kinds of materials, as long as they are electrically conductive. Try making buttons with foil, silverware, or paper clips.
Student Instructions
Smart Bike - Buzzer
Now that we know how to add more buttons, you can add a button to control the smart bike's horn.
Do This
Using the button that you've already wired to the board, find a good spot to place your horn button. Then:
- Create a button object for your horn button
- Add an event handler to buzz when button is pressed
Hint: The button object that you create won't be in the onBoardEvent() dropdown, so you'll need to type the name you've chosen in. Make sure not to use quotation marks!
Student Instructions
Smart Bike - Headlight
The last part of the smart bike plan that we need to figure out is the automatic headlight.
Do This
First you'll need to decide what to use for your headlight. You could add another LED circuit, or perhaps you can find a way to mount the board that allows for using the color LEDs as a headlight. Once you've figured out the physical layout of your lights, add code to your program that turns on and off the headlight based on how light or dark it is.
Hint: If you're using the built-in color LEDs, you might need to protect the light sensor to make sure that it's responding to the ambient light level and not the light from the LEDs.
Student Instructions
Smart Bike - Final Touches
At this point your smart bike should have all of its basic functionality in place. Now is your chance to add any finishing touches.
Do This
You may want to divide and conquer at this point, allowing some members of your group to focus on the physical aspects of the prototype while others work on improving the code. As this is a prototype, don't worry about making everything perfect, but do try to ensure that the prototype communicates your design well enough to test and get feedback.
Standards Alignment
View full course alignment
CSTA K-12 Computer Science Standards (2017)
AP - Algorithms & Programming
- 2-AP-10 - Use flowcharts and/or pseudocode to address complex problems as algorithms.
- 2-AP-11 - Create clearly named variables that represent different data types and perform operations on their values.
- 2-AP-14 - Create procedures with parameters to organize code and make it easier to reuse.
- 2-AP-19 - Document programs in order to make them easier to follow, test, and debug.
CS - Computing Systems
- 2-CS-02 - Design projects that combine hardware and software components to collect and exchange data.
- 2-CS-03 - Systematically identify and fix problems with computing devices and their components.
IC - Impacts of Computing
- 2-IC-21 - Discuss issues of bias and accessibility in the design of existing technologies.