Lesson 10: Building an App: Color Sleuth
Overview
This lesson attempts to walk students through the iterative development process of building an app (basically) from scratch that involves the use of if statements. Following an imaginary conversation between two characters - Alexis and Michael - students follow the problem solving and program design decisions they make for each step of constructing the app. Along the way they decide when and how to break things down into functions, and of course discuss the logic necessary to make a simple game.
The last step - writing code that executes an end-of-game condition - students must do on their own. How they decide to use if statements to end the game will require some creativity. The suggested condition - first to score 10 points - is subtly tricky and can be written many different ways.
At the conclusion of the lesson there are three practice Create PT-style questions as well as resources explaining the connection between this lesson and the actual Create PT. Depending on how you use these materials they can easily add an additional day to this lesson.
Purpose
The purpose here is for students to see how "experts" would approach writing an app from scratch when all you have to start out with is a sketch on paper of some idea. Research has shown that what novices often need is an expert walk-through to explain the rationale behind certain decisions and to see the kinds of problems they anticipate and solve. There are a few key things that happen in this lesson that we hope students see and take to heart:
- There is no one "correct" way to approach writing a program
- You don't write programs "in order" from top to bottom - you write in pieces and organize the code into sections and functions.
- Start with a small problem to solve - solve it and move to the next one
- Use a buddy or "thought partner" to talk things through
- Sketch out pseudocode on paper to get your thoughts straight
- If you get stuck, there is always something small you can do to make progress
After this lesson students are prepared to complete the AP Create PT. If you have more time in your year you may continue through Unit 5 Chapter 2 before beginning the task. When you decide to begin the task use the materials in the AP Create PT Prep unit to further prepare students. For more details refer to pages 32 and 33 of the CSP Curriculum Guide .
Agenda
Getting Started
Activity
Wrap Up (15-50 mins)
View on Code Studio
Objectives
Students will be able to:
- Write code to implement solutions to problems from pseudocode or description
- Follow the iterative development process of a collaboratively created program
- Develop and write code for conditional expressions to incorporate into an existing program
- Write a large program from scratch when given directions for each step
Links
Heads Up! Please make a copy of any documents you plan to share with students.
For the Students
- Color Sleuth and the AP Create PT - AP Explanation
- Color Sleuth - Rubric
Vocabulary
- Boolean Expression - in programming, an expression that evaluates to True or False.
- Conditionals - Statements that only run when certain conditions are true.
- If-Statement - The common programming structure that implements "conditional statements".
- Selection - A generic term for a type of programming statement (usually an if-statement) that uses a Boolean condition to determine, or select, whether or not to run a certain block of statements.
Introduced Code
Teaching Guide
Getting Started
Remarks
In this lesson you're going to build an app from scratch, but you'll have guidance and help. The app you'll make will require you to apply all of the skills you've learned so far:
- Adding event handlers
- Using variables
- Breaking problems down into functions
- Using
ifstatements
In the lesson, you'll follow the path of two imaginary students - Alexis and Michael - as they walk through each of the problems that have to get solved along the way. They'll do the thinking and problem solving, you'll write the code.
This project will mirror many of the elements of the Create PT which we'll look into more deeply at the end of the project. At the end of this project you should know all the programming skills you'll need to complete that task.
Here is what you're going to make...
What are you worried about? Where to Start?
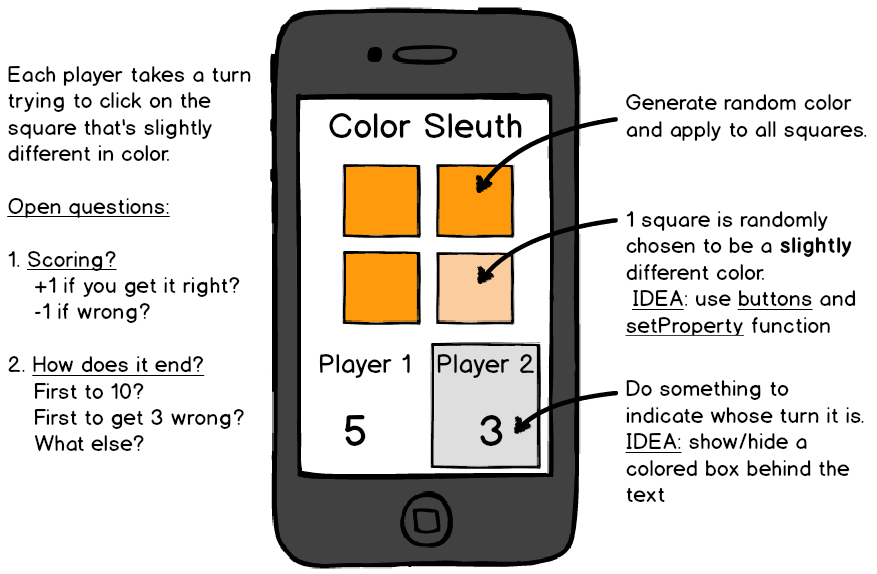
Show this image of the sketch mock-up of the app.
- Students can also find it in code studio in the lesson introduction.
With this image on display...
Prompt:
"Looking at just this sketch of the app with its few notes about what it's supposed to do...What are you thinking?...What are you worried about?...Are there elements of this that you're not sure you know how to program?"
With an elbow partner write down two things:
- Make a quick list of things you're not sure you know how to program yet, or things you're worried about.
- What would be the first thing you'd try to get working? (Assume that all of the design layout is done -- what's the first code you'd write to get things started?)
Discussion Goal
This is an informal way to do the first part of a KWL (Know, Want-to-know, Learned) Chart. You can do a formal one for this lesson if you think it would be helpful.
The point of the conversation here is really just to activate students' thinking about what they do and don't know.
For things they don't know or they're worried about you can assure them that techniques for doing those things are revealed in the lesson
For where they should start encourage students to start with what they know, rather than what they don't. A good way to make progress on an app is start by adding things they know first since that will help get them started.
Let students discuss with their partners for a few minutes.
Open discussion to the group: What are you worried about? Where would you start?
Possibilities for "Worried about:"
- Making random colors with code
- Choosing a random button to make a different color
- Knowing whether the user clicked the "right" button or not
- Switching player turns
- Keeping track of whose turn it is - and the score
- How does the game end?
Possibilities for "Where to start":
- NOTE: almost anything is possible, encourage students to start with things they know rather than things they're worried about, like:
- Adding event handlers for the button clicks
- Adding a variable (or two) to keep score
- Can they use what they know about
randomNumberto generate these random colors? -- worth looking into.
Activity
Transition to Code Studio
Students can work individually or with a partner
- As usual, we recommend that students at least have a coding buddy - someone they can work with and ask questions of as they work through the exercises.
- It's also reasonable to have students pair-program during this lesson, switching off writing the code at each level.
Wrap Up (15-50 mins)
Gallery Walk (Optional)
- In theory students made some of their own personal modifications - you can do a gallery walk to share
- You can also gallery walk to look at and appreciate code for the end-of-game conditions.
Review the Epilogue
-
The last level in code studio contains some text about the app development walk through. Students don't have to read it, but you should review its key points about:
-
how and why writing code is a creative process
- There is no one correct way to do things
- The realistic parts of Alexis and Michael's conversation
Teaching Tip
Ready for the Create PT: After completing this lesson students will have the minimum skills they need to complete the AP Create PT. Time permitting you should continue through Unit 5 Chapter 2 and get as far as you can before starting the Create PT - the more programming students have under their belts the better.
When you do opt to begin it, students should use the materials in the AP Create PT Unit to prepare. You can find it as a unit in the dropdown menu to assign to your section in the teacher dashboard.
Connections to the AP Create Performance Task
Distribute: Color Sleuth and the AP Create PT - AP Explanation (students can find a link on Level 1 of this lesson)
-
This document explains how the elements of this project, and the process, map to each requirement for the AP Create PT.
-
Point out to students that if they had gone through a similar process as Alexis and Michael that this project basically meets the requirements of the AP Create Performance Task. The trick would be provide written responses that properly highlight everything.
-
You could optionally have students practice writing responses to the real AP Create Task writing prompts using this document as a guide.
Other Create PT Options and Resources:
-
There are three questions (bubbles) at the end of this lesson in style of the Create PT. They use the color sleuth project as an example as though it were submitted for the Create PT. Two questions address algorithms and one is a refresher on abstraction.
-
Optionally pull out the AP Digital Portfolio Student Guide - Resource so that you can have it on hand to review the different components of the Create PT.
-
Optionally head over to the AP Create Task Prep Unit if you'd like to go more in depth with Create Task review at this point.
Review if statements for assessment
The stage that follows this one is an assessment the covers if-statements. You can review the kinds of "toy" problems that appear in the AP Assessment, many of which are similar to the kinds of problems students did in the exercises in lessons prior to this one.
That includes the unplugged "will it crash?" exercises. You might look at those again for review.
- Unit 5 Lesson 10 Introduction
- Teacher Overview
- Student Overview
Teaching This Lesson
This lesson looks like it has a lot of reading. The reading should go fairly fast since it's written like a script of two people talking.
You can think about your pause points in this lesson, where you might gather everyone to check for understanding, or at least do a check-in with various groups.
- There are a few unavoidably tricky steps in the latter half of the lesson - steps that require students to modify or add to the code in more than one place in order to see the next thing. It's worth verifying that students have successfully completed these before moving on.
You might also consider reading out loud some parts of the script - particularly some the tricker decision-making points - to make sure students understand what decision was made and why.
- It's also important to acknowledge along the way what's recapped in the Epilogue - that what we're walking students through here is NOT the one true correct way to make this app. Each decision, while well-reasoned, is relatively arbitrary.
- The goal of the script is to provide a model for collaboration, thinking about problems in small pieces, and how a process of iterative development can lead to a robust project.
Unit 5: Lesson 10 - Building an App: Color Sleuth
Background
(click image above to enlarge)
Follow two imaginary characters, Alexis and Michael, as they walk through building an app from scratch - The Color Sleuth App. As you follow the story Alexis and Michael will solve problems and make decisions about how to write the code, but you will do all of the actual code writing.
Vocabulary
This vocab should be review but it comes up in this lesson
- Boolean Expression - in programming, an expression that evaluates to True or False.
- Conditionals - Statements that only run under certain conditions.
- If-Statement - The common programming structure that implements "conditional statements".
- Selection - A generic term for a type of programming statement (usually an if-statement) that uses a Boolean condition to determine, or select, whether or not to run a certain block of statements.
Lesson
- Warm-up: What are you worried about, where would you start?
- Activity: Building an app: Color Sleuth walk-through
- Wrap-up: Gallery Walk and Review the Epilogue
Introduced Code
Resources
-
Color Sleuth Project Rubric (copy as MS Word, Google Doc)
-
Explanation of how the final color sleuth project meets the requirements of the AP Create Performance Task
- Color Sleuth and the AP Create PT - AP Explanation (copy as MS Word, Google Doc)
- Color Sleuth - Planning the App
- Student Overview
Planning an App
We're going to walk through several phases of development for an app that uses if statements and conditionals in various ways.
The goal is to follow a creative process from beginning to end to see how ideas come to life, as well as to use your new knowledge of if statements.
To do this we will follow a discussion between two characters MICHAEL and ALEXIS who work together to share ideas about how to design the app and write the code.
Of course, you will be the one actually writing the code but following MICHAEL and ALEXIS will give you insight into the development process.
MICHAEL
Hey Alexis, I want to make an app, can you help me think through it? Be my thought partner?
ALEXIS
Of course. Happy to. What have you got?
MICHAEL
So I want to make an app that tests people's perception of color difference, but I want to make it a little game. Here's a sketch of what I have in mind.
ALEXIS
Wow. This is a great sketch. I think I get it. What do you need help with?
MICHAEL
Well, how should I start?
ALEXIS
It seems to me that first thing you probably want to figure out it how to generate the squares of color. Nothing works without that. So tackle that first, and worry about scoring and taking turns later.
MICHAEL
Okay, you're probably right. I had an idea for how to do that when I noticed the setProperty command in App Lab.
ALEXIS
setProperty? What's that?
MICHAEL
You know how in Design Mode you can set properties of a button, like its color, width, height, and so on?
Well with setProperty you can do the same thing with code!
ALEXIS
I see. Cool.
MICHAEL
Here look at this diagram...
Click continue to see the diagram
- How Set Property Works
- Student Overview
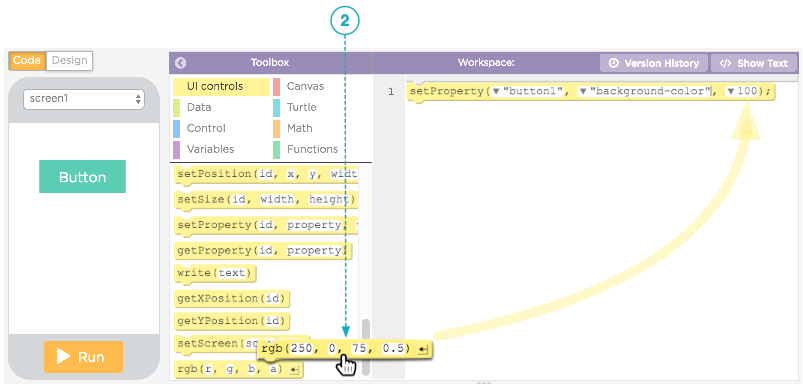
How setProperty Works
setProperty is the code that lets you set properties of UI elements like color, width, font size, etc. Any property you can set in Design Mode can also be set in code using setProperty
1. In Code Mode you can find setProperty in the UI Controls toolbox.
2. Choose the id of the UI element you want to change a property of
3. The pulldown menu shows a list of properties that you can set for that element. It matches the list of properties that you see for an element in Design Mode
4. The last parameter is the value you want to set for that property. We're interested in background-color which has a variety of values you can give it.

How to set the "background-color"
There are a number of ways you can specify colors in App Lab.
1. background-color is a string (in quotes) that represents the color. Typically the string is a named color like "red" or a hex value.

2. you can also use the rgb function to set the color. The rgb function is a convenient way to compose colors by setting each color channel individually.
3. You'll notice that the rgb function has 4 parameters for the red, green, blue and alpha values you want. The alpha value is decimal number between 0 and 1 that represents how opaque the color is (opaque is the opposite of transparent) as a percentage. 1 means fully opaque, and for example 0.5 means 50% opaque.
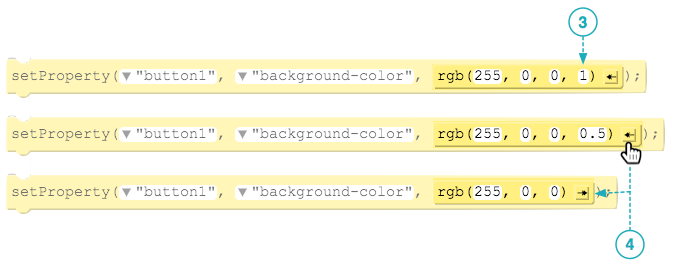
4.You can omit the alpha value entirely - it will default to 1.0 - by clicking the parameter arrow to collapse the last parameter. For the app we're making we probably don't need transparent colors so this will make our code simpler to read.
5.The rgb function actually just returns a color string as well. If we store the value that rgb returns in a variable then we can simply plug in that variable as the value for setProperty for several different UI elements if we want. Below we use myColor to set both the button color and the icon color of the screen.

Let's try it...
Student Instructions
You try it -- use setProperty
Time to get coding! This is the starting point for a whole new project.
- We've started you out with all of the UI elements in place. You'll work with this design and layout for now.
- We've also started you out with some code that sets the color of one of the buttons.
- Use setProperty 3 more times to set the color of the other 3 buttons so all 4 are orange.
- We've chosen an orange color
rgb(230,155,0)for now, but this will change later.
- We've chosen an orange color
Student Instructions
Let's make one square slightly different
Add two lines to the bottom of the code you have that look like something like this.
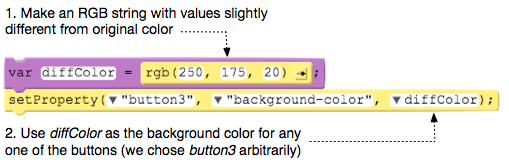
What does this do? We're doing two things...
- Creating a variable to hold the RGB string of a different color, and
- Overwriting the background color of one of the buttons after having just set it a few lines earlier
Yes, this means your code will change the background color of one of the buttons a few lines after you just set the color in the first place but it will happen so fast you won't notice, and doing it this way will be useful later on.
- How to pick a random button
- Student Overview
How to pick a random button
ALEXIS
Okay, great. setProperty works. What's next?

MICHAEL
Well, I wanted to pick one of the squares at random to make the different colored one. Also, I want the color to be random, not just orange, every time.
ALEXIS
Okay, well I'm not sure about the colors yet, but I do have an idea for how to choose one of the buttons randomly.
MICHAEL
I'm all ears.
ALEXIS
Okay, notice how all the buttons have IDs that are pretty much the same? "button1", "button2", "button3", "button4". There's a pattern. It's always: "button" + some number
So I think we can use a trick we learned a while ago to build a string...
MICHAEL
Ah, I think I see where you're going...
ALEXIS
We can use randomNumber as the number, and then just tack it on to the string "button" and Presto!, we'd have generated one of the button IDs.
MICHAEL
Right. We can do something like this: var randButtonId = "button"+randomNumber(1,4);
Then we can add that into our existing code like this:
    var diffColor = rgb(250, 175, 20);                    // make different color
--> var randButtonId = "button"+randomNumber(1,4);            // make a random button ID
    setProperty(randButtonId, "background-color", diffColor); // set bgcolor of randomButtonId to diffColor
ALEXIS
Cool. Let's try it.
Click continue to try it
- How to Pick a Random Button
- 7
Teaching Tip
Common Mistake
- It's likely that some students will forget to remove the quotation marks and accidentally try to use
"randButtonID"as the id in setProperty like this:
setProperty("randButtonID", "background-color", diffColor);
There should be no quotation marks because you want to use the value stored in randButtonID not the string "randButtonID". It should look like the example in the instructions:
Student Instructions
You try it - Pick a button at random to make a different color
We've included the code discussed on the previous page below.
The last lines of your code should look something like this:
var diffColor = rgb(250, 175, 20);
var randButtonId = "button"+randomNumber(1,4);   // create a random button Id
setProperty(randButtonId, "background-color", diffColor);  // set its color to diffColor
Notice that there is really only one new line - to make the randButtonID variable.
The other change is to replace "button3" as the id in setProperty with randButtonID.
Suggestion:
Add console.log(randButtonId) somewhere after you generate the button ID so you can see which button is supposed to have the different color. It might be hard to spot!
- How to make a random color
- Student Overview
How to make a random color
ALEXIS
Hey, we can use the same technique to make a random color!
MICHAEL
I was thinking the same thing. We can use the `rgb` command with 3 random numbers
ALEXIS
Right, so rather than hard-coding the string like var color = rgb(230, 155, 0); we can make 3 random numbers between 0-255, put each in a variable, and then use them to make the color.
MICHAEL
Yup. I think the code should look something like this:
var R = randomNumber(0,255);
var G = randomNumber(0,255);
var B = randomNumber(0,255);

var color = rgb(R, G, B);
ALEXIS
Genius! But wait a second. Now I'm worried about making our slightly different color. For testing with the orange we just added 20 to each of the R, G, and B values.
MICHAEL
We can do that now, too! If we make diffColor after color we can just add 20 to each variable before making a new string.
ALEXIS
Right, the code should look like this:
R = R+20;  //add 20 to current value of R
G = G+20;
B = B+20;

var diffColor = rgb(R, G, B);
MICHAEL
Good, but I think there's still a problem. What about numbers that are close to 255? For example, there's a chance that the 3 random numbers we make will come out to be something like (250, 250, 250). If we add 20 to each of those the values will be over 255. I don't know what happens if you try to specify a color with a value greater than 255.
ALEXIS
Well, I know that's actually not a problem. If you try to specify a color as something like rgb(270, 290, 300) the actual color will end up being rgb(255,255,255) anyway. It doesn't break the system, I tried it back when we were doing turtle programming.
MICHAEL
Okay, that's good news. But I just thought of another problem...
Even if large values for RGB don't break the system, our problem is that the color won't look very different. The difference between rgb(250,250,250) and rgb(255,255,255) is practically nothing. It will look basically the same and the person won't be able to play very well.
ALEXIS
Hmmm. Right. Well...here's an idea. What if we don't generate random numbers between 0 and 255? What if we just generate random numbers between 0 and 235? Then no matter what, if we add 20 it can't possibly go over 255.
MICHAEL
Brilliant! Okay so back when we generate the random color in the first place we should do this:
var R = randomNumber(0,235);
var G = randomNumber(0,235);
var B = randomNumber(0,235);

var color = rgb(R, G, B);
ALEXIS
Right and then you can use the same thing we came up with before - adding 20 to each of the RGB values to make diffColor.
MICHAEL
Nice. Okay, let's try it.
## Click continue to try it- How to Make a Random Color
- 9
Teaching Tip
Students may have trouble figuring out where to insert this code since we're now not just adding to the end of the program. You can look at the exemplar, but here is the suggested solution.
// make an RGB string with random values -- only up to 235 so we can safely add 20 later
var R = randomNumber(0,235);
var G = randomNumber(0,235);
var B = randomNumber(0,235);
var color = rgb(R, G, B);

// use the random RGB string as the bgcolor for all 4 buttons
setProperty("button1", "background-color", color);
setProperty("button2", "background-color", color);
setProperty("button3", "background-color", color);
setProperty("button4", "background-color", color);

// make an RGB string where each value is +20 from the color created above
R = R+20;
G = G+20;
B = B+20;
var diffColor = rgb(R, G, B);

// generate a random button ID
var randButtonID = "button"+randomNumber(1,4);

// make a randomly chosen button have the color that's +20
setProperty(randButtonID, "background-color", diffColor);
Student Instructions
You try it - make a random color

First: Make the basecolor be a string with random values in it rather than hard-coded.
Second: Add 20 to each of the R, G, B values to make diffColor
This means you will have to insert several lines of code in two different places in your program: just before you create var color and just before var diffColor.
Run multiple times to test! - Each time you run the program you should see randomly chosen colors with a randomly chosen button that's slightly different.
Code Reference from Alexis and Michael's discussion [click to expand]
Here is the code they discussed for creating an RGB string with random values:
var R = randomNumber(0,235);
var G = randomNumber(0,235);
var B = randomNumber(0,235);

var color = rgb(R, G, B);
And here is the code they discussed to make diffColor:
R = R+20;  //add 20 to current value of R
G = G+20;
B = B+20;
var diffColor = rgb(R, G, B);
Teaching Tip
This step is deceptively simple. You're just wrapping up all the code you wrote inside a function called setBoard
Common Mistake: forgetting to call setBoard() at the top of the program after putting all the code inside a function. If a student says it's not working or their screen is blank, that's probably why.
Here is the suggested solution.
setBoard();  // call setBoard

function setBoard() {           // define setBoard
  var R = randomNumber(0,235);
  var G = randomNumber(0,235);
  var B = randomNumber(0,235);
  var color = rgb(R, G, B);
  setProperty("button1", "background-color", color);
  setProperty("button2", "background-color", color);
  setProperty("button3", "background-color", color);
  setProperty("button4", "background-color", color);

  R = R+20;
  G = G+20;
  B = B+20;
  var diffColor = rgb(R, G, B);
  var randButtonID = "button"+randomNumber(1,4);
  setProperty(randButtonID, "background-color", diffColor);
}
Student Instructions
Next Step - encapsulate "game board" creation in a function
Let's call the 4 buttons with random colors the "Game Board." Assuming that your program now creates a new randomly generated game board each time you run, let's take the next step.
When playing the game we need to create a new game board repeatedly, not just when the program starts. Since we have a chunk of code that we want to use repeatedly, that's a clue we should take that code and put it in a function.
DO THIS:
- Define a new function called
setBoard. - Move all of the code that sets the colors of the buttons inside the function - this is actually all the code you have so far.
- Add a call to
setBoard()as the first line of code in the program to verify that it works - When you're done the code should look like this:
setBoard();
function setBoard(){

    < all the button color setting code
    you wrote from previous exercises >
}
TIP: This is easy in text-mode [click to expand]
Because this is a relatively large chunk of code to move inside a function, it might be easier to do in text mode.

NOTE: The program should not behave any differently after this step - we're just organizing the code to make it more useful. In the next step will make more use of setBoard(). For now, just make the function and call it once.
Student Instructions
Next: display which button was chosen in the console
In the game the "correct" button is the one we randomly chose to make a different color. Let's add a console.log message to display its ID - it will make future work easier.
- add a console.log message like
console.log("correct one is: " + randButtonId)at the end of thesetBoardfunction. - overall the setBoard function will look like this:
function setBoard(){

    // generate random color
    // make all 4 buttons have same color
    // pick a random Button Id
    // set its color to something different

    console.log("correct one is: " + randButtonId);  <-- Add this line
}
- U5 color sleuth check correct
- Student Overview
Next Step - Activating buttons
MICHAEL
Okay great we can produce random game boards!
What next?
ALEXIS
I think the next thing would be to add click-functionality to the buttons.
MICHAEL
Yeah, where if you click on a button we check whether it's the right one or not. So we're going to need 4 event handlers, one for each button.
ALEXIS
Right. Actually I'm thinking this would be a great time for another function. That will save us from writing the same code over and over again in each event handler.
The function should:
- Check whether they hit the right button or not
- Update the score
MICHAEL
Ooh, and we should also change the game board every time a button is clicked, too.
ALEXIS
Good thinking. We can put that in this function too since it's called on every button click. Let me sketch out what I'm thinking...

MICHAEL
I get it. Cool. So now my question is: How will the function know which button is correct?
ALEXIS
Hmm. Good question.
MICHAEL
Oh, what if we just made randButtonId a global variable? That way every time setBoard() is called, it generates a new random id and it becomes a global variable that any other function can look at.
Here, let me add to the sketch...
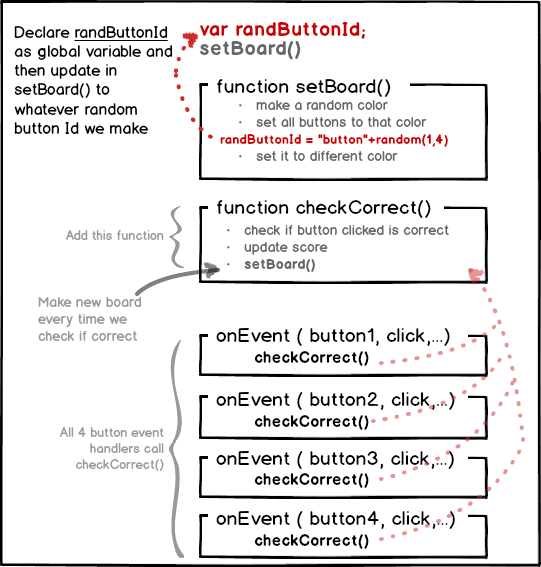
ALEXIS
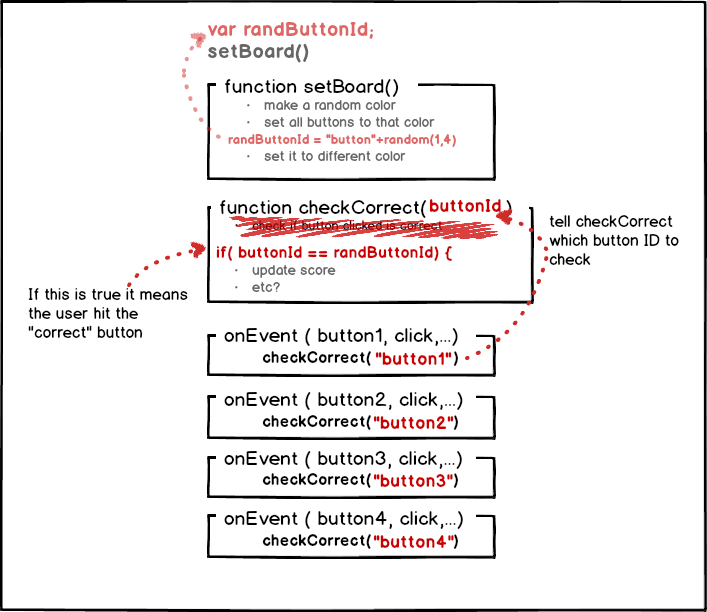
Ok, good. randButtonId is actually the "correct" button to click in the game, and it's now a global variable. But now checkCorrect() needs a way to know both which button was hit so we can compare it to randButtonId.
MICHAEL
What if we gave checkCorrect a parameter? So if you call checkCorrect("button3") for example, it checks whether "button3" is correct and updates the score.
ALEXIS
I see, good idea. Seems like a pretty easy if-statement to write we compare the buttonId passed to the function and randButtonId
Here, I'll sketch it out...
MICHAEL
Nice. But, wow, that's a lot to change.
ALEXIS
True, but I'm glad we thought this out on paper first. I think we can do it. We shouldn't do it all at once, though. We should do it in steps, and at each step verify that the change is working.
MICHAEL
Let's just do that with console.log messages. At each step will just add console.log messages to verify that things are working, and we can remove them later if we want.
ALEXIS
Yeah. Let's take it in pieces. I suggest:
- Add global var for correct button
- Add 4 event handlers
- Add function checkCorrect(id)
- Add if-statement to verify correctness.
MICHAEL
Let's do it.
Teaching Tip
Here is a working version of where students should be at this point.
var randButtonID;
setBoard();

function setBoard() {
  var R = randomNumber(0,235);
  var G = randomNumber(0,235);
  var B = randomNumber(0,235);
  var color = rgb(R, G, B);
  setProperty("button1", "background-color", color);
  setProperty("button2", "background-color", color);
  setProperty("button3", "background-color", color);
  setProperty("button4", "background-color", color);

  R = R+20;
  G = G+20;
  B = B+20;
  var diffColor = rgb(R, G, B);
  randButtonID = "button"+randomNumber(1,4);
  setProperty(randButtonID, "background-color", diffColor);
  console.log("correct button is: "+randButtonID);
}
Student Instructions
Step 1 - Make randButtonId a global variable
Making randButtonId global means modifying the code to declare/create it outside of any function and then setting its value inside setBoard().
- Create a new variable on line 1:
var randButtonId; - Switch to text-mode
- Inside the setBoard() function, delete the
varin front ofrandButtonIdso that rather than re-creating the variable, we set the value of the global one.
Updated code should look like this (new or updated lines have <-- arrows)
var randButtonId;     <-- declare as global variable
setBoard();
function setBoard(){

    //...set board code...

    randButtonId = "button"+randomNumber(1,4);    <-- remove "var" from assignment

}
Testing it out
Unfortunately, there is not much to test here other than to determine your code still functions. This is just a step that doesn't really change any functionality.
- If it works the same as before, it's probably right, move on.
- If it's broken or doesn't run double-check the changes you made.
Teaching Tip
Common mistakes:
- If students are getting error messages about unknown variables, be on the lookout for student mixing up use of variables with strings. For example in the event handler it should be:
checkCorrect("button1")and NOTcheckCorrect(button1).
Working version of the code at this point:
var randButtonID;
setBoard();

function setBoard() {
  var R = randomNumber(0,235);
  var G = randomNumber(0,235);
  var B = randomNumber(0,235);
  var color = rgb(R, G, B);
  setProperty("button1", "background-color", color);
  setProperty("button2", "background-color", color);
  setProperty("button3", "background-color", color);
  setProperty("button4", "background-color", color);

  R = R+20;
  G = G+20;
  B = B+20;
  var diffColor = rgb(R, G, B);
  randButtonID = "button"+randomNumber(1,4);
  setProperty(randButtonID, "background-color", diffColor);
  console.log("correct button is: "+randButtonID);
}

function checkCorrect(buttonId) {
  console.log("checking: "+buttonId);
  setBoard();
}

onEvent("button1", "click", function() {
  checkCorrect("button1");
});
onEvent("button2", "click", function() {
  checkCorrect("button2");
});
onEvent("button3", "click", function() {
  checkCorrect("button3");
});
onEvent("button4", "click", function() {
  checkCorrect("button4");
});
Student Instructions
Steps 2 and 3 - Add checkCorrect(buttonId) and Event Handlers
This feels like a big step, but it's actually just a few small ones. We'll see some new functionality at the end.
-
Add a function definition for
checkCorrect(buttonId)that:- Contains a console.log message to display the parameter
- Calls setBoard()
function checkCorrect(buttonId){
    console.log("Checking: "+buttonId);
    setBoard();
}
-
Add 4 "click" event handlers - one for each button - that call checkCorrect
- The event handling functions should call
checkCorrect(...)with its button id. - So for button1 it should look something like:
onEvent("button1", "click", function(){
    checkCorrect("button1");
});
- The event handling functions should call
TESTING
Once you've added this code you should really see some changes. When you click on buttons you should see: 1. Console messages showing what was clicked 2. The board should change each time you click a button 3. Console messages showing the correct answer for each new board.
Teaching Tip
Common Mistakes
-
Students may have trouble knowing where to insert the if-else statement in the code. See the example below to give them guidance.
-
Output will be very confusing if students put the if-statement AFTER the call to setBoard() since that would effectively change the board before you had a chance to verify the click was correct.
-
Make sure that each call to
checkCorrectfrom the eventHandlers is passing the correct buttonId -- for example a copy/paste oversight might have all of them callingcheckCorrect("button1"), or of course a misspelling or capitalization problem likecheckCorrect("Button1")won't throw any errors but won't give correct results since there is no button with the id (Capital B)"Button1"- it needs to be"button1" -
If students didn't make
randButtonIda global variable properly, then things won't consistently work right at this stage. Make sure they're not re-declaring the variable withvarinside the function.
Code at this point
var randButtonId;
setBoard();

function setBoard() {
  var R = randomNumber(0,235);
  var G = randomNumber(0,235);
  var B = randomNumber(0,235);
  var color = rgb(R, G, B);
  setProperty("button1", "background-color", color);
  setProperty("button2", "background-color", color);
  setProperty("button3", "background-color", color);
  setProperty("button4", "background-color", color);

  R = R+20;
  G = G+20;
  B = B+20;
  var diffColor = rgb(R, G, B);
  randButtonId = "button"+randomNumber(1,4);
  setProperty(randButtonId, "background-color", diffColor);
  console.log("correct button is: "+randButtonId);
}

function checkCorrect(buttonId) {
  console.log("checking: "+buttonId);
  if( buttonId == randButtonId ) {
      console.log("You got it right!")
  } else {
      console.log("WRONG");
  }
  setBoard();
}

onEvent("button1", "click", function() {
  checkCorrect("button1");
});
onEvent("button2", "click", function() {
  checkCorrect("button2");
});
onEvent("button3", "click", function() {
  checkCorrect("button3");
});
onEvent("button4", "click", function() {
  checkCorrect("button4");
});
Student Instructions
Step 4 - add an if-statement in checkCorrect
Add a simple if-else statement inside the function checkCorrect that:
- Compares
buttonIdandrandButtonIdand - Displays a message to console that they got right or wrong
Insert something like this between your existing console.log statement and the call to setBoard()
    if( buttonId == randButtonId ) {
        console.log("You got it right!");
    } else {
        console.log("WRONG");
    }
TEST IT: Verify that the if-statement is giving correct results

- You should be able to click on buttons and see messages that verify your if-statement is working
- Be sure to click on all the buttons to test the scenarios
- Is it detecting correct or incorrect button clicks properly?
- Is it changing the board every time?
- Your console output might look something like what's shown at right.
TIP: It might be useful to temporarily remove or comment out the call to setBoard() so the board doesn't change every time when you click. This would let you verify that every button works right for a single board setup. Then add it back in once you're done.
- Color Sleuth - How to switch player turns
- Student Overview
Whose turn is it?
ALEXIS
Wow, it's really beginning to feel like a game!
MICHAEL
I know. So now let's think about scoring.
It's not so simple because what we want is for the players to take turns.
ALEXIS
Right, to update the score we need to know which player clicked a button. That means we need a way to indicate whose turn it is, and then update things based on that.
MICHAEL
I think we can just make another global variable to keep track. We can just store a number: 1 for player 1 and 2 for player 2. Then every time a button is clicked, we make a new game board, and we can also switch the player from 1 to 2, or 2 to 1.
ALEXIS
Okay, so there are actually two major things we need to do:
- Alternate turns between player1 and player2 each time a button is clicked
- Update player1's score if it was her turn or player2's score if hers.
MICHAEL
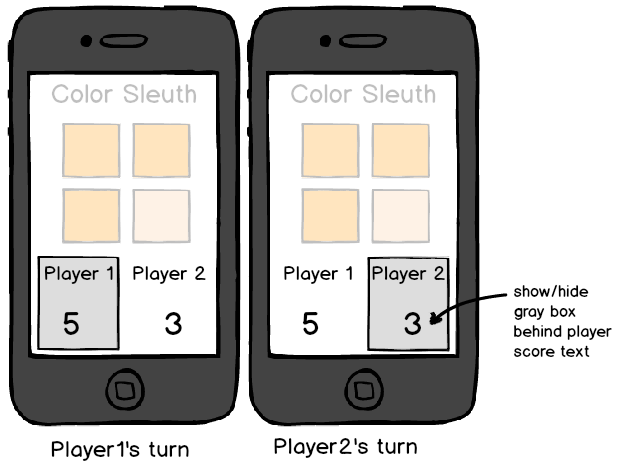
Probably yeah. Also, I wanted to indicate on the screen whose turn it is by showing and hiding a simple gray box behind the player's score, like this:
So, part of alternating turns is to update the screen to show whose turn it is. What should we do first?
ALEXIS
Well, I think we should start by getting the alternating player action working first. Because we can't really test whether we're updating the correct player's score unless we have it.
MICHAEL
Mhm. Good thinking. So let's start with get alternating turns working.
ALEXIS
It seems like we're going to need a small if statement that says something like "if it's player1's turn right now, then make it player2's turn, otherwise (it must be player2's turn so) make it player1's turn."
MICHAEL
Maybe we should put the code into another function that handles just the switching of the player and updating the screen. Call it something like switchPlayer().
ALEXIS
I think I follow. let's make sure we're both thinking the same thing. Let me add to the pseudocode here...
MICHAEL
I like it.
ALEXIS
Okay, let's add it with just console.log statements to verify for now. We'll update the UI once we know we have the variable changing correctly.
MICHAEL
Sounds good. Let's do it.
Click to try it
Teaching Tip
This is another pretty big step because you need to modify the code in 3 different places.
It helps to point out the pattern we identify here:
- Add a global variable
- Add a new function definition (that updates that variable in some way)
- Add a call to the new function you just made.
We don't have to add a new function do this. We could have just written the if-statement into the checkCorrect function. But that would start to become big and unwieldy. We are trying to model the fact that you can anticipate cases where your code will be easier to read and maintain if you are able to break the discrete parts of the problem into functions.
The more the code inside a function can read like a description of how to solve the problem, the better. For example you might sketch out check correct like this:
Check Correct:
- update the score
- make a new board
- switch player turns
At this point we have nice tidy functions for the last two parts: setBoard() and switchPlayer().
Working version of the code at this point:
var currentPlayer = 1;
var randButtonId = 1;
setBoard();

function setBoard() {
  var R = randomNumber(0,235);
  var G = randomNumber(0,235);
  var B = randomNumber(0,235);
  var color = rgb(R, G, B);
  setProperty("button1", "background-color", color);
  setProperty("button2", "background-color", color);
  setProperty("button3", "background-color", color);
  setProperty("button4", "background-color", color);

  R = R+20;
  G = G+20;
  B = B+20;
  var diffColor = rgb(R, G, B);
  randButtonId = "button"+randomNumber(1,4);
  setProperty(randButtonId, "background-color", diffColor);
  console.log("correct button is: "+randButtonId);
}

function checkCorrect(buttonId) {
  console.log("checking: "+buttonId);
  if( buttonId == randButtonId ) {
      console.log("You got it right!");
  } else {
      console.log("WRONG");
  }
  setBoard();
  switchPlayer();
}

function switchPlayer(){
  if(currentPlayer==1){
    currentPlayer=2;
  } else {
    currentPlayer=1;
  }
  console.log("current player: "+currentPlayer)
}

onEvent("button1", "click", function() {
  checkCorrect("button1");
});
onEvent("button2", "click", function() {
  checkCorrect("button2");
});
onEvent("button3", "click", function() {
  checkCorrect("button3");
});
onEvent("button4", "click", function() {
  checkCorrect("button4");
});
Student Instructions
Next Step - Alternating Turns
This is another step that requires 3 parts. But notice there is a pattern to what we're starting to do, and it is a common one:
- Add a global variable
- Add a new function definition (that updates that variable in some way)
- Add a call to the new function you just made.
And that's exactly what you're going to do right now.
- Add global
var currentPlayer = 1to the top of the program. -
Add a new function definition in your code for
switchPlayer()with an if-statement and console.log message. It should look something like this:function switchPlayer(){ if(currentPlayer==1){ currentPlayer=2; } else { currentPlayer=1; } console.log("current player is: "+currentPlayer); }
-
Add a call
switchPlayer()as the last line inside thecheckCorrectfunction
TEST IT OUT

- After you add this code, you should see a new message in the console amongst the others indicating whose turn it is. The output might look something like the output shown at right (look for lines that say current player is: 2)
- Note: right now most of our output is in the console because it's easy and fast to verify that things are working. We'll start updating the UI next!
Teaching Tip
Current working version:
Update made to switchPlayer function.
var currentPlayer = 1;
var randButtonId = 1;
setBoard();

function setBoard() {
  var R = randomNumber(0,235);
  var G = randomNumber(0,235);
  var B = randomNumber(0,235);
  var color = rgb(R, G, B);
  setProperty("button1", "background-color", color);
  setProperty("button2", "background-color", color);
  setProperty("button3", "background-color", color);
  setProperty("button4", "background-color", color);

  R = R+20;
  G = G+20;
  B = B+20;
  var diffColor = rgb(R, G, B);
  randButtonId = "button"+randomNumber(1,4);
  setProperty(randButtonId, "background-color", diffColor);
  console.log("correct button is: "+randButtonId);
}

function checkCorrect(buttonId) {
  console.log("checking: "+buttonId);
  if( buttonId == randButtonId ) {
      console.log("You got it right!");
  } else {
      console.log("WRONG");
  }
  setBoard();
  switchPlayer();
}

function switchPlayer(){
  if(currentPlayer==1){
    currentPlayer=2;
    showElement("player2_highlight");
    hideElement("player1_highlight");
  } else {
    currentPlayer=1;
    showElement("player1_highlight");
    hideElement("player2_highlight");
  }
  console.log("current player: "+currentPlayer);
}

onEvent("button1", "click", function() {
  checkCorrect("button1");
});
onEvent("button2", "click", function() {
  checkCorrect("button2");
});
onEvent("button3", "click", function() {
  checkCorrect("button3");
});
onEvent("button4", "click", function() {
  checkCorrect("button4");
});
Student Instructions
Update the UI to indicate whose turn it is

A choice has been made for you in the design of the app to indicate whose turn it is in the UI.
- Notice in the design that there are two gray rectangles behind the player scores with ids
player1_highlightandplayer2_highlight.player2_highlightstarts out hidden.
Do this:
Add code to the if statement in switchPlayer
Use the hideElement and showElement commands (found in the UI controls toolbox) to show and hide these rectangles as a way of indicating whose turn it is.
* For example if it's player 1's turn, then show player1_highlight and hide player2_highlight
When you're done you should see the player highlight alternate like the graphic above.
TIP: Make the player2_highlight start out hidden by checking the "hidden" box for it in design mode.
- Color Sleuth - Keeping score
- Student Overview
Updating the Score
ALEXIS
Okay, now let's think about our if statement in checkCorrect and how to update the score properly. How do you want scoring to work?
MICHAEL
I think I want to make it so that if you guess correctly you get 1 point, but if you get it wrong you lose 3 points!
ALEXIS
Okay cool. To do that though we need to know which player's score to update.
MICHAEL
Right. To update the score we actually need to know two things:
- If the correct button was pressed or not and
- Which player's score we need to update
ALEXIS
Well, first of all, it sounds like we need new global variables to keep track of each player's score.
MICHAEL
Right. Let me make a note of it.

ALEXIS
And to know which player's score to update we can just nest some if-statements inside our current one. Let me hack out some pseudocode:

Ugh. Just writing that down felt like a lot.
MICHAEL
Yeah, I was thinking we could use a series of compound expressions like this.

MICHAEL
Blech. Not much better.
ALEXIS
I just thought of a 3rd option...and don't hate me for suggesting this, but...we could make another function called something like updateScoreBy(amountToAdd).
And this function's whole job is to figure out whose turn it is and add the amount given in the parameter to the correct player's score.
MICHAEL
Mmmmm. Interesting. But what if we need to subtract from the score? Do we need a new function?
ALEXIS
Actually, No! We can just give a negative number to the parameter if we want to subtract! If we add -3 to the score that's the same as subtracting.
MICHAEL
Oh, that's clever! Will it save us code?
ALEXIS
Maybe, let me sketch it out.

MICHAEL
So, the total amount of code is about the same as the if-statements, but I think this is SO much easier to read.
ALEXIS
I agree. Look how clean and easy to read checkCorrect is this way.
MICHAEL
So, you convinced me, we need to add another function. I'm sensing a pattern.
ALEXIS
Yeah, we're going to need to do the same kind of thing we did before:
- Add global variables for player1 and player2 scores
- Add a new function to update the score
- Call that function from the appropriate places.
MICHAEL
That's basically what we had to do last time.
ALEXIS
Yup. Let's do it again but for this new problem.
MICHAEL
Let's get coding!
Click continue to do it
Teaching Tip
Current working version of the code for this point:
var p1Score=0;
var p2Score=0;
var currentPlayer = 1;
var randButtonId;

setBoard();

function setBoard() {
  var R = randomNumber(0,235);
  var G = randomNumber(0,235);
  var B = randomNumber(0,235);
  var color = rgb(R, G, B);
  setProperty("button1", "background-color", color);
  setProperty("button2", "background-color", color);
  setProperty("button3", "background-color", color);
  setProperty("button4", "background-color", color);

  R = R+20;
  G = G+20;
  B = B+20;
  var diffColor = rgb(R, G, B);
  randButtonId = "button"+randomNumber(1,4);
  setProperty(randButtonId, "background-color", diffColor);
  console.log("correct button is: "+randButtonId);
}

function checkCorrect(buttonId) {
  console.log("checking: "+buttonId);
  if( buttonId == randButtonId ) {
      console.log("You got it right!");
      updateScoreBy(1);
  } else {
      console.log("WRONG");
      updateScoreBy(-3);
  }
  setBoard();
  switchPlayer();
}

function updateScoreBy(amt){
  if(currentPlayer==1){
    p1Score += amt;
  }
  else{
    p2Score += amt;
  }
  console.log("P1 Score: "+p1Score);
  console.log("P2 Score: "+p2Score);
}

function switchPlayer(){
  if(currentPlayer==1){
    currentPlayer=2;
    showElement("player2_highlight");
    hideElement("player1_highlight");
  } else {
    currentPlayer=1;
    showElement("player1_highlight");
    hideElement("player2_highlight");
  }
  console.log("current player: "+currentPlayer);
}

onEvent("button1", "click", function() {
  checkCorrect("button1");
});
onEvent("button2", "click", function() {
  checkCorrect("button2");
});
onEvent("button3", "click", function() {
  checkCorrect("button3");
});
onEvent("button4", "click", function() {
  checkCorrect("button4");
});
Student Instructions
Next Step - add function updateScoreBy
We're going to follow the same pattern we used when adding switch player. We'll add variables, a function, calls to the function, and for now just use console.log statements to verify we've got things working.
- Add global variables to the top of the code:
var p1Score=0;andvar p2Score=0; -
Add a new function definition
updateScoreBywith an if-statement and console.log to verify. Something like this:function updateScoreBy(amt){ if(currentPlayer == 1){ p1Score = p1Score + amt; } else { p2Score = p2Score + amt; } console.log("P1 score: " + p1Score); console.log("P2 score: " + p2Score); }
-
Add calls to
updateScoreBy(1)andupdateScoreBy(-3)to the appropriate place inside the if statement in thecheckCorrectfunction.- You can leave your console.log statements in there for now as well. Just add calls to
updateScoreByalong with them.
- You can leave your console.log statements in there for now as well. Just add calls to
TEST IT OUT
When you run the program now you should be able to verify in the console that the player's scores are updating. Study the console output to make sure and verify that:
- updateScoreBy is being called from checkCorrect with each click
- if you have console.log statements in
updateScoreBythen you should at least see that it's being called with each click
- if you have console.log statements in
- The correct player's score is being updated
- The scores are being updated by the correct amount
A sample of the output might look like this:

Teaching Tip
Common Mistakes
Most mistakes here are going to be related to:
- Misspelling and capitalization. i.e.
"score1_label"v."score1_Label" - Mixing up strings and variables. i.e. correct:
setText("score1_label", p1Score)- first param is a string second is variable holding the value.
A working version of the code at this point looks like this:
var p1Score=0;
var p2Score=0;
var currentPlayer = 1;
var randButtonId;

setBoard();

function setBoard() {
  var R = randomNumber(0,235);
  var G = randomNumber(0,235);
  var B = randomNumber(0,235);
  var color = rgb(R, G, B);
  setProperty("button1", "background-color", color);
  setProperty("button2", "background-color", color);
  setProperty("button3", "background-color", color);
  setProperty("button4", "background-color", color);

  R = R+20;
  G = G+20;
  B = B+20;
  var diffColor = rgb(R, G, B);
  randButtonId = "button"+randomNumber(1,4);
  setProperty(randButtonId, "background-color", diffColor);
  console.log("correct button is: "+randButtonId);
}

function checkCorrect(buttonId) {
  console.log("checking: "+buttonId);
  if( buttonId == randButtonId ) {
      console.log("You got it right!");
      updateScoreBy(1);
  } else {
      console.log("WRONG");
      updateScoreBy(-3);
  }
  setBoard();
  switchPlayer();
}

function updateScoreBy(amt){
  if(currentPlayer==1){
    p1Score += amt;
  }
  else{
    p2Score += amt;
  }
  console.log("P1 Score: "+p1Score);
  console.log("P2 Score: "+p2Score);
  setText("score1_label", p1Score);
  setText("score2_label", p2Score);
}

function switchPlayer(){
  if(currentPlayer==1){
    currentPlayer=2;
    showElement("player2_highlight");
    hideElement("player1_highlight");
  } else {
    currentPlayer=1;
    showElement("player1_highlight");
    hideElement("player2_highlight");
  }
  console.log("current player: "+currentPlayer);
}

onEvent("button1", "click", function() {
  checkCorrect("button1");
});
onEvent("button2", "click", function() {
  checkCorrect("button2");
});
onEvent("button3", "click", function() {
  checkCorrect("button3");
});
onEvent("button4", "click", function() {
  checkCorrect("button4");
});
Student Instructions
Next step - update the UI to show the score.

This is pretty easy at this point.
There are UI text labels for the player's scores called score1_label and score2_label.
Add setText statements at the end of the function (either replace the console.log statements, or just add after them). The label for player 1 would look like this:
setText("score1_label", p1Score);
TEST IT OUT
- After adding the
setTextstatements you should see the score being updated with each click (see animation). - You can actually play the game a little bit now!
Why set both text labels each time? [click to expand]
You might be wondering why we set both text labels each time updateScoreBy is called, rather than putting it inside the if-statement to set the text of the appropriate label. After all, only one score is changing every time.
- Color Sleuth - How does it end?
- Student Overview
The End Game
ALEXIS
All right! This is fun.
MICHAEL
Okay, the last thing we need to do is have a way for the game to end.
ALEXIS
What are you thinking?
MICHAEL
Well, I don't know. I can see a lot of possibilities. I do know that I want there to be a winner, and when the game is over it switches a different screen that says "Game Over" and says who won. Like this:

ALEXIS
Sounds do-able. So, how do you want to determine the winner?
MICHAEL
I was thinking something simple, just based on the score.
ALEXIS
Let's come up with a few ideas...
MICHAEL
I was thinking about the rule being: First to 10 wins. Keep playing until one person's score reaches 10.
ALEXIS
Interesting. What about First to get 3 wrong loses? That's tougher because you'd have to add a variable to count incorrect clicks for each player and add additional if-statements.
MICHAEL
Maybe, I'll look into that. How about: Play until the difference in scores is greater than 5?
ALEXIS
They might play forever that way! How about making it a team game: play until the combined score score is 20 or something like that?
MICHAEL
Or play until, combined, they get 3 wrong?. That would be easier to count since we'd just need a single variable.
ALEXIS
Well that's a lot of ideas. Whatever you choose, I think how you should add the code will basically be the same and we can follow the same pattern -- add a function.
MICHAEL
I agree. I think in checkCorrect, right after we update the score, we should check if the game is over before setting the board or switching players. Like this:

ALEXIS
Yeah, I see. So in checkGameOver() if the game is over you'll just switch screens right there, and set some labels. Otherwise do nothing.
MICHAEL
Right. checkGameOver will appear to do nothing most of the time, because it's just checking the conditions behind the scenes. But once the end-of-game condition is hit, the screen will switch.
ALEXIS
So if you add this function, it's just a matter of choosing your condition.
MICHAEL
Okay, well. I think I can handle it from here. Thanks for all your help, Alexis.
ALEXIS
Don't mention it! It was fun. I'm looking forward to playing your game.
MICHAEL
Me too. Just need to finish it...
Click continue to finish the game
- Project: Finish Color Sleuth
- Teacher Overview
- Student Overview
This is probably going to be the hardest level because there is the least amount of guidance.
Also, the end game condition can be written a number of different ways. Even for a particular condition like "first to 10" there are several different ways you could go about it. This is intentional in order to spur actual problem solving, and encourage students to talk to each other about possible solutions.
Encourage students to: Study the pseudocode diagram from the previous page - it has the outline of what you need to add to the code Don't forget to add a little bit and test with console.log statements * Ask a friend for help.
2 possible ways to write the checkGameOver function are provided in the examples found in the teacher panel, each using a different technique of if-statements that we learned about.
Challenge - Pick a way for the game to end and implement it
Your challenge now is to add some code completely on your own. Use what you've learned so far, and Alexis and Michael's discussion to help you.
This is the last programming level
- Make all changes and additions to the program that you want here
- When you're done hit Submit
Goal: Add code that provides a way for the game to end which:
Switches to the gameOver_screen
Shows which player won the game by showing player1Win_label or player2Win_label
We've provided gameOver_screen as part of the template for this project -- Switch to Design Mode to take a look at what's there
Suggestions
If you're stuck for ideas, try to implement the end game condition of "first to 10" - first player to reach a score of 10 wins.
You should use the suggestion from the discussion to add a function like checkGameOver() and call it from checkCorrect
Above and Beyond: optional extra options for your project [Click to expand]
Here are a bunch of ways you can add to or extend the project:
- Add "start over" button on the last screen, which should reset everything, and go back to the game play screen
- Add a welcome screen that explains the rules and invites the player to start the game (make it the default screen)
- Make the game more difficult:
- Make the colors more similar (we added 20 to every RGB value, try 15 or 10).
- Or make the difficulty variable - you can generate a random number between 5 and 20 and add that to the RGB values.
- Or make it get progressively more difficult - use a variable to keep track of how much to add to each RGB value and decrease it over time.
- Or on a welcome screen ask if the player wants to play easy, medium, or hard.
- Add a timing element - lookup the documentation for setTimeout which calls a function after a certain amount of time. (Note: you may need to remix the project in as a free-play App Lab project to do this).
- You can also use
getTime()at the beginning and end of your code to figure out how long it took for the game to end, which you could use to adjust the score.
- Color Sleuth - Epilogue
- Teacher Overview
- Student Overview
Use this epilogue as the foundation for wrap up. Either have students read it, review it out loud.
Color Sleuth - Epilogue
There are a million ways to do this
We hope that following the conversation between Alexis and Michael helped to demonstrate both that:
- Writing any program requires making a lot of decisions
- Those decisions often require creativity and problem-solving
But Alexis and Michael came up with just one way to write the program out of many many possibilities. If they had started a different way, or made different decisions along the way, the actual code may have come out much differently, even if the program worked the same.
Writing code is a form of personal expression
This fact - there are so many ways to go about writing the code for an app - is what people find so cool, fun, and engaging about programming.
It's surprising to many people who haven't programmed before that, like any piece of writing, writing code is not like solving a math problem. It's a creative undertaking and the resulting code provides view into the mind of the author.
As evidence, just look at your classmates' solutions for how to end the Color Sleuth game. Even if two people chose the same end game condition - let's say the "first to 10" rule - did they write the code the same way? Probably not. Would you be interested to see the code of someone else who tried to write the same end game condition as you? Probably! You might be interested to see how someone else went about it.
Is Alexis and Michael's conversation actually realistic?
The conversation between Alexis and Michael has been optimized for this lesson - it's shorter than what is probably realistic, and also Alexis and Michael didn't really make any bad decisions. They made decisions and came up with ideas that people with a bit more experience might. Most of the time the things you try out, solutions you come up with, don't all work. Many times you start down one path and realize you might want to start over. That's ok.
While you might not always have as smooth a path to a solution as Alexis and Michael, the way that they are portrayed talking to each other is realistic. In fact, it captures many of the elements of the actual conversations between the authors of Color Sleuth app as they developed it for this lesson.
How people actually collaborate
If you study the elements of Alexis and Michael's conversation, the realistic part is the way they talk to each other about writing code. It's not like solving a math problem, but more like figuring out how to build something.
Here are the elements modeled in the conversation that we hope you take to heart and use when you are collaborating to write programs:
- Approach someone to ask them to be a "thought partner"
- Suggest solutions as options rather than correct answers
- Recognize that you are picking one path of many toward a working program
- Sketch things out on paper as you go
- Use earlier decisions to form a foundation, a set of patterns, to build on later
- Take a small step and verify it works before making more decisions
- Don't write the code from top to bottom, but fill it in with pieces
- Start with small, manageable pieces, then build and combine to make something bigger
Onward
As you move forward try to collaborate in this way. It's not about getting the right answer, it's about finding a path that works.
Student Instructions
AP Practice - Create PT - Abstraction
One component of the AP Create Performance Task is describing an abstraction within your program.
-
2d. Capture and paste a program code segment that contains an abstraction you developed individually on your own (marked with a rectangle in section 3 below). This abstraction must integrate mathematical and logical concepts. Explain how your abstraction helped manage the complexity of your program.
(Must not exceed 200 words)
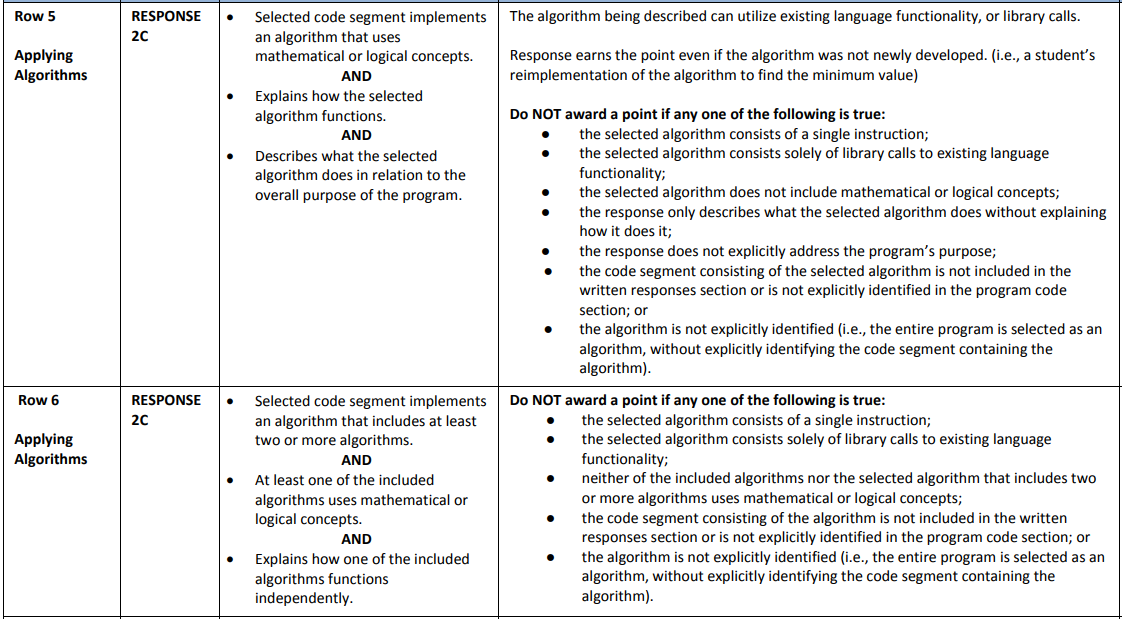
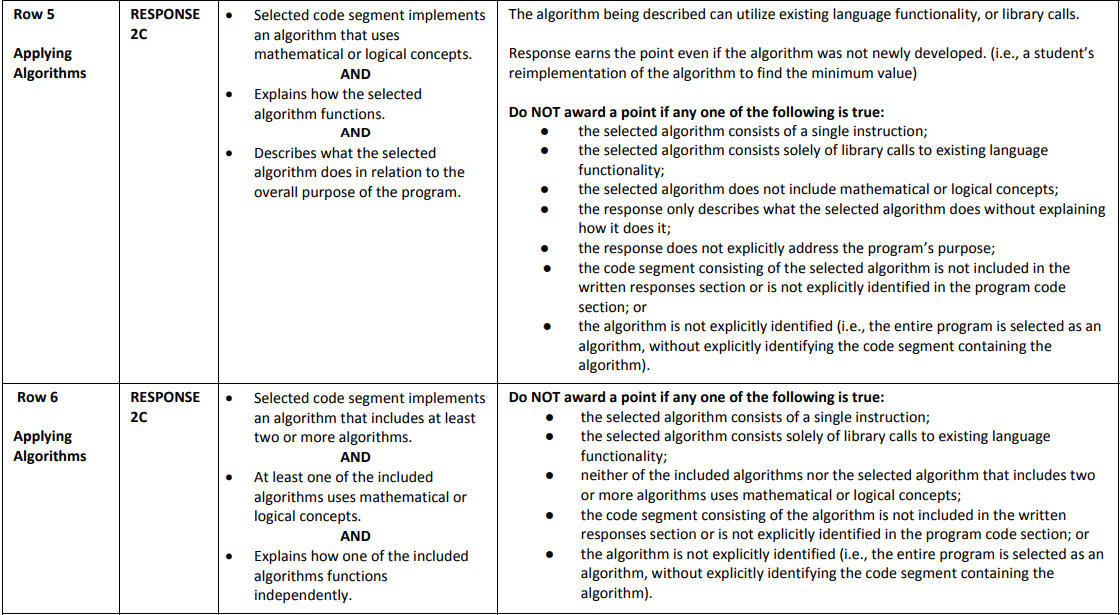
Here's one row of the scoring guide for this question

Write the Response

The code selection above is taken from the Color Sleuth activity you just completed. This selection would count as an abstraction on the Create PT, but to earn Row 8 you will need to describe how this abstraction manages complexity.
Write response 2d describing the abstraction above. Use the writing prompt and scoring guidelines as a guide.
Student Instructions
AP Practice - Identify the Algorithm
One component of the AP Create Performance Task is selecting an algorithm that you developed.
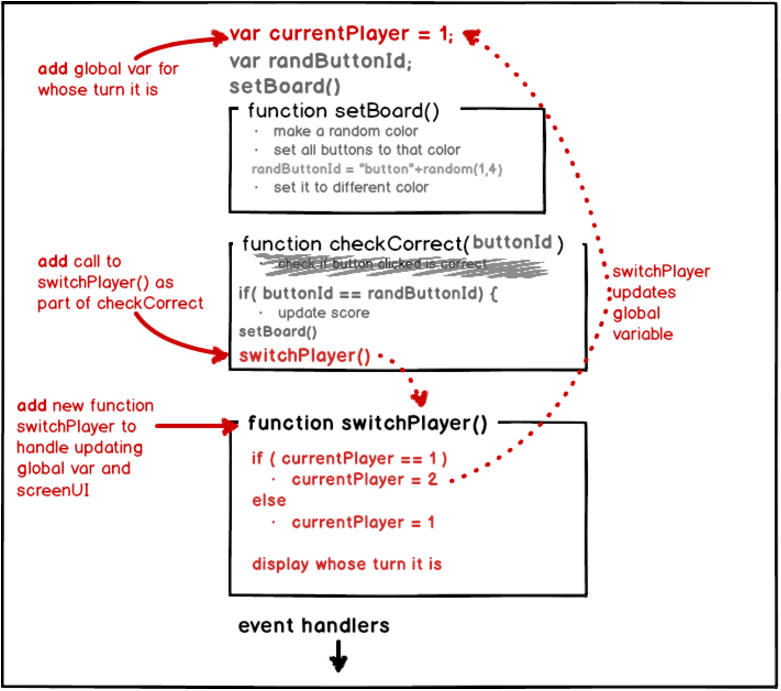
- Mark with an oval the segment of program code that implements the algorithm you created for your program that integrates other algorithms and integrates mathematical and/or logical concepts.
Here's the scoring guide for this question

Choose the Student-Developed Algorithm
The program code below is taken from the Color Sleuth activity you just completed.

Write which of the ovals (A, B, C, or D) is placed around code that best meets the criteria as a student-developed algorithm.
Explain your answer using the criteria in the scoring guide.
Student Instructions
AP Practice - Create PT - Algorithm
One component of the AP Create Performance Task is describing an algorithm within your program.
-
2c. Capture and paste a program code segment that implements an algorithm (marked with an oval in section 3 below) and that is fundamental for your program to achieve its intended purpose. This code segment must be an algorithm you developed individually on your own, must include two or more algorithms, and must integrate mathematical and/or logical concepts. Describe how each algorithm within your selected algorithm functions independently, as well as in combination with others, to form a new algorithm that helps to achieve the intended purpose of the program. (Must not exceed 200 words)
Here's two rows of the scoring guide for this question
Write the Response

This code selection is taken from the Color Sleuth activity you just completed and would count as an algorithm on the Create PT.
Write response 2c describing the algorithm above. Use the writing prompt and scoring guidelines as a guide. Here are the main points to make sure you include.
- Name your main algorithm and each of the two sub-algorithms
- Explain what each sub-algorithm does and how the code of each actually works
- Explain how the main algorithm works and how it helps achieve the purpose of the program
Standards Alignment
View full course alignment
Computer Science Principles
1.1 - Creative development can be an essential process for creating computational artifacts.
1.1.1 - Apply a creative development process when creating computational artifacts. [P2]
- 1.1.1B - Creating computational artifacts employs an iterative and often exploratory process to translate ideas into tangible form.
1.2 - Computing enables people to use creative development processes to create computational artifacts for creative expression or to solve a problem.
1.2.4 - Collaborate in the creation of computational artifacts. [P6]
- 1.2.4A - A collaboratively created computational artifact reflects effort by more than one person.
- 1.2.4C - Effective collaborative teams practice interpersonal communication, consensus building, conflict resolution, and negotiation.
- 1.2.4D - Effective collaboration strategies enhance performance.
- 1.2.4F - A collaboratively created computational artifact can reflect personal expressions of ideas.
3.1 - People use computer programs to process information to gain insight and knowledge.
3.1.2 - Collaborate when processing information to gain insight and knowledge. [P6]
- 3.1.2B - Collaboration facilitates solving computational problems by applying multiple perspectives, experiences, and skill sets.
4.1 - Algorithms are precise sequences of instructions for processes that can be executed by a computer and are implemented using programming languages.
4.1.1 - Develop an algorithm for implementation in a program. [P2]
- 4.1.1A - Sequencing, selection, and iteration are building blocks of algorithms.
- 4.1.1C - Selection uses a Boolean condition to determine which of two parts of an algorithm is used.
4.1.2 - Express an algorithm in a language. [P5]
- 4.1.2G - Every algorithm can be constructed using only sequencing, selection, and iteration.
5.1 - Programs can be developed for creative expression, to satisfy personal curiosity, to create new knowledge, or to solve problems (to help people, organizations, or society).
5.1.2 - Develop a correct program to solve problems. [P2]
- 5.1.2A - An iterative process of program development helps in developing a correct program to solve problems.
5.1.3 - Collaborate to develop a program. [P6]
- 5.1.3A - Collaboration can decrease the size and complexity of tasks required of individual programmers.
- 5.1.3B - Collaboration facilitates multiple perspectives in developing ideas for solving problems by programming.
- 5.1.3C - Collaboration in the iterative development of a program requires different skills than developing a program alone.
- 5.1.3D - Collaboration can make it easier to find and correct errors when developing programs.
- 5.1.3E - Collaboration facilitates developing program components independently.
- 5.1.3F - Effective communication between participants is required for successful collaboration when developing programs.
5.5 - Programming uses mathematical and logical concepts.
5.5.1 - Employ appropriate mathematical and logical concepts in programming. [P1]
- 5.5.1D - Mathematical expressions using arithmetic operators are part of most programming languages.
- 5.5.1E - Logical concepts and Boolean algebra are fundamental to programming.