Lesson 4: Headings
Overview
In this lesson, students continue to use HTML to structure text on web pages, this time with headings. Students learn how the different heading elements are displayed by default and practice using them to create page and section titles. Students then start to decide how they will organize their content on their own personal web pages. In the last level, students begin the project that they will continue to work on throughout the unit.
Purpose
This lesson introduces the heading tags that students will use in their pages for the rest of the unit. It also reinforces the general structure of HTML (opening tag / content / closing tag) so that students are ready to begin adding their own content in the project.
The personal web page that students work on at the end of the lesson will follow them throughout the unit. As they learn more HTML and CSS, they will improve the page, adding images, colors, and different fonts. This lesson is a chance for them to start the page, knowing that they will continue to improve it over the next few weeks.
Agenda
Warm Up (5 minutes)
Activity (45 minutes)
Wrap Up (5 minutes)
View on Code Studio
Objectives
Students will be able to:
- Use heading tags to change the appearance of text on a web page.
- Structure content into headings, subheadings, and paragraphs.
Preparation
- Have student journals (or project sketches) ready to give back.
- If you will not use journals to track HTML tags, prepare poster paper to do so as a whole class
Vocabulary
- Heading - A title or summary for a document or section of a document.
Introduced Code
Teaching Guide
Warm Up (5 minutes)
Teaching Tip
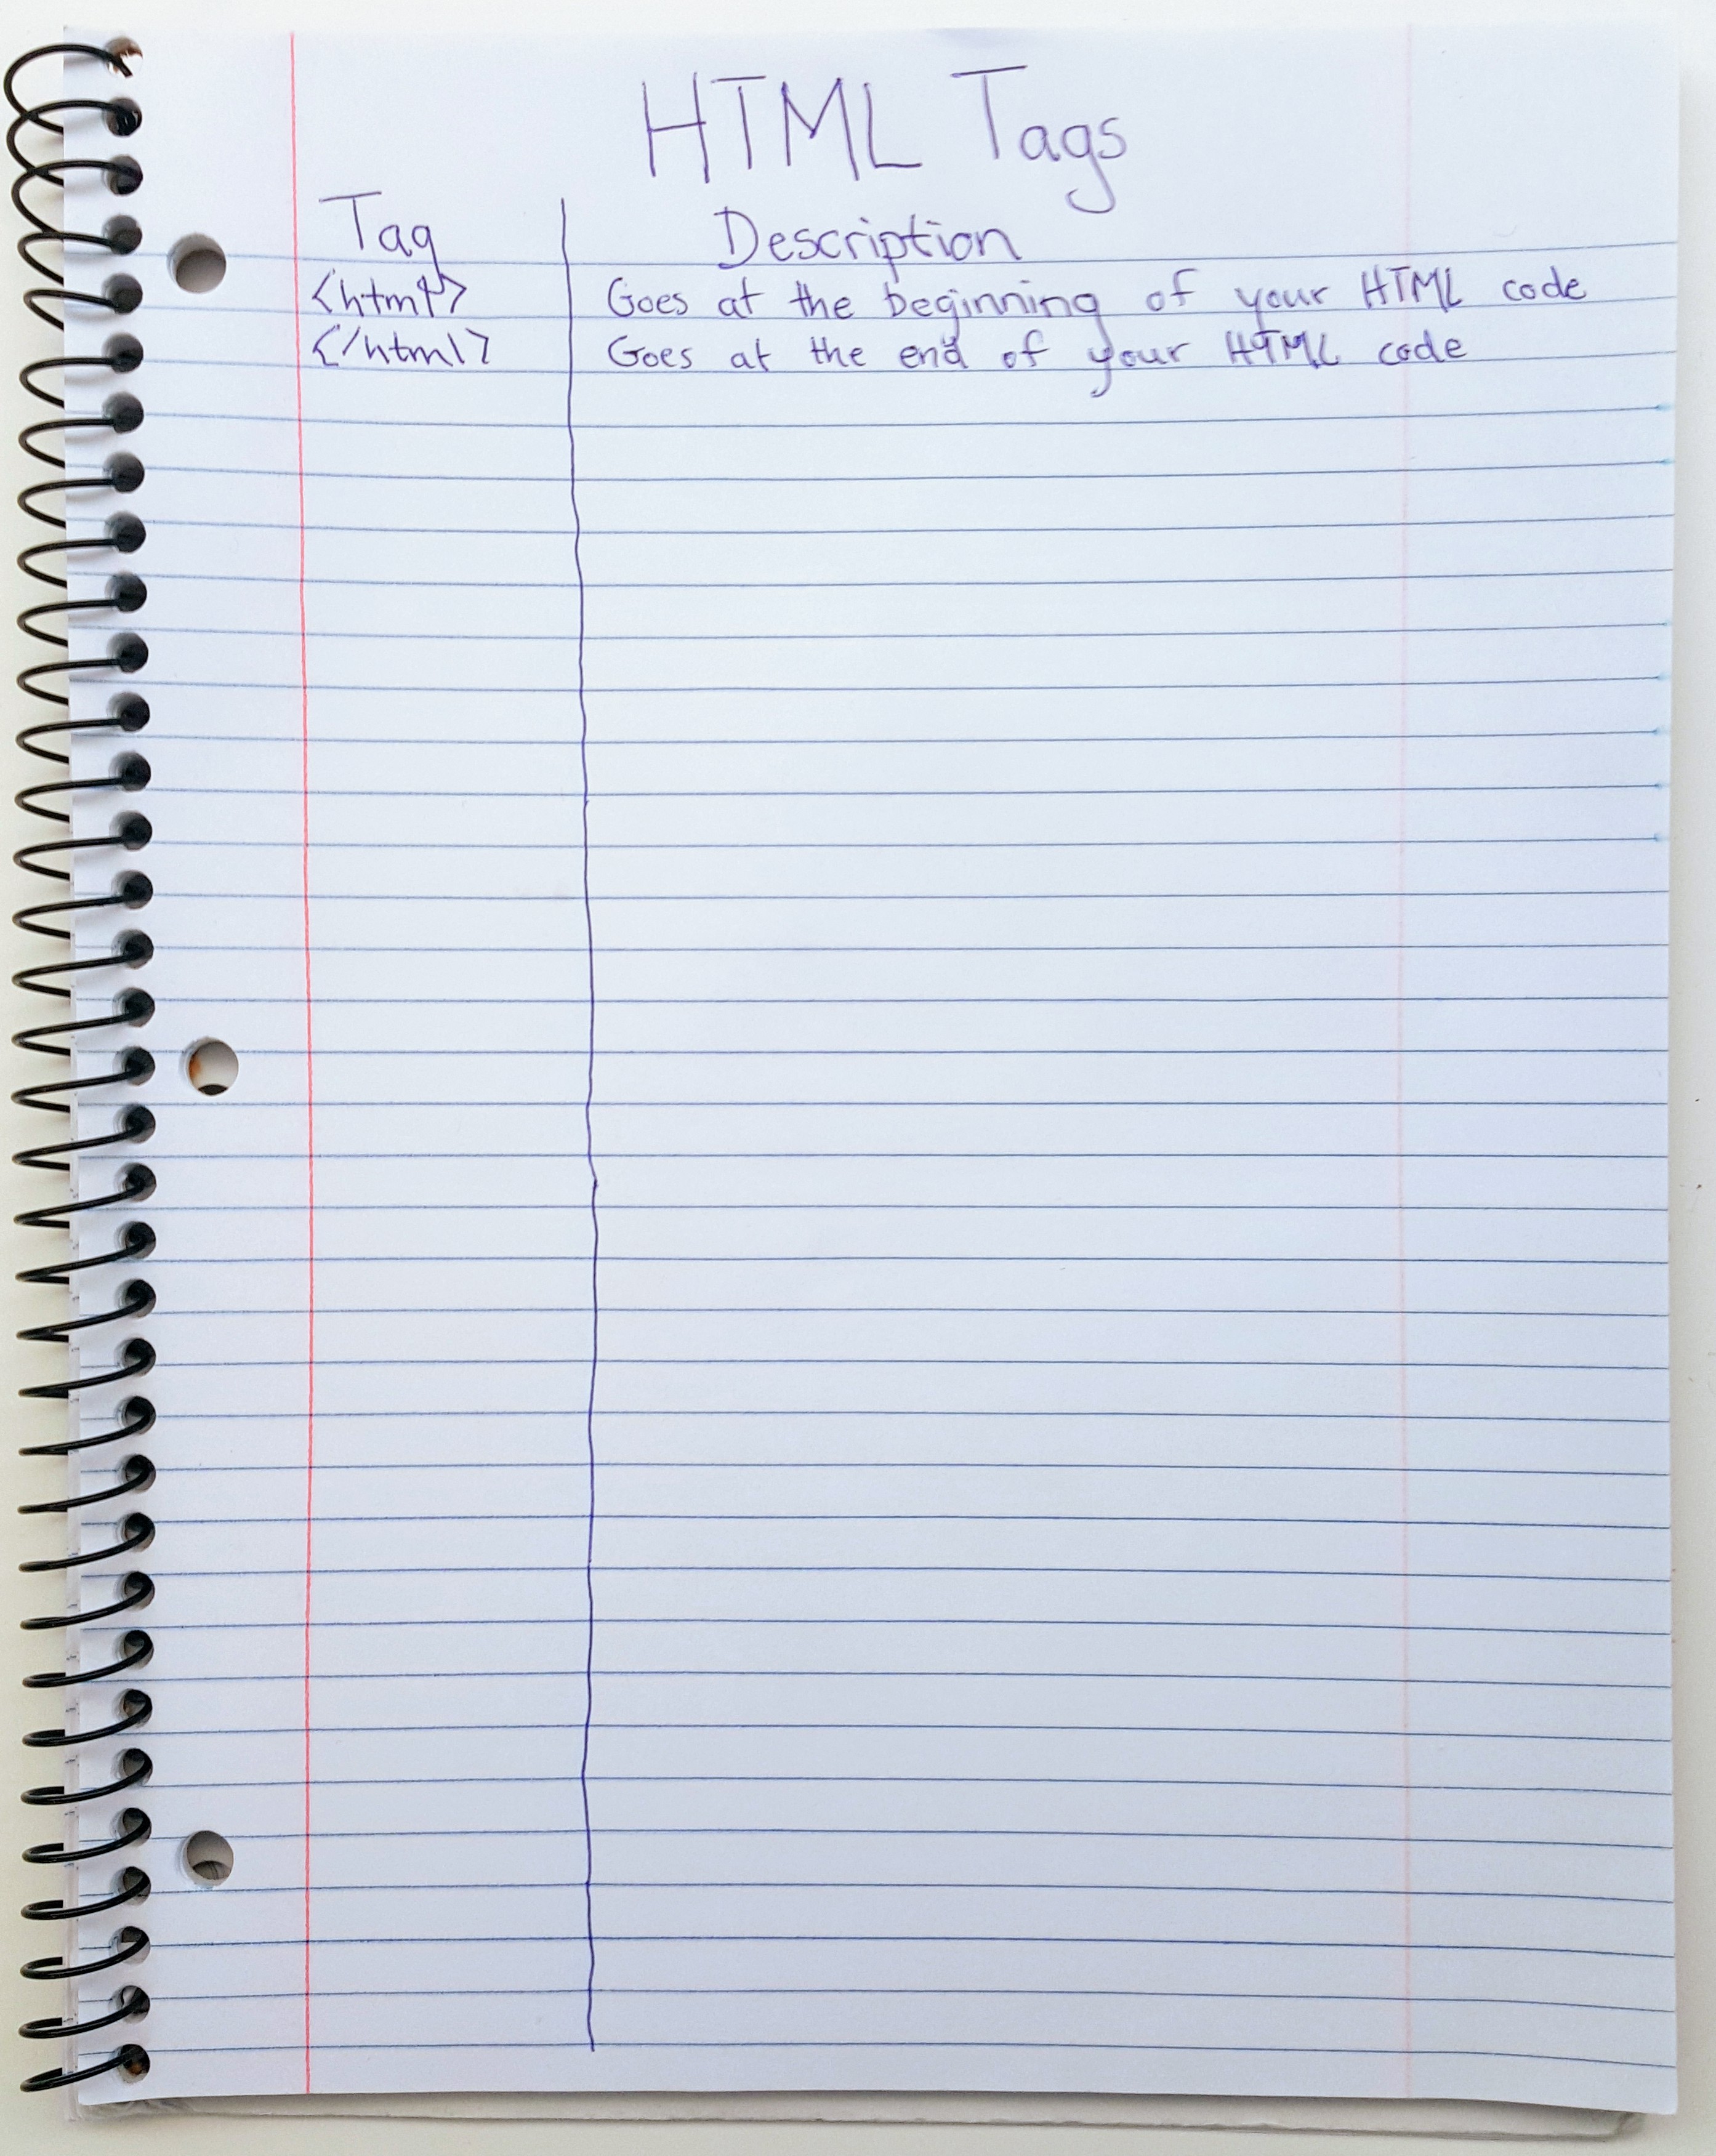
Journal or Poster? Throughout this unit students will be keeping track of the tags they learn. This warm up descibes one option for students to record the HTML tags that they learn by writing them in their journals. If you wish you can keep track of the same information on a shared class poster that you update after each lesson. Prompts throughout the unit will tell you when students should update their journals or the class poster.
Tags Poster
Group: Put students into groups of three to four students.
Journal: Have students make a T-chart on a blank page in their journals and label the top "HTML Tags"
Discussion Goal
Goal: The goal of this discussion is to review the tags that students saw in the previous lesson.
<!DOCTYPE html>- Tells the computer that this is a document written in HTML<html>- Indicates the beginning of your code written in HTML<head>- Contains information (sometimes called "metadata") about your web page<body>- Contains all the main content of your web page<p>- Defines a paragraph
Prompt: Yesterday, you learned about HTML, the language of the World Wide Web. HTML uses tags to structure content on web pages. In your groups, think of as many tags as you remember and what they do.
Give students a few minutes to think of as many tags as they can.
Discuss: Groups should discuss with one another and record their ideas in their journals (or alternately prepare to share on the shared class poster). Afterwards quickly share across the room to make sure all groups have listed all tags.
Remarks
As we learn more HTML tags, we'll be keeping track of them so we'll have a reference as we make our web pages.
Activity (45 minutes)
Pair Programming
Teaching Tip
Pair Programming: Pair programming is practiced in education and in industry. Students who pair program are more confident in their abilities and are more likely to continue to study computer science. This practice is most effective if it is introduced early and the rules for switching partners are enforced by the teacher. You can read more about Pair Programming in the Computer Science Discoveries Curriculum Guide
Group: students into pairs.
Remarks
We're going to be working on Web Lab again today, but this time we'll be using pair programming. Pair progamming helps people make better programs by working together, but there are some rules we have to follow to make sure it goes well.
Display: Show the Pair Programming video.
Review: Ensure that students understand the rules for pair programming:
- There is only one computer.
- The driver is the only one to touch the keyboard/mouse.
- The navigator should look for problems in the code and keep track of the high-level plan.
- Both driver and navigator should be communicating constantly.
- Driver and navigator must switch when the teacher indicates, typically every couple minutes.
Web Lab: Headings
Transition: Have pairs go to Code Studio and both log in using the "Pair Programming" feature.
Prompt: students to switch driver and navigator every three minutes.
Wrap Up (5 minutes)
Journal
Prompt: Have students update their "HTML Tags" log with the heading tags they learned in this lesson.
Prompt: Have students reflect on their development of the Five Practices of CS Discoveries (Problem Solving, Persistence, Creativity, Collaboration, Communication). Choose one of the following prompts as you deem appropriate.
-
Choose one of the five practices in which you believe you demonstrated growth in this lesson. Write something you did that exemplified this practice.
-
Choose one practice you think you can continue to grow in. What’s one thing you’d like to do better?
-
Choose one practice you thought was especially important for the activity we completed today. What made it so important?
- Lesson Overview
- Student Overview
Overview
This lesson continues the introduction to HTML tags, this time with headings. The class practices using heading tags to create page and section titles and learns how the different heading elements are displayed by default. Next, the class plans how to organize content on the personal web pages that will be built across the unit and begins the first page of the project.
Vocabulary
- Heading - A title or summary for a document or section of a document.
Introduced Code
- Heading -
<h1></h1>
- Pair Programming
- Student Overview
Student Instructions
Headings
What are headings?
Headings are the different sized section titles throughout a web page. Headings add structure to your web page by breaking it up so its easier for a user to read.
How do I make different sized headings?
Headings come in 6 different sizes. So far you have primarily used the biggest one: <h1>. The number '1' in the HTML tag designates that this is the biggest heading. The smallest heading is <h6>. You can also try the <h2>, <h3>, <h4>, and <h5> tags, which get smaller as the number gets larger.
What is HTML?
HTML stands for Hypertext Markup Language. HTML is used to add structure to the content of a web page. HTML uses tags to specify where certain structures start and end. These tags are sets of characters not found in the English language so that the content and structure can be differentiated.
What is an HTML element?
An HTML element is a piece of a website that is marked by a start tag and sometimes closed with an end tag. The element also includes the content inside the tags. For example:
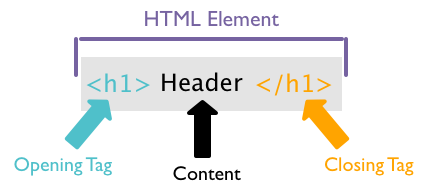
What is an HTML tag?
An HTML tag is the special set of characters that tells the machine where the start or end of an HTML element is and what type it is.
So far, you've organized your content into paragraphs. Another way HTML allows you to organize your code is by using headings. A heading is a short piece of text that goes at the top of a section of content, like a title.
Do This: Find the headings in the web page below and use the Inspector Tool to see the code that makes them. Make sure you and your partner agree on what the tags do. * Change the code so that "Drawing" and "2 years" match the headings on the rest of the page.
Student Instructions
Heading Sizes
What are headings?
Headings are the different sized section titles throughout a web page. Headings add structure to your web page by breaking it up so its easier for a user to read.How do I make different sized headings?
Headings come in 6 different sizes. The most common heading is <h1> The number 1 in the HTML tag designates that this is the biggest heading. The smallest heading is <h6>. You can also try the <h2>, <h3>, <h4>, and <h5> tags which get smaller as the number gets larger.What is HTML?
HTML stands for Hypertext Markup Language. HTML is used to add structure to the content of a web page. HTML uses tags to specify where certain structures start and end. These tags are sets of characters not found in the English language so that the content and structure can be differentiated.What is an HTML element?
An HTML element is a piece of a website that is marked by a start tag and sometimes closed with an end tag. The element also includes the content inside the tags. For example:
What is an HTML tag?
An HTML tag is the special set of characters that tells the machine where the start or end of an HTML element is and what type it is.Headings can come in different sizes. In this page, there are six different sized headings, but they are all mixed up. Can you and your partner figure out how to fix them?
Do This: Use the inspector tool to figure out what makes the headings different sizes Make sure you and your partner agree on what the different heading tags do. * Change the tags so that the headings are in order from biggest to smallest, and the text says the correct size, as in the picture below.

Teaching Tip
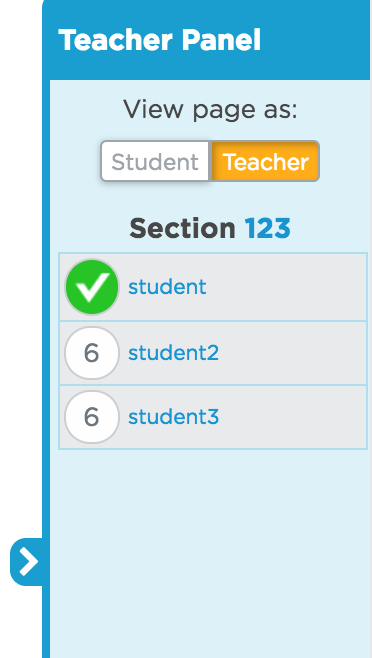
Level Types: This multiple choice question that asks students to choose how HTML headings will display on a web page. You can see which students have answered the question correctly by going to that level and pulling out the Teacher Panel from the right hand side. Students who have successfully answered the question will have a green bubble. Students have as many chances as they like to answer correctly, so guessing and checking can also lead to a correct answer.
Student Instructions
<h3> Eggs </h3>
<h1> Bacon </h1>
<h6> Waffles </h6>
Teaching Tip
Check for Understanding

This page can be used as an assessment for the HTML tags introduced in this lesson and the last. There is no one right answer for this level, but students should organize the text into some reasonable structure. An example is included to the right.
Student Instructions
Headings and Paragraphs
What is a paragraph element?
Paragraphs are marked by opening(<p>) and closing(</p>) tags as well. Paragraphs in HTML can be any length of text from one word to a bunch of sentences. All of your text in your web page should be contained in an HTML element (headings or paragraphs). Paragraphs group together sets of sentences and put some space between that group of text and the next group of text.
How do I create multiple paragraphs?
Paragraphs are marked by opening(``) and closing(`
`) tags as well. To create more than one paragraph you will want multiple sets of opening and closing `` tags. For example
<p>
  This is a paragraph.
</p>
<p>
  This is another paragraph.
</p>
What are headings?
Headings are the different sized section titles throughout a web page. Headings add structure to your web page by breaking it up so its easier for a user to read.How do I make different sized headings?
Headings come in 6 different sizes. So far you have primarily used the biggest one <h1>. The number 1 in the HTML tag designates that this is the biggest heading. The smallest heading is <h6>. You can also try the <h2>, <h3>, <h4>, and <h5> tags which get smaller as the number gets larger.What is HTML?
HTML stands for Hypertext Markup Language. HTML is used to add structure to the content of a web page. HTML uses tags to specify where certain structures start and end. These tags are sets of characters not found in the English language so that the content and structure can be differentiated.What is an HTML element?
An HTML element is a piece of a website that is marked by a start tag and sometimes closed with an end tag. The element also includes the content inside the tags. For example:
What is an HTML tag?
An HTML tag is the special set of characters that tells the machine where the start or end of an HTML element is and what type it is.The author of this page added in a lot of content, but did not think about structure. All of the text is mashed together.
Do This: Look through the content with your partner and decide what you think the best structure should be. Use your heading and paragraph tags to code the structure into the page.
- Headings in HTML
- Teacher Overview
- Student Overview
Updating the Tags List
This map level recaps the tags that students learned throughout this lesson. Encourage students to use this resource to update their HTML tags list or poster.
- Problem Solving Process for Programming
- Teacher Overview
- Student Overview
Review the Problem Solving Process
Review the four steps of the Problem Solving Process as a class.
The Problem Solving Process for Programming
Define

- Read the instructions carefully to ensure you understand the goals
- Rephrase the problem in your own words
- Identify any new skills you are being asked to apply
- Look for other problems you've solved that are similar to this one
- If there is starter code, read it to understand what it does
Prepare
- Write out an idea in plain English or pseudocode
- Sketch out your idea on paper
- List what you already know how to do and what you don't yet
- Describe your idea to a classmate
- Review similar programs that you've written in the past
Try
- Write one small piece at a time
- Test your program often
- Use comments to document what your code does
- Apply appropriate debugging strategies
- Go back to previous steps if you get stuck or don't know whether you've solved the problem
Reflect
- Compare your finished program to the defined problem to make sure you've solved all aspects of the problem
- Ask a classmate to try your program and note places where they struggle or exhibit confusion
- Ask a classmate to read your code to make sure that your documentation is clear and accurate
- Try to "break" your program to find types of interactions or input that you could handle better
- Identify a few incremental changes that you could make in the next iteration
Teaching Tip
Personal Website Project
This level kicks off the personal website project that students will continue working on throughout the unit. You can require them to show you a journal sketch before getting back on Code Studio, or let them decide for themselves when they are ready.
Students who finish early can be encouraged to add new content to the page or revise the content that they have.
Student Instructions
Start Your Page
It's time to create your personal web page! You'll get to choose the content that you will share with the world.
Define
Your assignment is to make a web page using the HTML you have learned. The web page should have at least two headings of different sizes, and it should use paragraphs, too.
Prepare
Before you start to code your web page, you need to have a plan. Use the ideas that you wrote down a couple lessons ago, and decide what this page will be about. You'll have a chance to make other pages later.
Draw a sketch of your web page, including headings and paragraphs that it includes. Show your sketch to your partner and explain which tags you will use for the different parts of the page. You can look at the previous levels if you've forgotten what the different tags are, or ask your partner for help.
If you've sketched something you haven't learned how to code yet, you can save it for later.
Try
Use the HTML you've learned to create your page. You can ask a partner to help you if you get stuck, but you are the driver for your own web page, meaning you should be typing in all the code yourself.
Reflect
Once you have finished your web page, compare it to your sketch to make sure you didn't forget anything. Ask your partner to look, too, and think about any feedback you get and whether you want to make changes to your page.
Student Instructions
Start Your Project
Now that you have a plan for your personal website, you can start coding it here. Don't worry if you can't do everything you want today. You'll have plenty of chances to improve your work as you learn more about developing websites.
Do This
- Use HTML to create the page that you sketched out. Make sure it includes
- At least two headings of different sizes
- At least one paragraph
- Reflect on your page by comparing to your sketch and showing it to your partner
Standards Alignment
View full course alignment
CSTA K-12 Computer Science Standards (2017)
AP - Algorithms & Programming
- 1B-AP-11 - Decompose (break down) problems into smaller, manageable subproblems to facilitate the program development process.
- 1B-AP-15 - Test and debug (identify and fix errors) a program or algorithm to ensure it runs as intended.