Session 4: Previously, On CSP...
20 minutes
facilitator presentation
Purpose
This session gives all participants context for the U5L2 Model Lesson that follows this session.
Objectives
- Participants understand how the content of Unit 4 connects to Unit 5.
- Participants have experience with the Mental Model developed in U5L1 for a List.
Supplies & Prep
Room Setup:
- None
Facilitator Supplies:
- CSP Slides - Workshop 2 - 21-22
- Posters that include:
- A diagram of a list (as pictured in the slides)
- How removeItem, appendItem, and insertItem work
- Optional for Live Demo:
- You may use the slides to demonstrate the mental model, but if available, use physical manipulatives for this Live Demo. This will include:
- Small Baggies (7+ per pair)
- A large baggie (1 per pair)
- Dry-erase markers (1 per pair)
- Post-it notes
- You may use the slides to demonstrate the mental model, but if available, use physical manipulatives for this Live Demo. This will include:
Participant Materials
- Computers
Agenda
Previously, On CSP... (19 minutes)
Roles Reminder (1 minute)
Facilitation Guide
Previously, On CSP... (19 minutes)
Facilitator Tip
You should assume this content is all new for participants. Check for understanding frequently during this section.
You and your co-facilitator can decide to use concrete physical manipulatives during this section to demonstrate or use the slides as well. The focus is behind getting across the content - this is not a model lesson, but rather a space for participants to have some knowledge prior to the investigate task.
(2 minutes) Understanding Unit 4
💷 After Unit 4, students will know how to use variables, conditionals, and functions. They will know:
- How to use the watcher area of the screen to help them debug.
- How to use AND, OR, and NOT logical operators.
- How to avoid using local variables at this point. (U4L10 - Levels 6 and 7)
(17 minutes) Understanding U5L1 - Lists Explore
Remarks
💷 The lesson you are about to see is the second lesson in Unit 5. Let’s first go over what happens in the first lesson - U5L1 - Lists Explore. In this lesson, students build a mental model of a list by using baggies and stickies.
| Slides | Speaker Notes |
|---|---|
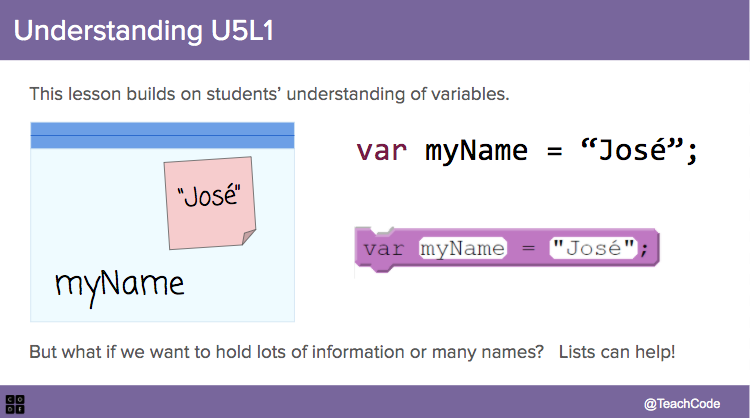 |
Say: Learning about lists builds on what students know about variables. We’ve already learned that variables can help us store one piece of information. But what if we have lots of information? |
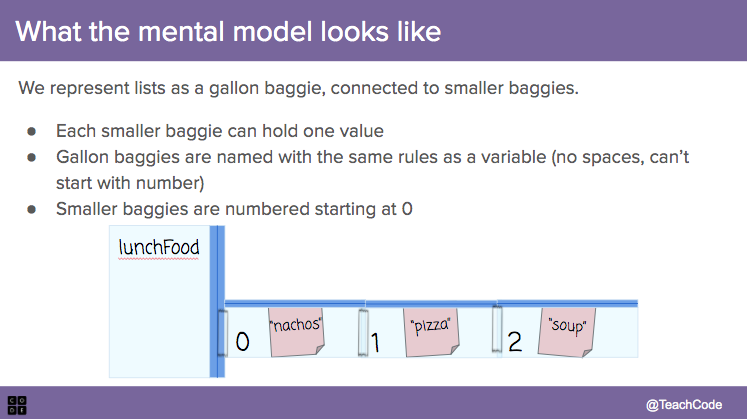 |
Say: This lesson represents lists as a gallon baggie full of small baggies. |
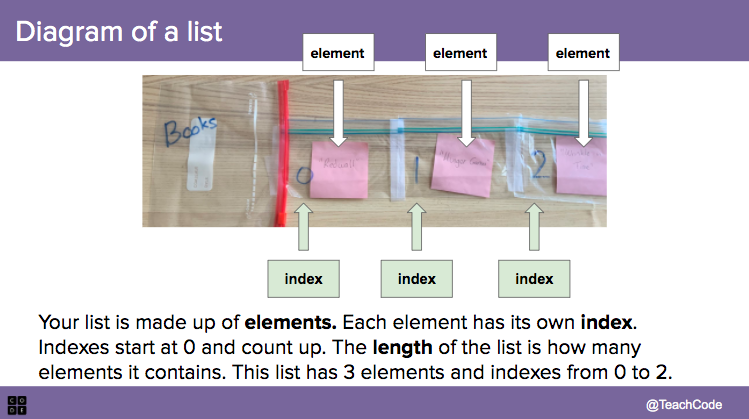 |
Diagram of a list. Say: Your list is made up of elements. Each element has its own index. Indexes are just numbers that count up from zero. The length of the list is how many elements it contains. This list has 3 elements and indexes from 0 to 2. |
 |
Say: Notice that all the bags can folded up and be placed inside the big variable baggie. Sometimes we want to think about the whole list, sometimes we want to think about individual elements. |
 |
How the code works Say: We create a list with this command. It creates a new list and assigns it to a variable. The square brackets indicate we’re making a list. Each value is separated by commas. |
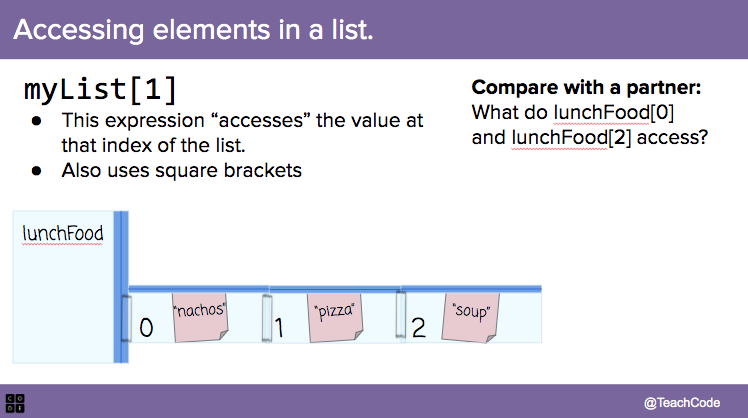 |
Accessing elements in a list. Say: If we want to access the values in our list we use the square brackets next to the name of our list. |
 |
Say: We can use list accesses inside of expressions, just like variables.  Click for animation Click for animation Say: This first expression evaluates to 23 because myNumbers[1] contains 20. |
 |
Say: We can assign the index of a list just like a variable. Click for animation Say: This code will assign a new value at index 2 of the list. |
 |
Say: The removeItem command will remove an item from a list. The item at the index given is removed, items to the right are shifted over, and the last index is removed. |
 |
Say: The appendITem command will add an item to a list. A new index is added to the end of the list and the new item is place in it. |
 |
Say: The insertItem command will add an item to the middle of a list. The item is placed in the index given. Then every item is moved over one space to make room. A new index is aded to the end of the list to make room. Do This: Have students discuss what the list will show after this command. |
💷 Review key takeaways from the slides.
Facilitator Tip
You may want to make posters to hang around the room that provide a diagram of a list and how removeItem, appendItem, and insertItem work. These posters can be referenced during the Model Lesson as well.
💷 In summary, after this lesson,
- Students will know how to create a list.
- Students will know how to access items in a list using the index.
- Students will know how to remove, add, or insert an item to a list.
Having this knowledge, students will enter into the next investigate lesson for Lists. It is important to know that your students will be using a list in their Create Performance Tasks too.
In the context of Unit 5, this is the first lesson in the unit. Most schools are 10 weeks into the school year at this point.
Roles Reminder (1 minute)
(1 minute) 💷 Roles Reminder
Before you start the model lesson, it may be helpful for your co-facilitator to set the scene by encouraging participants to act as true learners. One prompt that may help get participants in the right role is:
Remarks
“Think of a student from your class this year or a previous year who you want to embody during this model lesson. It might be someone who is lacking confidence or feels like computer science might not be for them. Consider channeling them (without taking identity markers that aren’t your own) and how they might engage in this lesson as you act as a learner.”